The Christmas season is synonymous with warmth, joy, and the magic of storytelling. From the twinkling lights on the tree to the carols playing softly in the background, every element adds to the festive atmosphere. Among the most iconic symbols of this season are angels. Whether they are perched atop the Christmas tree or depicted in classic carols like “Hark! The Herald Angels Sing,” angels represent peace, hope, and good news. But why simply buy angel decorations when you can make them? There is something incredibly special about capturing a moment in time with your child. As parents and caregivers know all too well, little hands don’t stay little forever. One day, you turn around, and those tiny fingers that used to wrap entirely around your thumb are grown. That is why handprint crafts are more than just art projects—they are time capsules. Today, we are sharing a delightful Handprint Angel Craft that is perfect for toddlers, preschoolers, and kindergarteners. It is simple, customizable, and results in a keepsake you will cherish for years to come. Plus, it is a fantastic way to keep little ones busy during the holiday break! Why You’ll Love This Craft Before we dive into the glue and glitter, let’s talk about why this specific project is a winner for families and classrooms. Low Mess: Unlike painting projects or slime, this paper craft is relatively tidy. Inexpensive: You likely already have all the materials in your home. Inclusive and Customizable: You can create angels with any skin tone, hair color, or dress style. It’s a wonderful opportunity to teach children that angels (and people!) come in all beautiful diversities. Fine Motor Practice: Tracing, cutting, and pasting are excellent ways for young children to develop hand-eye coordination. Materials Needed To create your heavenly host of angels, you will need a few basic craft supplies. Feel free to raid your craft drawer! Colored Craft Paper or Cardstock: You will need white for the wings (the handprints), yellow or gold for the halo, and various colors for the dress, skin, and hair. Pencil: For tracing hands and templates. Scissors: Child-safe scissors for the kids, and sharper ones for adults if needed. Glue Stick: Liquid glue works too, but a glue stick is less messy and dries faster for paper. Markers (Sharpies or Crayons): Black for the facial features and pink for the cheeks. You can also use colored markers to decorate the dress. Optional Embellishments: Glitter glue, sequins, yarn (for hair), or lace (for the dress trim). Step-by-Step Instructions Follow these simple steps to bring your angel to life. Step 1: Prepare Your "Wings" The most important part of this craft is the wings, which are made from your child’s handprints. The Process: Place your child’s hand flat on a piece of white paper or cardstock. Spread the fingers out slightly—this creates the "feathered" look of the wing. Trace around the hand with a pencil. Quantity: You will need two handprints per angel (one left hand and one right hand works best for symmetry, but two of the same hand works fine too!). Tip: If you want a more durable angel, trace the hands onto white foam sheets instead of paper. Step 2: Create the Body Parts If you are confident in your drawing skills, you can freehand the shapes. However, you can also easily draw these simple shapes yourself: The Dress: Draw a simple triangle or a bell shape. The Head: A simple circle. The Hair: Draw a shape that fits over the top of the circle. You can make it spiky, curly, long, or in buns! The Halo: A hollow oval or a simple ring shape. Trace these parts onto your chosen colored papers and cut them out. This is a great step for kids to practice their scissor skills. Remind them to turn the paper, not the scissors, for smoother curves. Step 3: Assemble the Head Now, let’s give our angel a face. Hair: Glue the hair piece onto the top of the head circle. If you want to get fancy, you can make a small slit in the hair piece and slide the face in, but simple gluing works just as well. Halo: Attach the golden halo to the back of the head so it "floats" just above the hair. Face: Use your black marker to draw two happy eyes, a nose, and a wide smile. Use a pink marker to add rosy round cheeks. Creative Idea: Use googly eyes for a sillier, more animated look! Step 4: Decorate the Dress Before we attach the head, let’s make the gown beautiful. This is where your child’s creativity can shine. Use markers to draw patterns on the dress: stars, swirls, hearts, or zig-zags. If you are feeling brave, add a line of glitter glue to the hem of the dress. Cut out a small paper heart or star and glue it to the center of the chest, as if the angel is holding it. Step 5: Assemble the Angel It is time to put it all together! Attach Head to Body: Apply a dab of glue to the top point of the dress (the triangle) and press the head firmly onto it. Attach the Wings: This is the magic moment. Take your two handprint cutouts. Apply glue to the palm area of the handprints. Stick them to the back of the angel's body. Positioning: Position them so the fingers are pointing outwards and slightly upwards, resembling majestic wings. The thumbs should ideally be pointing downwards or tucked behind the body so the four fingers look like flight feathers. Step 6: Final Touches Let the glue dry completely. Once dry, you can tape a loop of ribbon or string to the back of the angel if you wish to hang it up. 5 Creative Ways to Use Your Handprint Angels Now that you have made these adorable creations, what should you do with them? Here are five fun ideas: 1. Christmas Tree Ornaments Punch a hole in the halo, thread a piece of satin ribbon through it, and hang your angel on the Christmas tree. Make a new one every year to see how much the "wings" grow! 2. Personalized Gift Tags Skip the store-bought stickers. Tape a handprint angel to the top of a wrapped gift for Grandma or Grandpa. Write "To" and "From" on the back of the angel. It serves as both a tag and a bonus gift. 3. A Festive Garland Don’t stop at just one! Make 5 or 6 angels. String them together using a long piece of twine and hang them across the fireplace mantel or a doorway. 4. Table Centerpieces To make the angel stand up, curl the dress body into a cone shape (instead of a flat triangle) and tape it shut. Then attach the head and wings. Voila! You have a standing 3D angel for your holiday dinner table. 5. Greeting Cards Glue the flat angel onto the front of a folded piece of cardstock. Have your child write a message inside. "Sending you an angel to watch over you" is a sweet sentiment for distant relatives. Educational Connections: Learning Through Craft While this activity is fun, it is also rich in learning opportunities. Here is how you can make it educational: Cultural Conversations: Use this time to talk about how angels are depicted in art history. From the Renaissance paintings in Italy to sculptures in Spain, artists have imagined angels in many ways. Ask your child, "What do you think an angel looks like?" Emotional Intelligence: Discuss the concept of a "Guardian Angel" or a helper. Ask your child who helps them when they are sad or scared. It is a great way to talk about kindness and empathy. Geometry: Identify the shapes you are using. "The dress is a triangle. The head is a circle. The halo is an oval." Conclusion The hustle and bustle of December can sometimes feel overwhelming. Taking thirty minutes to sit down at the kitchen table, put away the screens, and focus on cutting, gluing, and chatting with your children is the best way to slow down and savor the season. This Handprint Angel Craft is more than just paper and glue; it is a memory of how small your child’s hands once were. It is a snapshot of their creativity at this age. Whether you hang it on the fridge or tuck it into a memory box, it is sure to be a treasured item. So, grab your supplies, put on your favorite holiday playlist, and start making some heavenly memories today!

10 Rat Crafts for Kids: Celebrating Creativity and Culture

When you think of animals to craft with kids, butterflies, puppies, and bunnies usually top the list. But what about the humble rat? While often misunderstood as mere pests, rats are actually incredibly intelligent, social, and clean creatures. In fact, they are so fascinating that we celebrate World Rat Day every year on April 4th to honor their importance to our ecosystem and their role as affectionate pets.

Beyond biology, rats hold a prestigious place in culture. In the Chinese Zodiac, the Rat is not just another animal—it is the very first sign of the cycle! According to legend, the Jade Emperor held a race to decide which animals would make it into the zodiac. The clever Rat hitched a ride on the Ox and jumped off at the finish line to claim first place. Because of this, the Rat represents wit, resourcefulness, and, in Chinese culture, is a symbol of wealth and surplus.

Whether you are celebrating the Year of the Rat (next occurring in 2032), looking for activities for World Rat Day, or simply want to teach your children about different animals, these 10 rat-themed crafts are perfect. They are fun, budget-friendly, and great for developing fine motor skills.

Let’s scurry into the world of creativity!

Fun Facts About Rats to Share While Crafting

Before we get the glue and scissors out, here are a few fun facts to share with your little ones to make the crafting session educational:

  • They are ticklish: Studies show that rats laugh (in high-pitched chirps we can’t hear) when tickled!
  • They are smart: Rats can learn tricks, solve puzzles, and even recognize their own names, just like dogs.
  • They are clean: Domestic rats groom themselves constantly, much like cats.

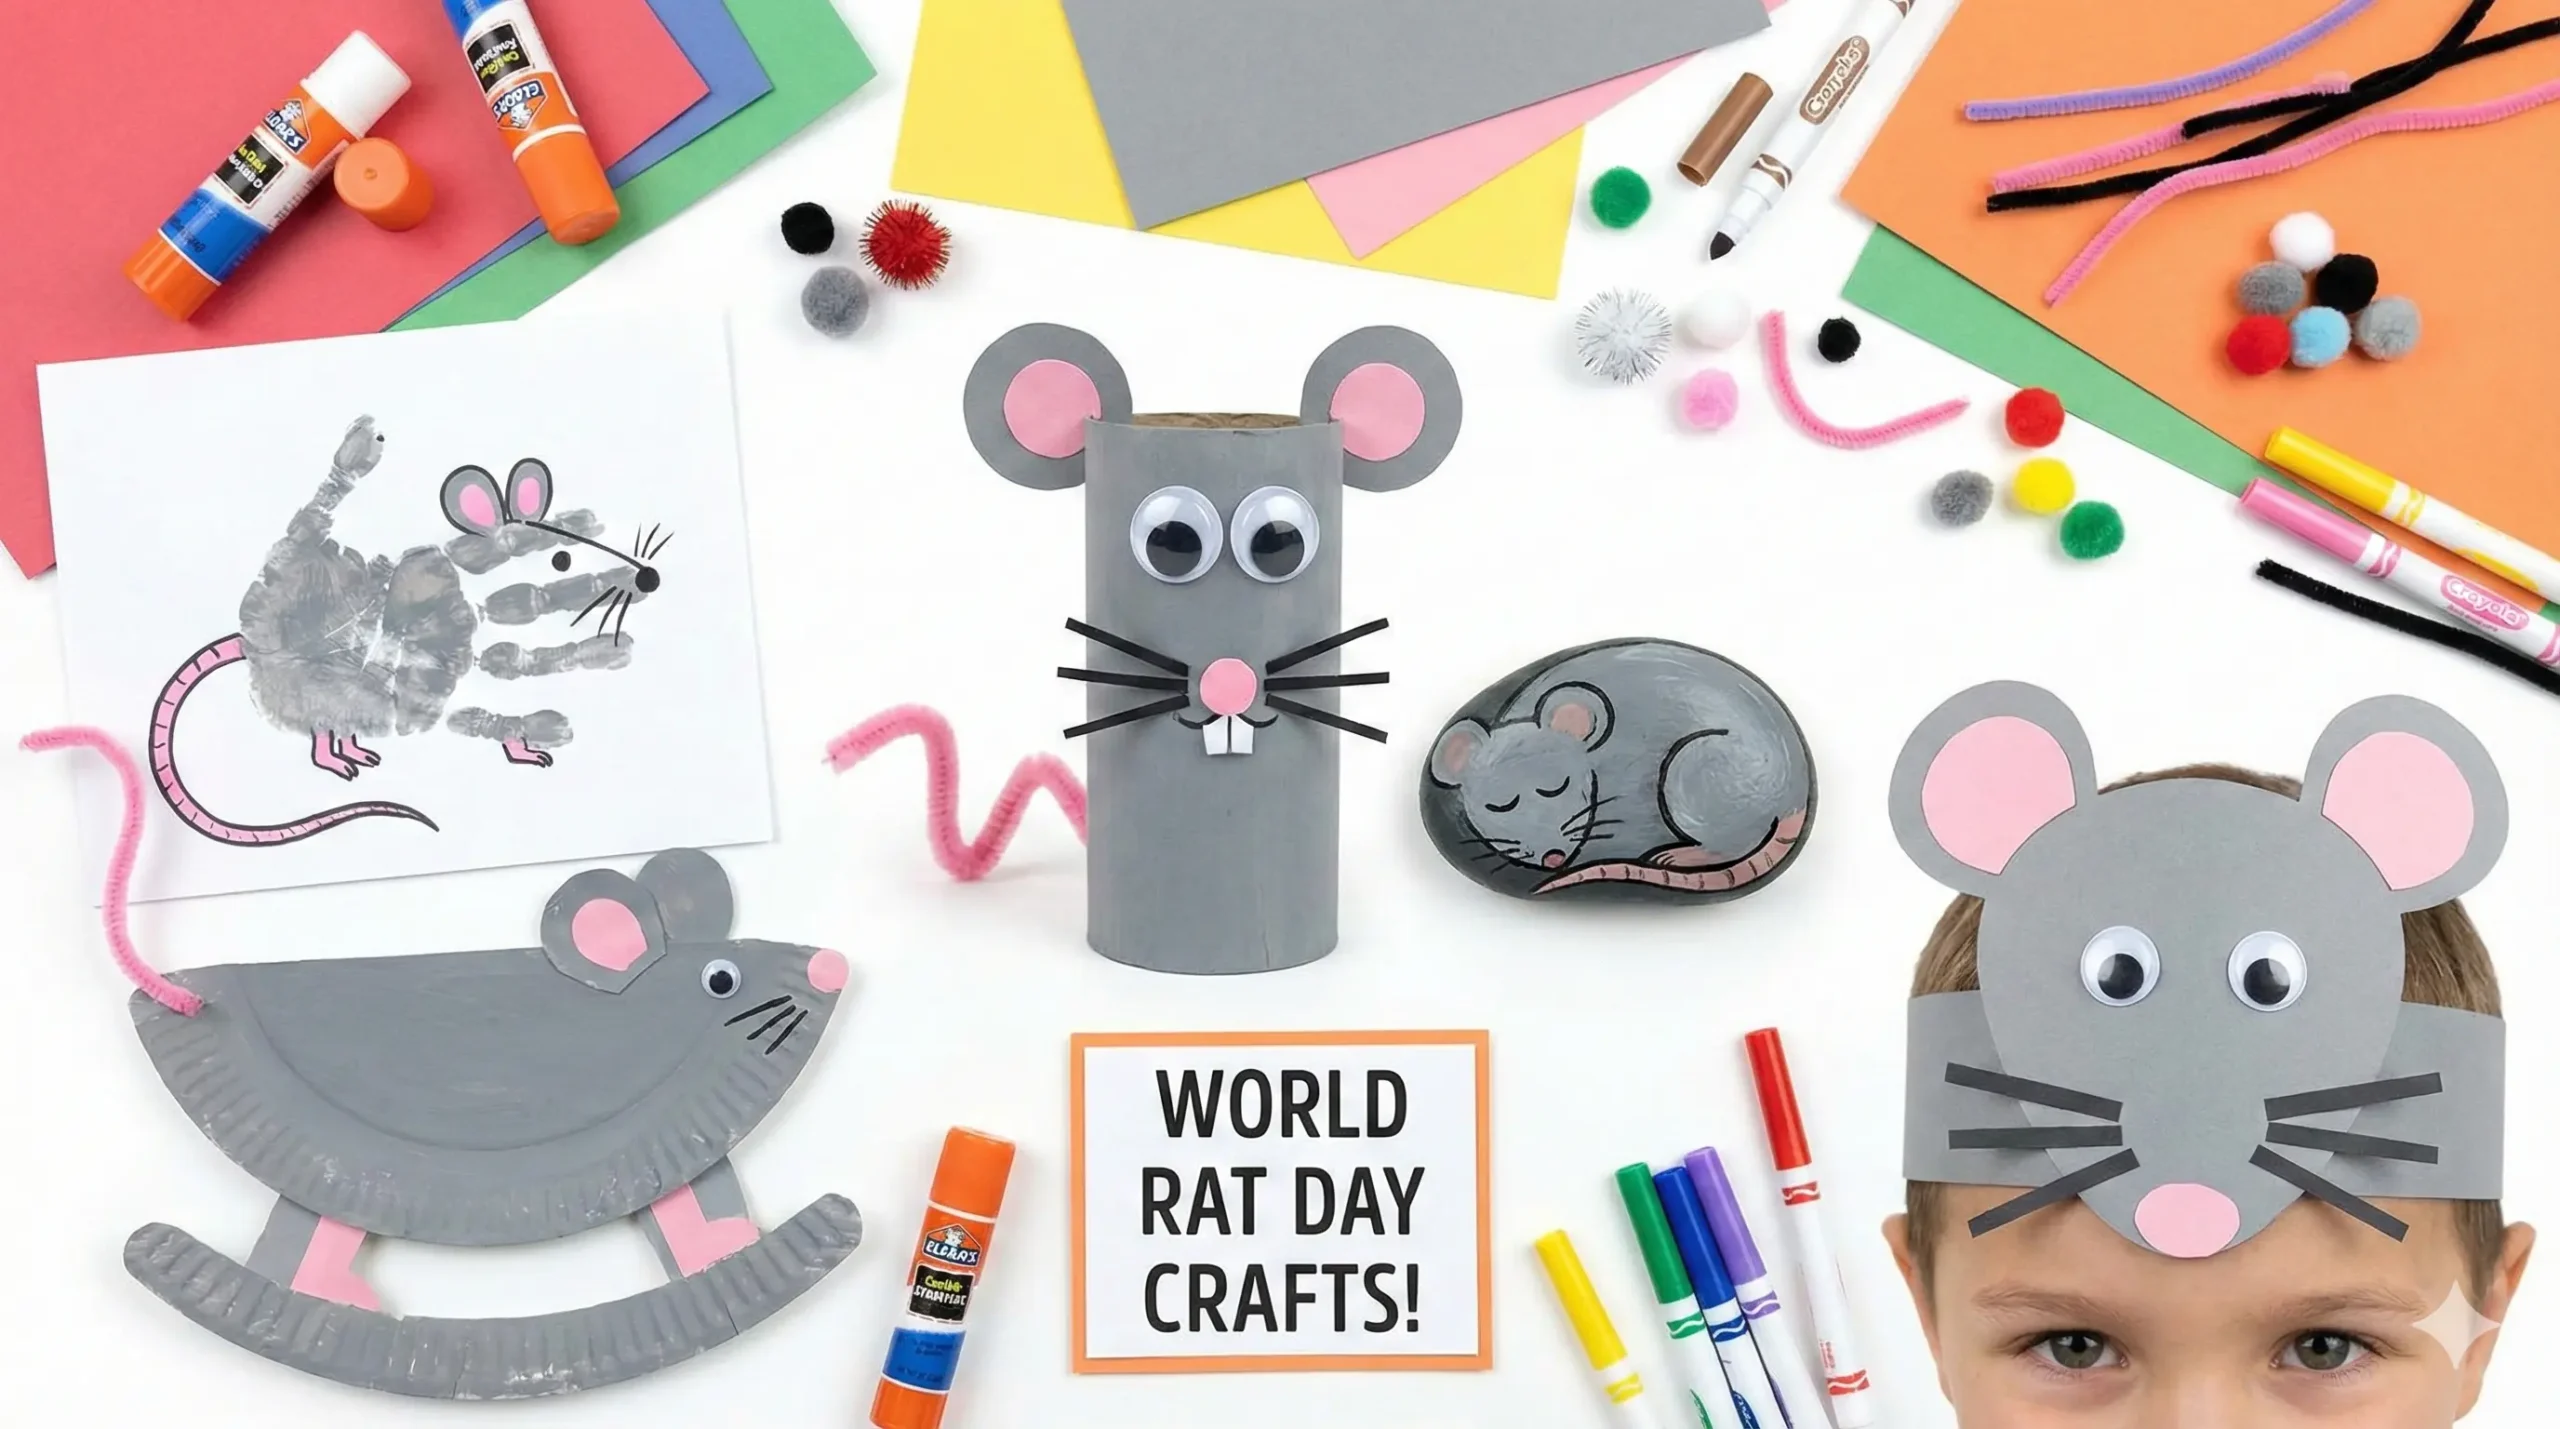
10 Adorable Rat Crafts for Kids

From paper plates to recycled rolls, these projects use everyday materials you likely already have at home.

1. The “King of the Zodiac” Rat Headband

Since the Rat won the Emperor’s race, why not crown your child the winner too? This simple paper headband is perfect for classroom parties or Chinese New Year celebrations.

  • Materials Needed: Grey or brown cardstock, scissors, stapler or tape, pink construction paper, black marker.
  • How to Make It:
    1. Cut a long strip of grey cardstock to fit around the child’s head.
    2. Cut two large round ears from the grey paper and two smaller pink circles for the inner ears. Glue them together and attach them to the front of the band.
    3. Draw a cute nose and whiskers in the center of the band.
    4. Staple the ends of the band to fit the child’s head securely.
  • Why it’s great: It encourages imaginative play. Once the hat is on, your child is the character!

2. Peek-a-Boo Pop-Up Card

This craft is a wonderful surprise greeting card. When the recipient opens the card, a cute rat face pops out at them!

  • Materials Needed: A4 cardstock (any color for the card), grey paper, glue, scissors.
  • How to Make It:
    1. Fold your cardstock in half.
    2. On the folded edge, make two parallel cuts about an inch long. Push this tab inward to create a “step” or “box” inside the card.
    3. Cut out a separate rat shape (or just a head) from the grey paper.
    4. Glue the rat onto the pop-up tab. When the card opens, the rat stands up!
    5. Decorate the background with drawings of cheese or New Year lanterns.

3. Toilet Roll Rat Puppet

Never throw away empty toilet paper rolls! They are the perfect shape for a rodent’s body.

  • Materials Needed: Toilet paper roll, grey paint, pink pipe cleaner (for the tail), googly eyes, black pom-pom.
  • How to Make It:
    1. Paint the cardboard roll entirely grey or brown. Let it dry.
    2. Glue a black pom-pom on one end for the nose.
    3. Glue on googly eyes and paper ears near the top.
    4. Poke a small hole in the back and thread the pink pipe cleaner through for a long, curly tail.
  • Pro-Tip: Make a whole family of rats in different shades to create a puppet show.

4. Heart-Shaped Valentine Rat

Who says rats can’t be romantic? This craft uses simple shapes to create a mouse or rat face, making it great for toddlers practicing their cutting skills.

  • Materials Needed: Construction paper (grey, pink, white), glue stick.
  • How to Make It:
    1. Cut a large grey heart (this is the face).
    2. Cut two medium grey circles (ears) and two smaller pink hearts (inner ears).
    3. Glue the ears to the top curves of the large heart.
    4. Add a small heart for the nose at the bottom point.
    5. Add whiskers made of thin paper strips.
  • Educational Value: Helps young children recognize geometric shapes like hearts and circles.

5. Egg Carton Rat Nose

This is a 3D mask that focuses just on the nose and whiskers—super cute for photos!

  • Materials Needed: An empty egg carton, grey paint, elastic string, black pipe cleaners.
  • How to Make It:
    1. Cut out one individual cup from an egg carton.
    2. Paint it grey (or pink).
    3. Poke three small holes on each side of the “snout.”
    4. Thread black pipe cleaners through the holes to create whiskers.
    5. Attach the elastic string to the sides so your child can wear the nose.

6. Rock Painting Rats

Rock painting is a craze that never goes away. These make excellent paperweights or garden decorations.

  • Materials Needed: Smooth oval stones, acrylic paint, varnish (optional).
  • How to Make It:
    1. Wash and dry the stone.
    2. Paint the entire stone a solid color (grey, black, or white).
    3. Once dry, paint a tear-drop shape for the face and two round ears.
    4. Add a long tail wrapping around the side of the rock.
    5. Seal with varnish if you plan to leave the “pet rat” outside in the garden.

7. Handprint Rat Art

Keepsakes that use your child’s handprint are always treasured by parents.

  • Materials Needed: Grey washable paint, white paper, markers.
  • How to Make It:
    1. Paint your child’s palm and fingers grey.
    2. Press the hand onto the paper with fingers close together (this forms the body) and the thumb sticking out (this forms the head/neck area).
    3. Once the paint dries, draw a tail coming off the pinky finger side.
    4. Draw ears and a face on the thumb imprint.
  • Why we love it: It captures the size of your child’s hand forever.

8. Felt Rat Bookmark

For the bookworms in the family, a rat bookmark with a long tail marking the page is a fun accessory.

  • Materials Needed: Grey felt, pink yarn or ribbon, fabric glue.
  • How to Make It:
    1. Cut a flat rat body shape out of stiff felt.
    2. Decorate the face with markers or felt scraps.
    3. For the tail, use a very long piece of pink ribbon or braided yarn. Glue it securely to the bottom of the felt body.
    4. The body sits at the top of the book, while the tail dangles down between the pages to mark your spot.

9. Paper Plate Rocking Rat

This interactive craft actually moves!

  • Materials Needed: Paper plate, paint, scissors.
  • How to Make It:
    1. Fold a paper plate in half.
    2. Cut out a semi-circle from the center of the straight edge to create a defined head and body shape, or simply leave it folded for a chubby rat.
    3. Paint the plate.
    4. Add ears and a tail.
    5. When you tap the side of the folded plate, the rat will “rock” back and forth on the curved bottom edge.

10. Cupcake Liner Rat

If you have leftover baking supplies, this is a quick 5-minute craft.

  • Materials Needed: Grey or patterned cupcake liners, construction paper, glue.
  • How to Make It:
    1. Flatten a cupcake liner into a circle.
    2. Fold in the sides to create a triangle shape.
    3. Glue this onto a piece of paper.
    4. Add round paper ears to the wide top part and a tail to the pointy bottom part.
    5. It creates a textured, 3D effect that looks great on greeting cards.

Why Crafting with “Pests” is Important

You might still be asking, “Why rats?” Celebrating animals that aren’t traditionally “cute” teaches children empathy. It helps them understand that every creature, big or small, fluffy or scaly, has a role to play in our world.

Leave a Reply

Your email address will not be published. Required fields are marked *