If you grew up with a Barbie doll in your hand, you know the feeling. The hours spent arranging the Dreamhouse, the drama of the fashion shows, and the sheer joy of adding a new accessory to the collection. I was absolutely crazy about Barbie dolls as a little girl—to the extent that I still have my old collection tucked away safely! I admit, I am a bit possessive about it, having spent years collecting various sets and accessories. I remember the pleading and cajoling I had to do just to get my parents to buy me the latest set. Looking back, I wish I had realized sooner that I didn’t need to wait for a store-bought box to expand my Barbie world. I could have just made whatever I wanted! Well, better late than never! With Barbie Day coming up on March 9th, there is no better time to dive into the world of DIY. Whether you are a parent looking to save money on expensive plastic accessories or a nostalgic collector wanting to get creative, these 20 adorable Barbie crafts are perfect for you. Most of them require supplies you already have in your recycling bin, turning "trash" into tiny treasures. Why DIY Barbie Crafts Are Better Than Store-Bought Before we jump into the list, let’s talk about why making your own accessories is often better than buying them. Cost-Effective: Barbie sets can be pricey. A simple plastic living room set can cost as much as a real throw pillow! DIY crafts use upcycled materials like cardboard, old socks, and plastic bottles, costing you almost nothing. Creativity Booster: These crafts encourage children to look at everyday objects differently. A shampoo bottle isn't just trash; it’s a potential handbag. A soapbox isn't waste; it’s a suitcase. This fosters critical thinking and imagination. Customization: When you buy a set, you get what you get. When you build it, you can choose the colors, patterns, and styles. You can match the Barbie furniture to your child's actual bedroom! Sustainability: Teaching kids to upcycle helps the planet. It is a small lesson in sustainability wrapped in a fun playtime activity. The Ultimate List: 20 Amazing Barbie Crafts to Make at Home We have categorized these crafts to help you find exactly what your dollhouse needs, from high-fashion accessories to essential furniture. Part 1: Fashion & Accessories Every fashionista needs a wardrobe update, and these crafts are quick, easy, and mostly no-sew! 1. The Shampoo Bottle Tote Bag Barbie sets often come with cute little bags, but let's be honest—they don’t hold anything! This practical tote is a game-changer. How to do it: Take an empty, clean travel-sized shampoo bottle. Cut off the top half. Wrap the bottom half in colorful Washi tape or fabric. Punch two holes in the sides and thread a pipe cleaner through to create handles. Now Barbie can actually carry her groceries! 2. No-Sew Sock Dresses Do you have a pile of unmatched socks? You have a Barbie wardrobe waiting to happen. The Hack: Cut the toe off a patterned sock. The elastic ankle part becomes a tube dress. Cut two small slits near the top for armholes, and voila! You have a chic sweater dress or a cozy winter gown. 3. Pipe Cleaner Headbands Accessories make the outfit. Twist metallic or fuzzy pipe cleaners into circles to fit Barbie’s head. You can twist them into cat ears, bows, or even a crown shape for a princess look. 4. Balloon Swimsuits This is a classic hack. Take a standard 12-inch balloon and cut off the neck and the bottom curve. Step Barbie into the remaining ring of rubber, pulling it up to form a tight-fitting swimsuit or bodysuit. It’s waterproof, too! 5. Bead Jewelry Using elastic thread and small seed beads, you can create necklaces and bracelets that are actually to scale. Tip: Use a slightly larger bead as a "pendant" for a statement necklace. 6. Duct Tape Shoes Lost a shoe? It happens to the best of us. Wrap Barbie’s foot in a little bit of plastic wrap (to protect it), then layer colored duct tape over it to form a shoe shape. Carefully cut it off the back of the heel, remove the plastic wrap, and slip the tape shoe back on. Part 2: Furniture & Decor A Dreamhouse isn't a home without furniture. Here is how to furnish a mansion on a budget. 7. The Soapbox Suitcase Why restrict Barbie to a tote bag when she can travel the world? A fashionista needs her luggage. The DIY: Take a travel soap holder or a small rectangular cardboard box. Glue a pipe cleaner handle to the top. Inside, you can glue a small mirror or a pouch. Paint the outside and add "stickers" (tiny bits of paper) to look like travel stamps. 8. Kitchen Sponges Bed For a comfy mattress, glue three or four kitchen sponges together side-by-side. Cover them with a piece of scrap fabric (glue it underneath). Add a smaller sponge wrapped in fabric for a pillow. It’s soft, squishy, and the perfect size. 9. Popsicle Stick Bench Glue popsicle sticks together to form a slat bench. You will need about 10 sticks for the seat and backrest, and 4 sturdy ones for the legs. Paint it white for a "garden party" vibe. 10. Matchbox Chest of Drawers Glue 3 or 4 empty matchboxes together in a vertical stack. Wrap the outside of the stack in pretty paper, but leave the drawer parts free to slide in and out. Glue a bead onto each drawer as a handle. This is perfect for storing the tiny jewelry you made earlier! 11. Tin Foil Mirror Cut an oval or rectangle out of stiff cardboard. Glue a smooth piece of aluminum foil (shiny side out) onto the center. Decorate the border with markers, gems, or puffy paint. Glue this to the wall of your dollhouse. 12. Bottle Cap Plates Save the metal or plastic caps from glass soda bottles. Paint them white or pastel colors. They are the perfect size for dinner plates. You can even cut pictures of food from magazines and glue them inside! 13. Toothpaste Cap Cups The caps from toothpaste tubes or travel-sized hairspray bottles make excellent tumblers and mugs. If they have a flaring bottom, they look like fancy goblets. 14. Felt Rugs Cut circles, ovals, or animal shapes out of fuzzy felt. It instantly adds warmth to a plastic floor. You can use fabric markers to draw patterns on them. Part 3: Lifestyle & Fun It is the little details that make playtime magical. 15. Mini Books Cut a strip of white paper and fold it accordion-style. Glue a piece of colored cardstock to the front and back to act as the cover. You can write "Barbie's Diary" or "Math" on the front. 16. Paperclip Hangers Bend a large paperclip into a triangle shape, leaving the hook at the top. This requires some pliers and adult help, but once done, you can actually hang the sock dresses in a closet! 17. Washi Tape Wall Art If you have a cardboard dollhouse, use Washi tape to create "frames" on the walls. Inside the frames, draw pictures or stick tiny photos. It creates a gallery wall without needing heavy glue. 18. Plastic Container Bathtub Use a clean, oval-shaped plastic container (like the ones used for butter or takeaway salads). Cut simple feet from foam or cardboard and glue them to the bottom. Fill with cotton balls for a "bubble bath" effect—no water mess required! 19. Duct Tape Hammock Cut a long strip of fabric or create a sheet of duct tape fabric. Punch holes in the short ends and tie strings through them. Tie the other ends of the strings to two stationary objects (like chair legs or a DIY stand). It’s the perfect summer chill spot for Barbie. 20. Pizza Saver Table You know that little plastic 3-legged "table" that comes in the middle of a delivery pizza to stop the box from crushing the cheese? It is literally the perfect size for a Barbie patio table! Just wash it and maybe paint it. Detailed Tutorial: How to Make a Cardboard Barbie Wardrobe To give you a taste of how easy this is, let’s do a deep dive into one of the most useful crafts: The Wardrobe. Supplies Needed: A shoe box (approx. 12 inches tall) A wooden skewer or chopstick Wrapping paper or paint Glue gun or strong tape Scissors Instructions: Prepare the Box: Stand the shoe box vertically. The lid will serve as the door. If the lid is detachable, tape one side of it to the box so it swings open like a door. Decorate: Paint or wrap the entire box (inside and out) with colorful paper. This covers the cardboard look and makes it stylish. Install the Rail: Measure the width of the box near the top. Cut your wooden skewer to be just slightly longer than that width. Poke a hole on the left and right sides of the box, about 2 inches from the top. Push the skewer through. This is your hanging rail. Add a Shelf: Cut a piece of cardboard to fit the bottom half of the box. Glue it in place to create a shelf for shoes and bags. The Handle: Glue a large bead or button to the outside of the door to act as a handle. Fill it up: Use your Paperclip Hangers (#16) and Sock Dresses (#2) to fill the closet! Conclusion: Crafting Memories We hope this list has inspired you to dig through your recycling bin and get creative. Crafting for Barbie isn't just about saving money; it is about the joy of creation. It transforms passive play into active engineering and design. When you sit down with your child to turn a soapbox into a suitcase or a sock into a ballgown, you are building more than just doll accessories—you are building memories. These are the moments they will remember, just like I remember my childhood collection. So, grab your glue stick, raid your craft drawer, and have a fantastic time celebrating Barbie Day!

20 Exciting Easter Egg Crafts for Kids: Creative Fun for the Whole Family

When you hear the phrase “Easter Egg,” what is the first thing that comes to your mind? If you are a movie buff, you might think of those clever little secrets or references hidden by directors in your favorite blockbusters. While finding those hidden gems on the screen is fun, nothing beats the original, colorful, and creative tradition of the actual Easter Egg!

Spring is in the air, the flowers are blooming, and Easter is just around the corner. It is a season of renewal, joy, and, of course, creativity. For parents and teachers, this is the perfect time to engage children in activities that celebrate the season while boosting their fine motor skills.

In this guide, we are going to explore 20 Exciting Easter Egg Crafts for Kids. From messy sensory play to precise paper weaving, there is something here for every age group. But before we break out the glitter and glue, let’s take a quick hop around the world to see how other cultures celebrate this egg-citing holiday

The fascinating History of Easter Egg Traditions

The tradition of the Easter egg is ancient, symbolizing new life and rebirth. While we might be used to chocolate eggs or plastic ones filled with jellybeans, the world has some truly unique ways of celebrating.

  • The United Kingdom: Here, the focus is on action! In a tradition known as the Easter Egg Roll, children decorate hard-boiled eggs and roll them down grassy hillsides. It is a race to see whose egg reaches the bottom first without cracking.
  • Germany: The Germans add a musical twist with the Egg Dance. Eggs are laid out on the floor, and participants must dance among them. The goal? To dance as gracefully as possible without stepping on or breaking any of the fragile shells.
  • Italy: In Italy, specifically on Easter Monday, they play Scuccetta. It is a competitive game where participants tap their boiled eggs against each other. The person whose egg remains uncracked is declared the winner!
  • Latin America: One of the most colorful traditions is the Cascarones. Families empty eggshells, clean them, dry them, and then stuff them with colorful confetti. These fragile eggs are then hidden, and when found, they are playfully crushed over someone’s head, showering them in a rainbow of paper!
  • Central Europe: There are older folk traditions involving water splashing and playful whipping with willow branches, often exchanged for decorated eggs, symbolizing health and beauty for the coming year.

Inspired by these global festivities? Why not start your own family tradition this year? You don’t need a hillside or confetti; you just need a kitchen table and some imagination.

20 Amazing Easter Egg Crafts for Kids

Here is our curated list of 20 distinct, fun, and affordable crafts. We have categorized them to help you find exactly what you need.

Mess-Free & Paper Crafts

1. Washi Tape Resist Art This is perfect for toddlers. Cut a large egg shape out of white cardstock. Let the child stick strips of painter’s tape or washi tape across the egg in random patterns. Then, let them paint over the whole egg with watercolors. Once dry, peel off the tape to reveal crisp white lines against the colorful background.

2. Paper Strip Weaving Great for older kids to practice coordination. Cut an oval frame out of colored paper (like a window). Cut thin strips of different colored construction paper. Have the child weave the strips (over-under-over-under) through the frame. It creates a beautiful plaid “textile” look.

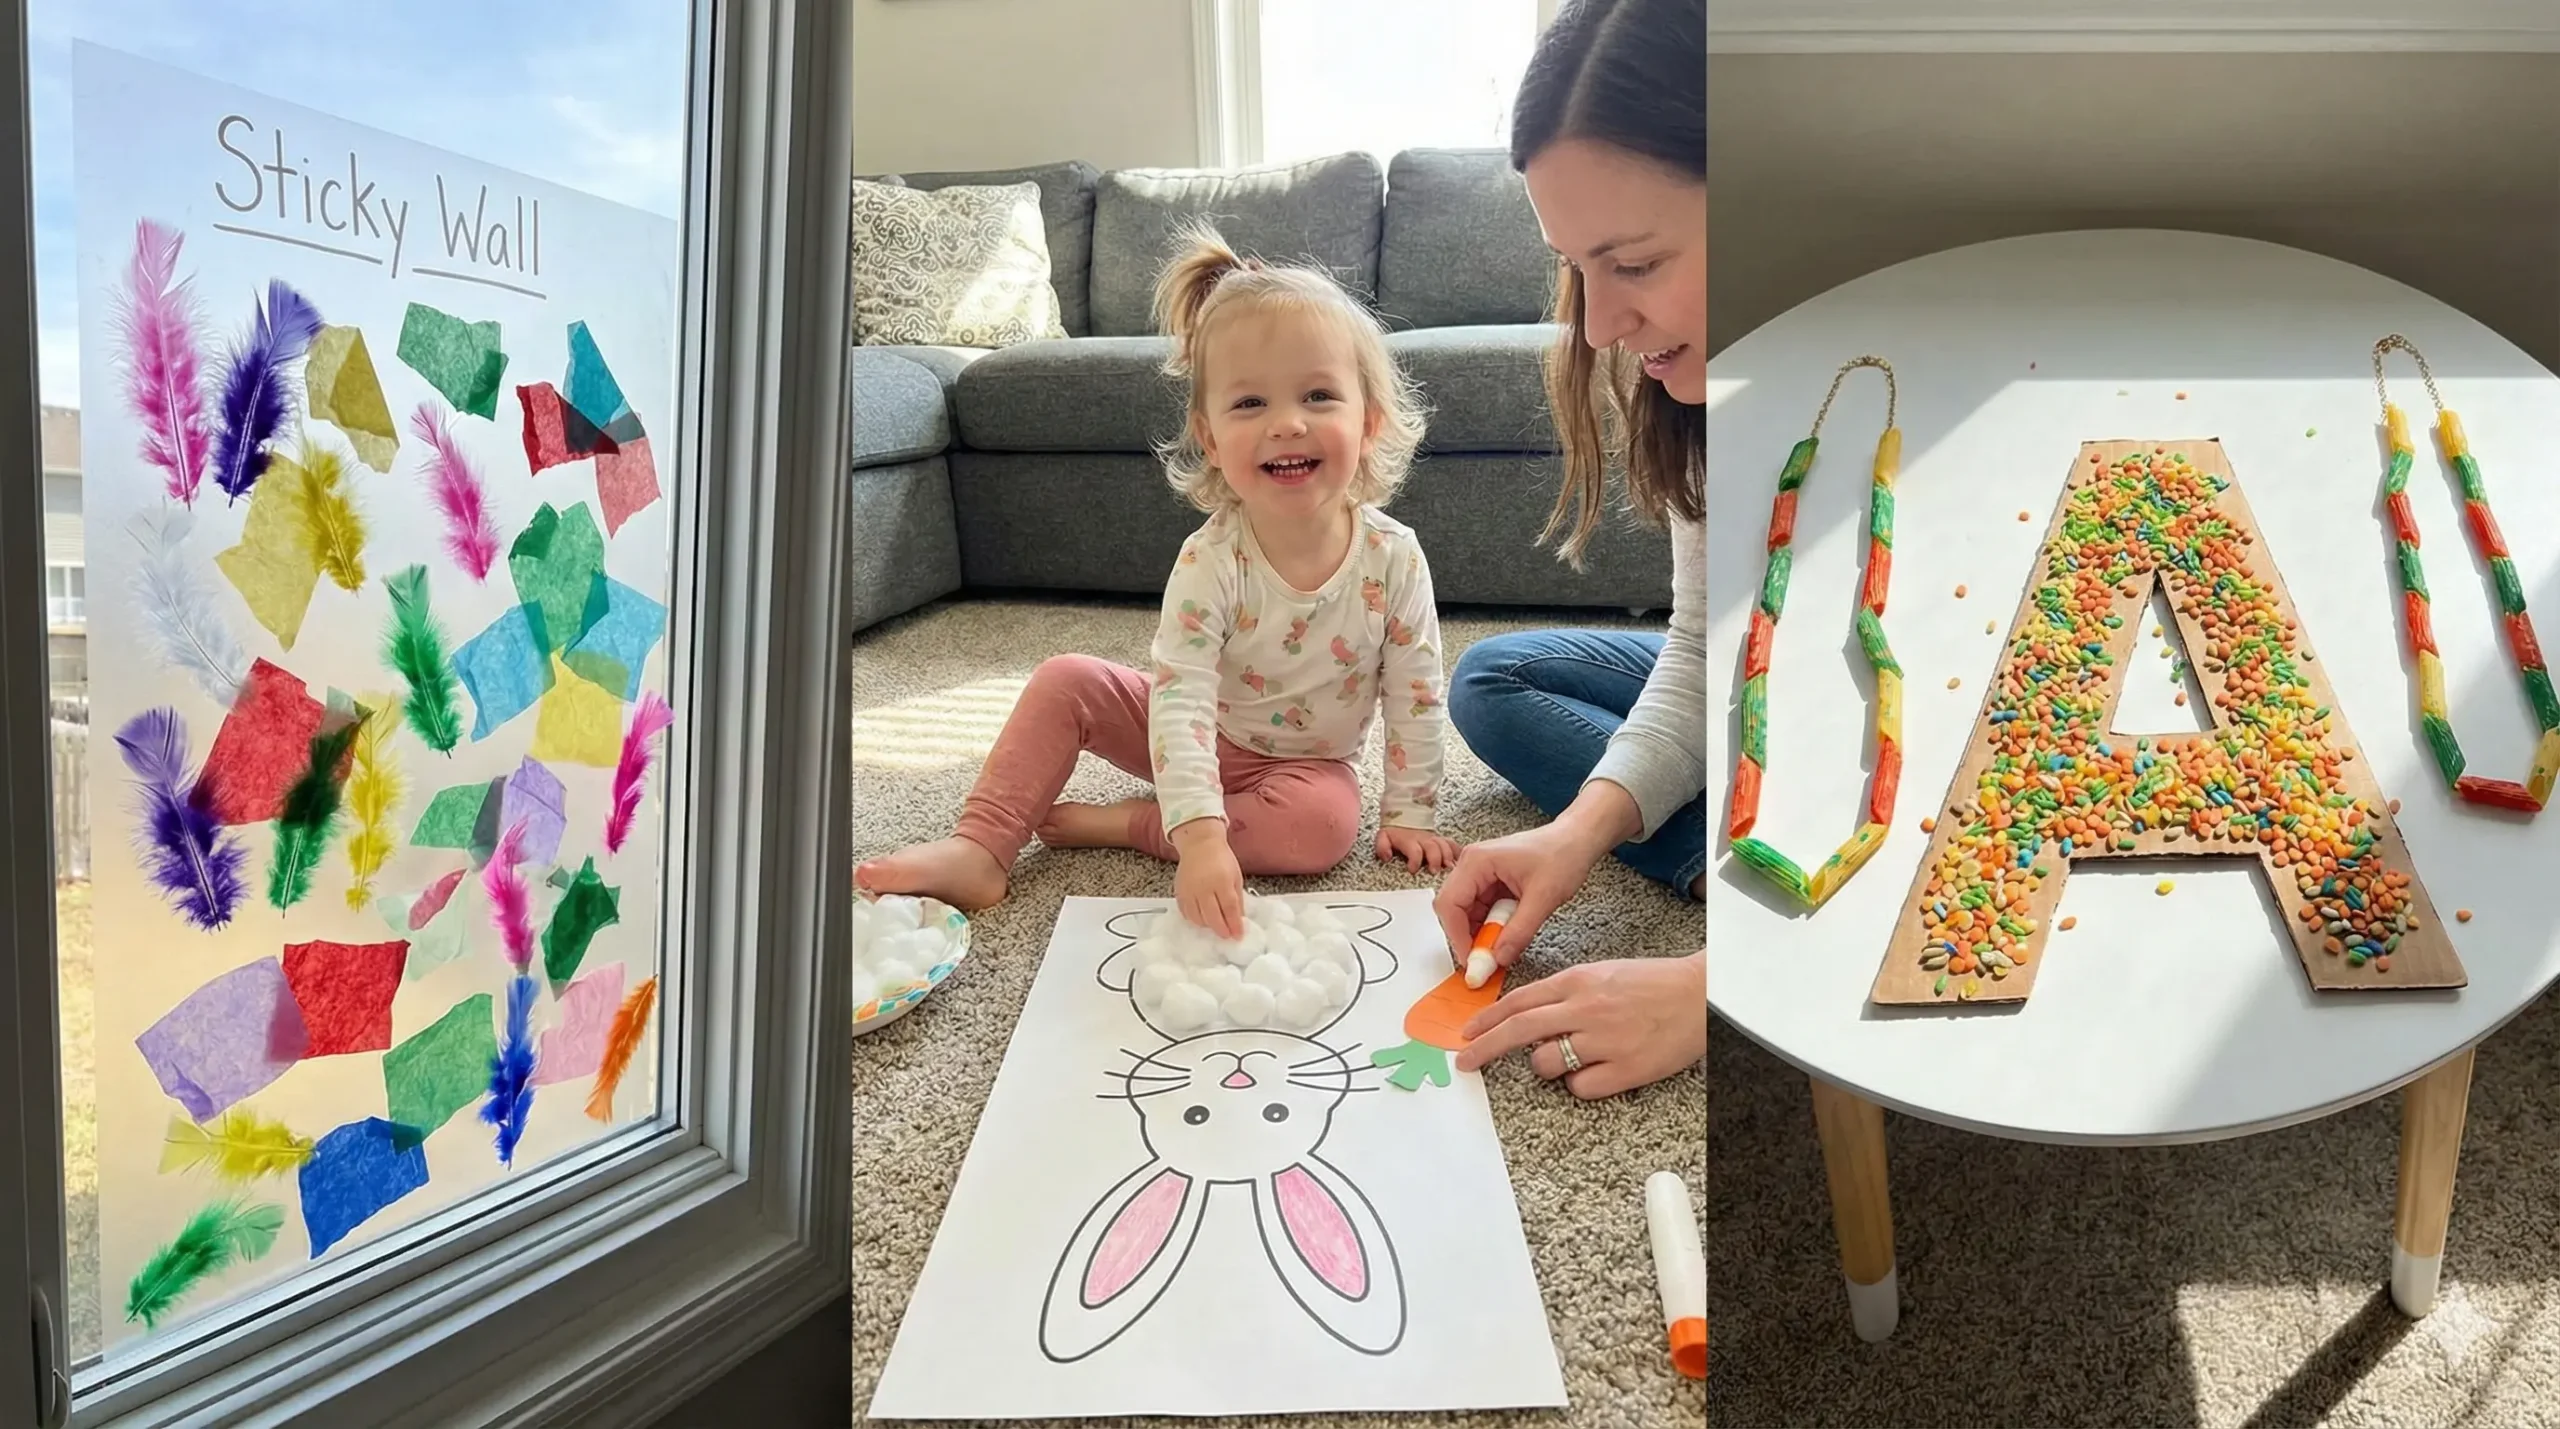
3. Contact Paper Suncatchers Cut an egg-shaped frame from black construction paper. Place it onto a sheet of clear contact paper (sticky side up). Let kids stick pieces of colorful tissue paper onto the sticky center. Seal it with another sheet of contact paper, trim the edges, and tape it to a window. The sunlight shining through is magical!

4. Tissue Paper Bleed Art Cut egg shapes from watercolor paper. Cut “bleeding” tissue paper into squares. Have the child spray the paper egg with water, then place the tissue squares on top. Spray again. Let it dry, then remove the tissue. The colors will have transferred to the paper, creating a dreamy, tie-dye effect.

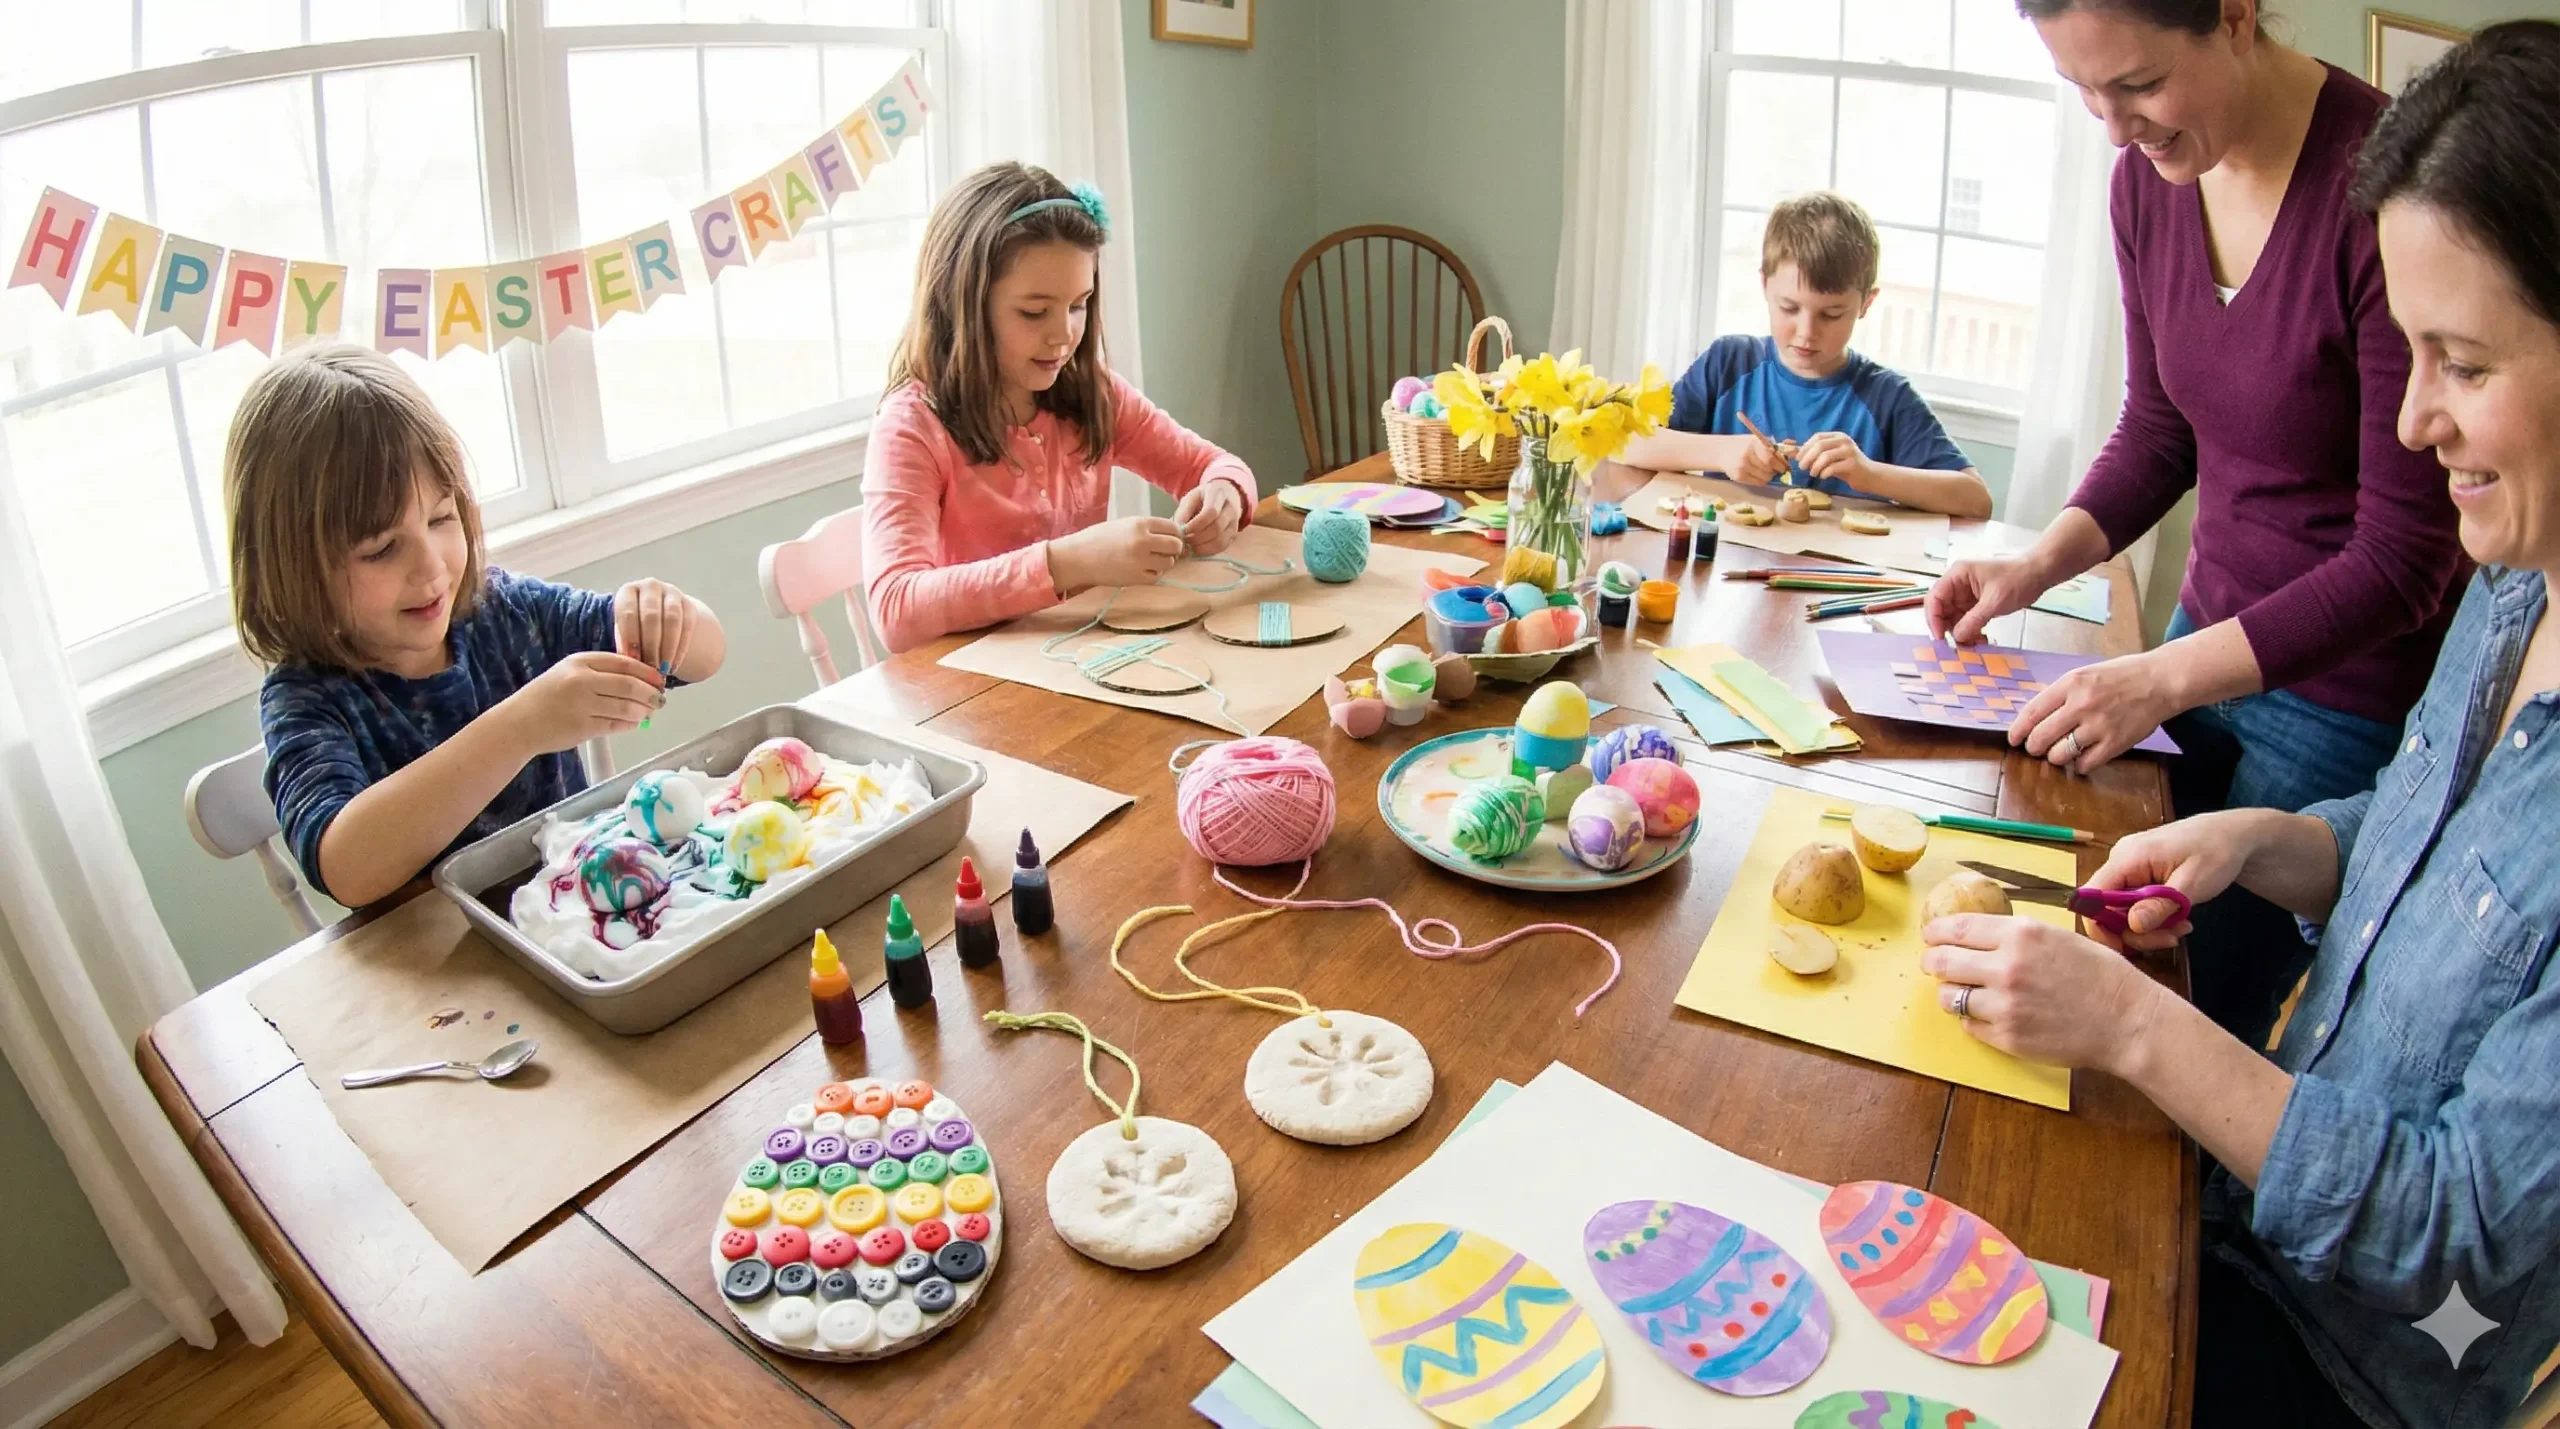
5. Potato Stamp Eggs A classic! Cut a potato in half. Use a knife to carve lines, zigzags, or circles into the cut surface. Dip the potato in paint and stamp it onto paper to create instant Easter eggs.

6. Doily Stenciled Eggs Place a paper doily over a piece of construction paper shaped like an egg. Use a sponge dipped in paint to dab over the doily. Lift the doily gently to reveal a delicate, lace-patterned egg.

7. Origami Flat Eggs For the puzzle lovers. Use square origami paper and follow simple folding instructions to tuck the corners in, creating a hexagonal/oval shape that looks like an egg. These are great for gluing onto greeting cards.

3D & Textured Crafts

8. Yarn Wrapped Eggs Cut an egg shape out of corrugated cardboard. Tape the end of a colorful yarn ball to the back. Have the child wrap the yarn around and around the cardboard until it is completely covered. It’s excellent for grip strength!

9. Salt Dough Keepsakes Mix flour, salt, and water to create a dough. Roll it out and use an egg-shaped cookie cutter. Bake them until hard. Once cool, kids can paint them with acrylics. These last for years and make great ornaments.

10. Tin Foil Relief Eggs Cut an egg shape from cardboard. Use a hot glue gun (adults only) to draw designs like swirls or zigzags on the cardboard. Let it dry and harden. Cover the entire egg with a sheet of tin foil, pressing down gently around the glue lines. Color the foil with permanent markers for a shiny, metallic art piece.

11. Button Mosaic Eggs Draw a large egg outline on a canvas or sturdy board. Provide a bowl of multi-colored buttons and glue. Kids can fill the egg shape with buttons, creating a textured mosaic. This is also a great way to use up spare buttons.

12. Shaving Cream Marbling Fill a baking tray with shaving cream and drop food coloring onto it. Swirl the colors with a toothpick. Press a paper egg cutout into the cream, then lift it up. Scrape off the shaving cream with a ruler, and the swirling color pattern will remain on the paper.

13. Pasta Shell Eggs Dye different pasta shapes (macaroni, bowties, shells) using vinegar and food coloring. Once dry, let kids glue them onto a cardboard egg shape. It creates a fascinating 3D texture.

14. Felt Pocket Eggs Cut two identical egg shapes from felt. Sew or glue the edges together, leaving the top open. Kids can decorate the front with felt stickers. These can be used as pouches to hold small chocolate treats or notes.

15. Q-Tip Pointillism Instead of brushes, give kids Q-tips (cotton swabs). Have them dip the Q-tip in paint and dot their designs onto a paper egg. This mimics the Pointillism art style and helps with concentration.

Upcycled & Nature Crafts

16. Nature Collage Eggs Go for a nature walk and collect small flowers, leaves, and grass. Cut an egg shape from cardboard and cover it with glue. Arrange the nature items on the egg for an earthy, botanical look.

17. Egg Carton Chicks Cut out a single cup from an egg carton. Flip it upside down and paint it yellow. Add a jagged beak from orange paper and draw eyes. These cute little “hatching” chicks can hide small candies underneath.

18. Plastic Egg Fireflies Do you have leftover plastic eggs from last year? Put a small battery-operated tea light inside a plastic egg. Glue on pipe cleaner wings and googly eyes. At night, turn the light on for a glowing firefly!

19. Balloon String Art Blow up a small water balloon (don’t fill with water, just air) to the shape of an egg. Dip yarn in white glue and wrap it messily around the balloon. Let it dry completely (24 hours). Pop the balloon and remove it. You are left with a stiff, hollow yarn egg.

20. Cardboard Roll Egg Stands Cut a toilet paper roll into 1-inch rings. Paint them and decorate with stickers or glitter. These serve as perfect little stands to hold real boiled eggs on the breakfast table.

Why Crafting is Important for Kids

Beyond just keeping them busy, these Easter egg crafts offer significant developmental benefits:

  1. Fine Motor Skills: peeling stickers, cutting with scissors, and grasping paintbrushes all help strengthen the small muscles in the hands and fingers, which is essential for writing.
  2. Cognitive Development: Following instructions (like in the origami or weaving crafts) helps improve sequencing and problem-solving skills.
  3. Sensory Processing: Crafts like shaving cream marbling or salt dough provide sensory input that helps children explore textures and materials.
  4. Cultural Connection: Discussing the origins of these traditions helps children understand the world beyond their immediate surroundings.

Conclusion

Easter is more than just a single Sunday; it is a season of color, life, and family. By engaging in these 20 exciting Easter egg crafts, you are building memories that will last much longer than a chocolate bunny.

Whether you choose the messy fun of shaving cream marbling or the quiet focus of paper weaving, the most important thing is the time spent together. So, clear off the table, put on some old clothes, and get ready to make some masterpieces.

Leave a Reply

Your email address will not be published. Required fields are marked *