Here is a comprehensive, SEO-optimized article of over 1000 words, designed to be engaging, high-quality, and suitable for AdSense/AdX approval. I have integrated the specific craft ideas you mentioned while expanding the list to a full 20 items with added educational value. 20 Easy Halloween Bat Crafts for Kids: Celebrate Bat Appreciation Month in Style! It is officially October, and the air is getting crisp, the leaves are turning orange, and the spooky season is upon us. But did you know that October is a special month for one particular nocturnal creature for two reasons? Yes, we are talking about the bat! October is widely known for Halloween celebrations, but it is also Bat Appreciation Month. While movies and spooky stories often paint bats as scary creatures of the night, they are actually fascinating, helpful animals that play a crucial role in our ecosystem. This dual celebration gives us the perfect excuse to break out the black construction paper, the googly eyes, and the glue sticks. We are going to celebrate the way we know best—by making 20 Brilliant Bat Crafts for Kids! Whether you are a teacher looking for classroom decor, a parent wanting a rainy afternoon activity, or just a Halloween enthusiast, this list has something for everyone. We have gathered ideas using paper, cardboard, yarn, nature items, and everyday recyclables. Why We Should Appreciate Bats (A Little Learning Before Crafting) To make your crafting session even more valuable (and to impress Google with educational content!), share these fun facts with your kids while you craft. It transforms a simple art project into a science lesson. Bug Busters: A single little brown bat can eat up to 1,000 mosquitoes in a single hour. They are nature’s pest control! Not Blind: The phrase "blind as a bat" is a myth. Bats can actually see quite well, but they use echolocation (sound waves) to navigate in the dark. Mammals: Bats are the only mammals capable of true flight. Flying squirrels just glide, but bats actually fly! Pollinators: Just like bees, some bats pollinate flowers and spread seeds to help rainforests grow. Now that we appreciate our winged friends, let’s get crafting! The Essential Crafting Toolkit Most of the crafts on this list use supplies you likely already have at home. Before you start, gather these essentials: Paper: Black construction paper, cardstock, and tissue paper. Adhesives: Glue sticks, PVA glue (white school glue), and tape. Cutting: Safety scissors for kids. Recyclables: Toilet paper rolls, egg cartons, and old CDs. Decorations: Googly eyes (a must!), glitter, and markers. Part 1: Paper & Cardboard Creations Simple, low-mess crafts perfect for toddlers and preschoolers. 1. The Classic Corner Bat Bookmark Keep up with your reading this season with a cute bat bookmark! This isn't your standard flat bookmark; it fits neatly on the top corner of your page so you never lose your place. How to do it: Start with a square piece of black paper. Fold it into an origami corner bookmark base. Add pointy ears to the top and glue wings to the back. Use white paper to make sharp little fangs. It looks like the bat is biting the page! 2. The Colorful "Personality" Bookmark Who says bats have to be black? Here is another idea for a Halloween corner bookmark, and we love how colorful it can be! The Twist: Keep the bat’s wings black to maintain the silhouette, but change up the body color for a different bat each time. Make a purple bat, a neon green bat, or even a polka-dotted bat. This is great for assigning different colors to different kids in a classroom. 3. Bat Treat Bags This little bat treat bag is great for collecting a small stash of candy or for giving your friends little Halloween gifts. And no, not all gifts have to be sweet edibles; there are plenty of non-candy gifts out there like stickers or erasers! How to do it: Take a small black paper lunch bag (or paint a brown one black). Fold the top down and cut the edge into a rounded "head" shape. Glue wings to the back. When you fill it with treats, the bat looks plump and happy! 4. Accordion Fold Flying Bats This is a great exercise for fine motor skills. How to do it: Fold a piece of black paper back and forth like a fan (accordion style) to create textured wings. Staple the center of the fan to a simple black cardboard body. Attach a string, and when you bounce it, the wings will flap because of the folds! 5. Paper Plate Moon & Bat Silhouette Instead of making the bat the main object, make a scene. How to do it: Paint a paper plate bright yellow (for a full moon) or spooky purple. Cut a simple bat silhouette out of black cardstock and glue it in the center. Punch a hole at the top and hang it in the window. 6. Handprint Bats A classic keepsake craft that parents love. How to do it: Trace your child’s hand on black paper twice. Cut them out. These handprints become the wings! Glue them to a simple round body shape. The fingers look like the bony structure of a bat's wing. 7. The Paper Chain Bat Family How to do it: Cut strips of black paper and loop them together to make a chain. On every second or third loop, attach a pair of wings and some eyes. It makes a perfect garland to drape across the fireplace mantel. Part 2: Recycled Materials (Upcycling Fun) Teach sustainability by turning trash into treasure. 8. Toilet Roll Bat The king of recycled crafts! How to do it: Take an empty toilet paper roll. Fold the top edges down inward to create two pointy "ears" on the sides. Paint the whole thing black. Add wings and eyes. These can stand up on a shelf or hang from the ceiling. 9. Egg Carton Bats How to do it: Cut a strip of three cups from an egg carton. The center cup is the head, and the two outer cups are the wings. Paint everything black. You can cut the edges of the outer cups to make them look jagged. Thread a ribbon through the top to hang them up. 10. Bottle Cap Micro-Bats These are tiny and adorable—perfect for magnets. How to do it: Paint a metal or plastic bottle cap black. Glue tiny paper wings to the back and miniature googly eyes to the front. Glue a magnet to the back, and you have a spooky fridge decoration. 11. Spoon Bats How to do it: Take a black plastic spoon (or paint a white one). The bowl of the spoon is the bat's face. Glue wings to the handle of the spoon. You can stick the handle into a potted plant to make it look like the bat is roosting in your flowers. 12. Coffee Filter Tie-Dye Bats This combines science (chromatography) and art. How to do it: Color a coffee filter with washable markers (purple, black, blue). Spray it with water and watch the colors blend. Once dry, pinch the center with a clothespin (painted black). The clothespin is the body, and the coffee filter becomes colorful, tie-dyed wings. 13. The Cardboard Tube candy stash Similar to the toilet roll bat, but seal the bottom with tape. Fill the tube with candy, then fold the top down to close it. It’s a bat piñata for one! Part 3: Nature & Texture Crafts Using different materials for sensory play. 14. Pinecone Bats Go for a nature walk and collect some pinecones. How to do it: The pinecone acts as a fuzzy, textured body. Glue black construction paper wings to the sides and add eyes. These look great sitting on a nature table or hanging from a Christmas tree (if you like spooky trees!). 15. Yarn Wrapped Bats Great for dexterity. How to do it: Cut a bat shape out of sturdy cardboard. Give your child a ball of black yarn. Have them wrap the yarn around the cardboard bat until it is completely covered and looks "furry." 16. Rock Painting Bats How to do it: Find a smooth, oval rock. Paint it black. Paint white fangs and yellow eyes. You can glue paper wings to the bottom of the rock, or simply paint the wings onto the rock itself if it's wide enough. Hide these in the garden for neighbors to find! 17. The Pom-Pom Bat How to do it: Make a large black pom-pom using yarn (or buy a mega-sized one). This is the body. Glue on felt wings and felt ears. It is soft, squishy, and makes a great "pet" bat for kids. 18. Foam Cup Hanging Bats How to do it: Punch two holes in the bottom of a Styrofoam cup. Thread a string through so the cup hangs upside down. Paint the cup black. The wide part of the cup is the shoulders, and the narrow part is the feet. Add wings. Hanging them upside down makes them look like they are sleeping! Part 4: For the Older Kids (Slightly more advanced) 19. Origami Bat The Challenge: There are many tutorials online for origami bats. They require no cutting or gluing, just precise folding. This is great for older elementary kids who want a challenge. Using special Halloween-patterned origami paper makes these look professional. 20. Stained Glass Bat Window How to do it: Cut a bat outline (frame) out of black cardstock. Stick it onto clear contact paper. Have the kids fill the inside with torn pieces of purple and blue tissue paper. Seal it with another sheet of contact paper. When you put it on the window, the sun shines through the wings! Tips for Displaying Your Bat Crafts Now that you have an army of paper bats, what do you do with them? ** The "Bat Cave" Door:** Tape the paper bats all over your front door to welcome Trick-or-Treaters. The Chandelier: Hang the toilet roll bats or egg carton bats from a light fixture or a mobile frame to create a swarm of flying bats. The Window Invasion: Use the silhouette bats to create a scene in your front window. Backlight them with orange or purple fairy lights for a spooky effect at night. Final Thoughts Halloween doesn't have to be about expensive store-bought decorations. Some of the best memories are made sitting around the kitchen table, covered in glue and glitter, laughing at a bat whose eyes are slightly crooked. This October, take a moment to appreciate the real bats outside eating the mosquitoes, and then come inside to celebrate them with these 20 Easy Halloween Bat Crafts. Whether you make a simple bookmark or a fuzzy pinecone friend, you are sparking creativity and fun.

Adorable F for Frog Craft: A Fun Upcycled CD Activity for Kids

There is something undeniably cheerful about frogs. With their wide grins, big eyes, and bouncy nature, they capture the imagination of children everywhere. Whether you are teaching the alphabet, exploring a pond ecosystem theme, or just looking for a rainy day activity, this F for Frog Craft is the perfect solution.

In this guide, we are hopping into the world of amphibians to bring you a delightful “Letter F” craft. Not only does this project help reinforce letter recognition, but it is also a fantastic way to upcycle old materials—specifically, those old CDs gathering dust in your drawers!

This craft is a standout addition to any Alphabet Animal series. It combines texture, color, and recycling into one simple project that preschoolers and kindergarteners will adore.

Why Teach with Animal Crafts?

Before we dive into the glue and felt, let’s talk about why this specific craft is such a powerful learning tool.

1. Phonics and Letter Recognition: Abstract concepts like letters can be hard for young minds to grasp. Associating the letter F with a familiar creature like a Frog creates a “memory hook.” When a child creates the frog, they aren’t just making art; they are cementing the “Fuh” sound in their mind.

2. Sensory Development: By using different materials—like the smoothness of a recycled CD and the fuzzy texture of felt—you are providing a sensory-rich experience. If you choose to use paper or foam, the cutting and pasting process refines fine motor skills essential for writing later on.

3. Environmental Awareness: This craft uses an old CD as the base. This is a subtle but effective way to introduce the concept of upcycling to children. You can explain that instead of throwing the CD in the trash, we are turning it into something beautiful.

Fun Frog Facts for Kids

While you are cutting and gluing, keep the conversation going with these fun educational tidbits. Google loves content that provides extra value, and parents love having “fun facts” ready for their kids!

  • Amphibian Life: Frogs are amphibians, which means they can live on both land and in water.
  • Super Jumpers: Some frogs can jump over 20 times their own body length. That is like a human jumping over a whole school bus!
  • Sticky Situation: Frogs drink water through their skin, not their mouths. They also use their long, sticky tongues to catch flies and bugs in the blink of an eye.
  • The Lifecycle: Frogs start as tiny eggs in the water, hatch into tadpoles (which look like fish), and eventually grow legs and lose their tails to become frogs.

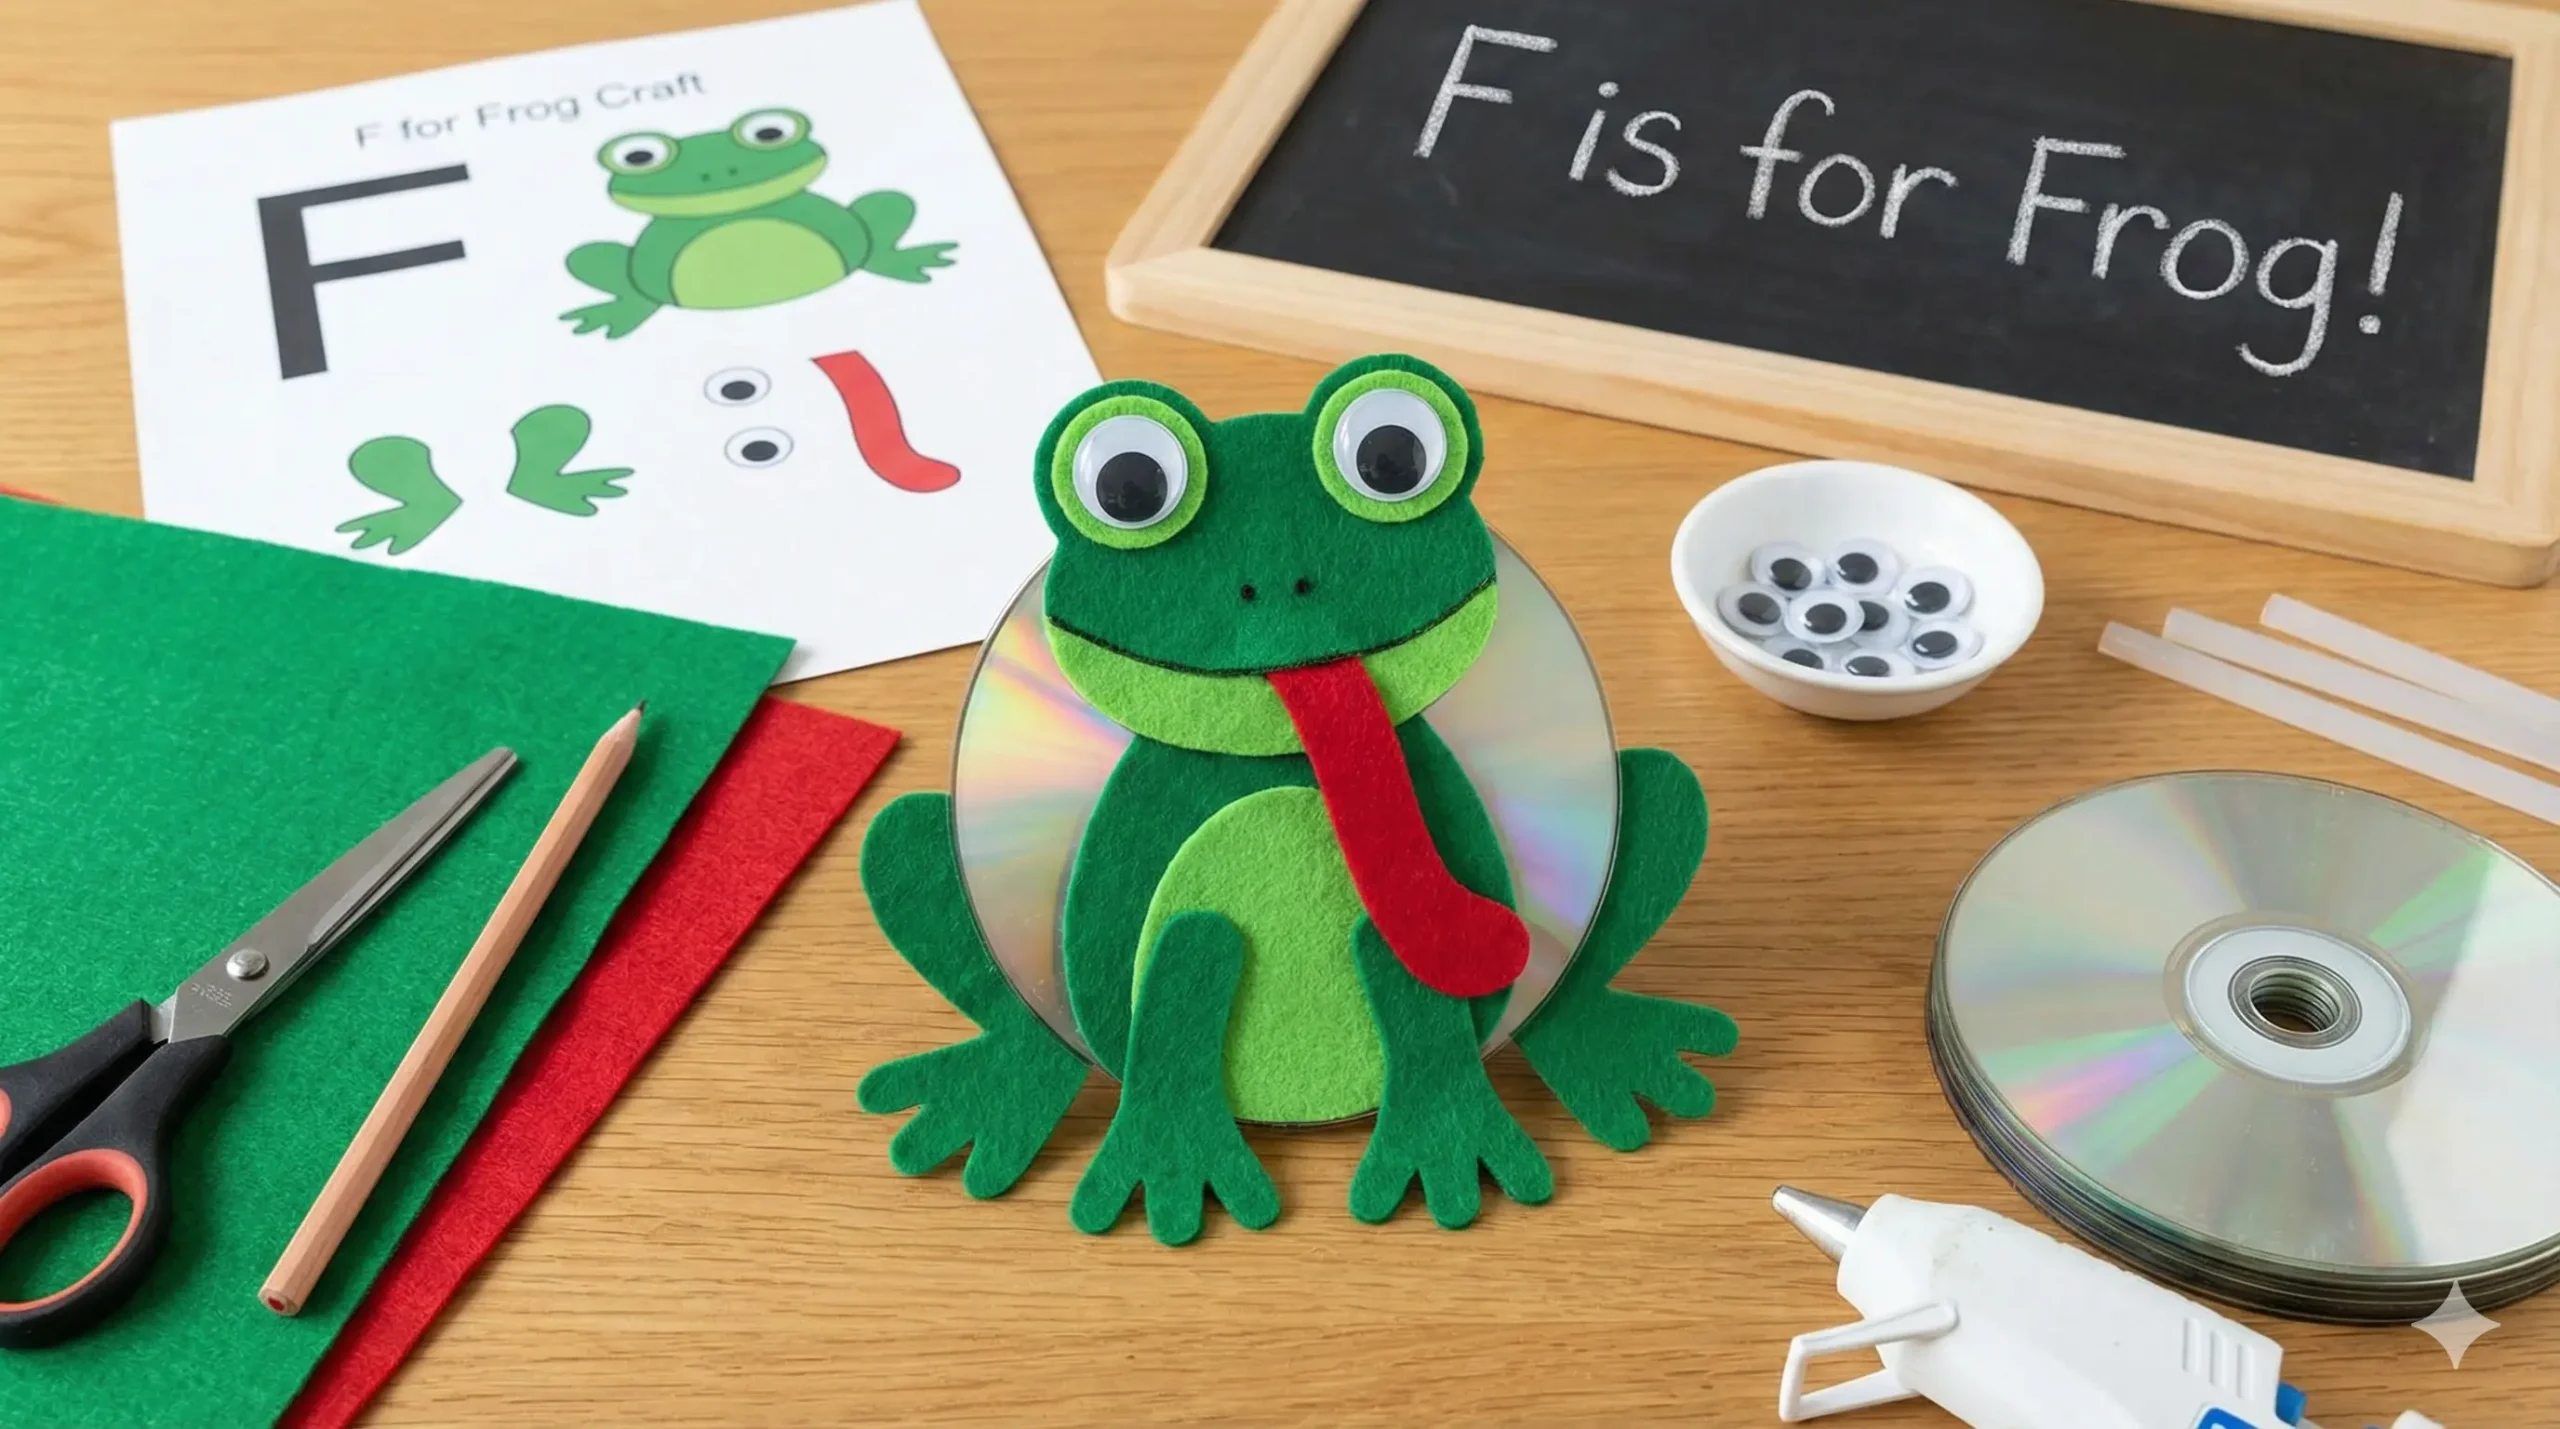
Supplies Needed for the F for Frog Craft

One of the best things about this project is its versatility. While we recommend using felt for a durable, tactile finish, you can easily swap materials based on what you have in your craft bin.

The Essentials:

  • The Base: An old CD or DVD (If you don’t have one, cut a circle out of sturdy cardboard).
  • The Template: You can draw your own simple frog parts (legs, eyes, mouth) or download a generic frog template online.
  • Scissors: Sharp fabric scissors for adults (if using felt) or safety scissors for kids (if using paper).
  • Adhesive: A hot glue gun works best for felt and CDs (adult supervision required). If using paper or cardstock, a standard glue stick or school glue is perfect.

The Materials (Choose Your Medium):

  • Option A (Textured):
    • Dark Green Felt: For the main body/head.
    • Light Green Felt: For the feet/flippers.
    • Red Felt: For the long tongue.
  • Option B (Standard):
    • Construction Paper or Cardstock in Dark Green, Light Green, and Red.
  • Option C (Sturdy):
    • Craft Foam sheets in the same colors.

The Details:

  • Googly Eyes: The bigger, the better! Large googly eyes give the frog a goofy, friendly personality.

Step-by-Step Instructions

Follow these steps to create your very own hopper.

Step 1: Prepare Your Materials

Start by printing your template on standard A4 or Letter-sized paper. If you are drawing freehand, sketch out:

  • Two large hind legs (folded style).
  • Two smaller front webbed feet.
  • A wide semi-circle for the mouth.
  • A long strip for the tongue.

Cut these paper shapes out first. These will serve as your stencils.

Step 2: Trace and Cut

Place your paper stencils onto your chosen material (Felt, Foam, or Construction Paper).

  • Trace the body/head shape (a large circle slightly bigger than the CD) onto the Dark Green material.
  • Trace the legs and feet onto the Light or Dark Green material (mixing shades adds depth!).
  • Trace the tongue onto the Red material.

Pro Tip: If using felt, use a piece of chalk to trace the shapes. It shows up well on dark green and brushes off easily.

Step 3: Prepare the CD Base

Take your old CD. This will act as the skeleton of the frog, keeping it stiff and durable. If you are using felt, apply a swirl of hot glue over the surface of the CD and press the large Dark Green felt circle onto it. Smooth it out so there are no bumps.

If you are using paper, simply glue the paper circle onto the CD. The shiny side of the CD can face the back—kids often love seeing the shiny reflection on the reverse side!

Step 4: Assemble the Face

Now for the personality!

  1. The Mouth: Glue the mouth shape near the bottom center of the face.
  2. The Tongue: Glue one end of the red tongue inside the mouth area. You can curl the felt or paper slightly to make it look like it’s reaching for a fly.
  3. The Eyes: Glue your large googly eyes near the top of the circle. If you don’t have googly eyes, you can cut circles out of white and black paper.

Step 5: Attach the Limbs

Flip your frog over (so you are looking at the back).

  1. Glue the two large hind legs at the bottom sides, angling them outward so it looks like the frog is ready to jump.
  2. Glue the smaller webbed feet at the bottom center or slightly to the sides, depending on the look you want.

Let the glue dry completely. Once dry, flip it back over, and say hello to your new amphibious friend!

Extending the Learning: Rainforest and Pond Themes

This craft works beautifully as the centerpiece for a broader lesson plan. Here is how you can expand the activity for a full morning of fun:

1. The “F” Sound Hunt

After making the frog, go on a scavenger hunt around the house or classroom for other things that start with F.

  • Can you find a Fan?
  • Can you find a Flower?
  • Can you find a Fork? Gather the items and place them next to the Frog craft.

2. Sensory Pond Bin

Create a sensory bin to simulate the frog’s home. Fill a plastic tub with:

  • Blue water beads or dyed blue rice (for water).
  • Lily pads cut from green foam.
  • Smooth stones and rocks.
  • Plastic flies or bugs. Let the kids play with their new CD Frog (if made of plastic/foam) or plastic toy frogs in this environment.

3. The Lifecycle Lesson

Pair this craft with a printable diagram of the frog lifecycle. Discuss how the frog changes shape. You can even use playdough to model eggs and tadpoles to accompany the big frog craft.

Tips for Working with Different Materials

If using Felt: Felt is fantastic because it lasts a long time. However, regular school glue often soaks right through felt and doesn’t stick well. Tacky Glue or a Low-Temp Hot Glue Gun are your best friends here.

If using Construction Paper: Paper is easier for children to cut themselves, making it better for practicing scissor skills. However, it is more fragile. If you want the frog to last, consider laminating the paper pieces before gluing them to the CD.

If using Craft Foam: Foam is the “best of both worlds.” It is easy to cut like paper but durable like felt. It also handles water/glue well. Foam frogs are great for decorating bulletin boards because they pop out in 3D!

Conclusion

The F for Frog Craft is more than just a cute art project. It is a vehicle for learning about biology, phonics, and sustainability. By taking a piece of “trash” like an old CD and transforming it into a character, you teach children that creativity knows no bounds.

Whether you are a parent looking to entertain a toddler who loves to jump, or a teacher planning a rainforest unit, this craft fits the bill perfectly. It is low-cost, high-engagement, and results in an adorable keepsake.

So, grab your green felt, plug in that glue gun, and get ready to hop into a world of creativity. Happy crafting!

Leave a Reply

Your email address will not be published. Required fields are marked *