If you are looking for a vibrant, engaging, and surprisingly simple art project to tackle with your children this weekend, you have come to the right place. You will absolutely love this gorgeous Paper Circle Heliconia craft, and you will be thrilled by how easy it is to make using nothing but basic supplies like colored craft paper, scissors, and glue.
In the world of paper crafting, sometimes the most stunning results come from the simplest shapes. By using basic circles, we can recreate the exotic and dramatic look of the Heliconia flower. This project is perfect for preschoolers learning their shapes, elementary students studying botany, or just anyone who wants to add a splash of tropical color to their home.
In this guide, we will explore the fascinating history of this unique flower, discuss the benefits of paper crafting for child development, and provide a detailed, step-by-step tutorial on how to make your own masterpiece.
What is a Heliconia? (And Why Does It Look So Cool?)
Before we dive into the glue and scissors, let’s take a moment to appreciate the subject of our art. You have probably heard of a flower called the ‘Bird-of-Paradise’, known for its bright orange and blue spikes. But have you heard of the ‘False Bird-of-Paradise’? How about a flower named ‘Lobster-Claws’ or ‘Toucan Beak’?
No? Well, believe it or not, these are all different nicknames for the beautiful Heliconia flower!
The Heliconia is famous for its bright, bold colors—usually fiery reds, oranges, yellows, and greens—and its unusual geometric shape. Because the flower looks so distinct, it makes for a perfect paper craft subject. You don’t need to draw complex petals; you just need to understand the shape.
Fun Facts About Heliconias for Kids
Turn this craft into a science lesson by sharing these fascinating facts while you work:
- A Mythological Name: The word ‘Heliconia’ comes from the Greek word Helikṓnios. This is derived from Mount Helicon in central Greece. In Greek mythology, Mount Helicon was the home of the Muses, who were the goddesses of the arts and sciences. So, this flower is literally named after a place of artistic inspiration!
- A Big Family: The term ‘Heliconia’ actually refers to a whole genus of plants. This family includes as many as 194 different species of flowers. They come in all shapes and sizes, but most share that iconic “claw” look.
- Banana Cousins: Heliconias have a lot in common with the bananas sitting in your fruit bowl. They used to belong to the same plant family (Musaceae), and they share a similar growth pattern with large, paddle-shaped leaves.
- The Hummingbird Connection: Because of their long, tube-like shape, bees and butterflies struggle to pollinate Heliconias. Instead, they rely on hummingbirds! The shape of the flower perfectly matches the curve of a hummingbird’s beak, making them the main pollinators for these tropical beauties.
- Endangered Beauty: Sadly, most of these species are currently listed as ‘vulnerable’ in the IUCN Red List of Threatened Species due to habitat loss in tropical forests. Making paper versions is a great way to appreciate their beauty without harming the environment.
Why Paper Crafts are Vital for Child Development
While this Heliconia craft results in a beautiful piece of decor, the process of making it is just as valuable as the result. Simple paper crafts like this one are powerhouses for developmental skills.
1. Fine Motor Skills
Cutting circles requires coordination. When a child holds scissors in one hand and rotates the paper with the other, they are practicing bilateral coordination. This is the same skill needed for tying shoes, typing, and washing dishes.
2. Geometry in Action
This craft deconstructs a complex flower into simple geometric shapes: circles, rectangles, and triangles (created by folding). Seeing how 2D circles can be folded to create a 3D effect helps children understand spatial awareness and geometry.
3. Focus and Patience
Gluing the “claws” of the Heliconia in a specific pattern (left, right, left, right) requires planning and focus. It teaches children to follow a sequence to achieve a desired outcome, a skill known as executive function.
Supplies You Will Need
One of the best things about this project is that it requires zero fancy equipment. You likely have everything you need in your desk drawer right now.
- Colored Craft Paper: You will need at least three colors.
- Color A (e.g., Red): For the main part of the flower bracts.
- Color B (e.g., Yellow or Orange): For the inner accent color.
- Color C (Green): For the stem and leaves.
- Scissors: Child-safe scissors for the little ones, or precision scissors for adults.
- Glue Stick or White Glue: A glue stick is usually less messy for paper crafts and dries faster.
- A Pencil: To sketch your circles before cutting.
- A Circular Object: To trace (like a cup, a lid, or a roll of tape) if you don’t have a compass.
Step-by-Step Instructions: How to Make the Paper Circle Heliconia
Follow these instructions to build your tropical bloom.
Step 1: Prepare Your Circles
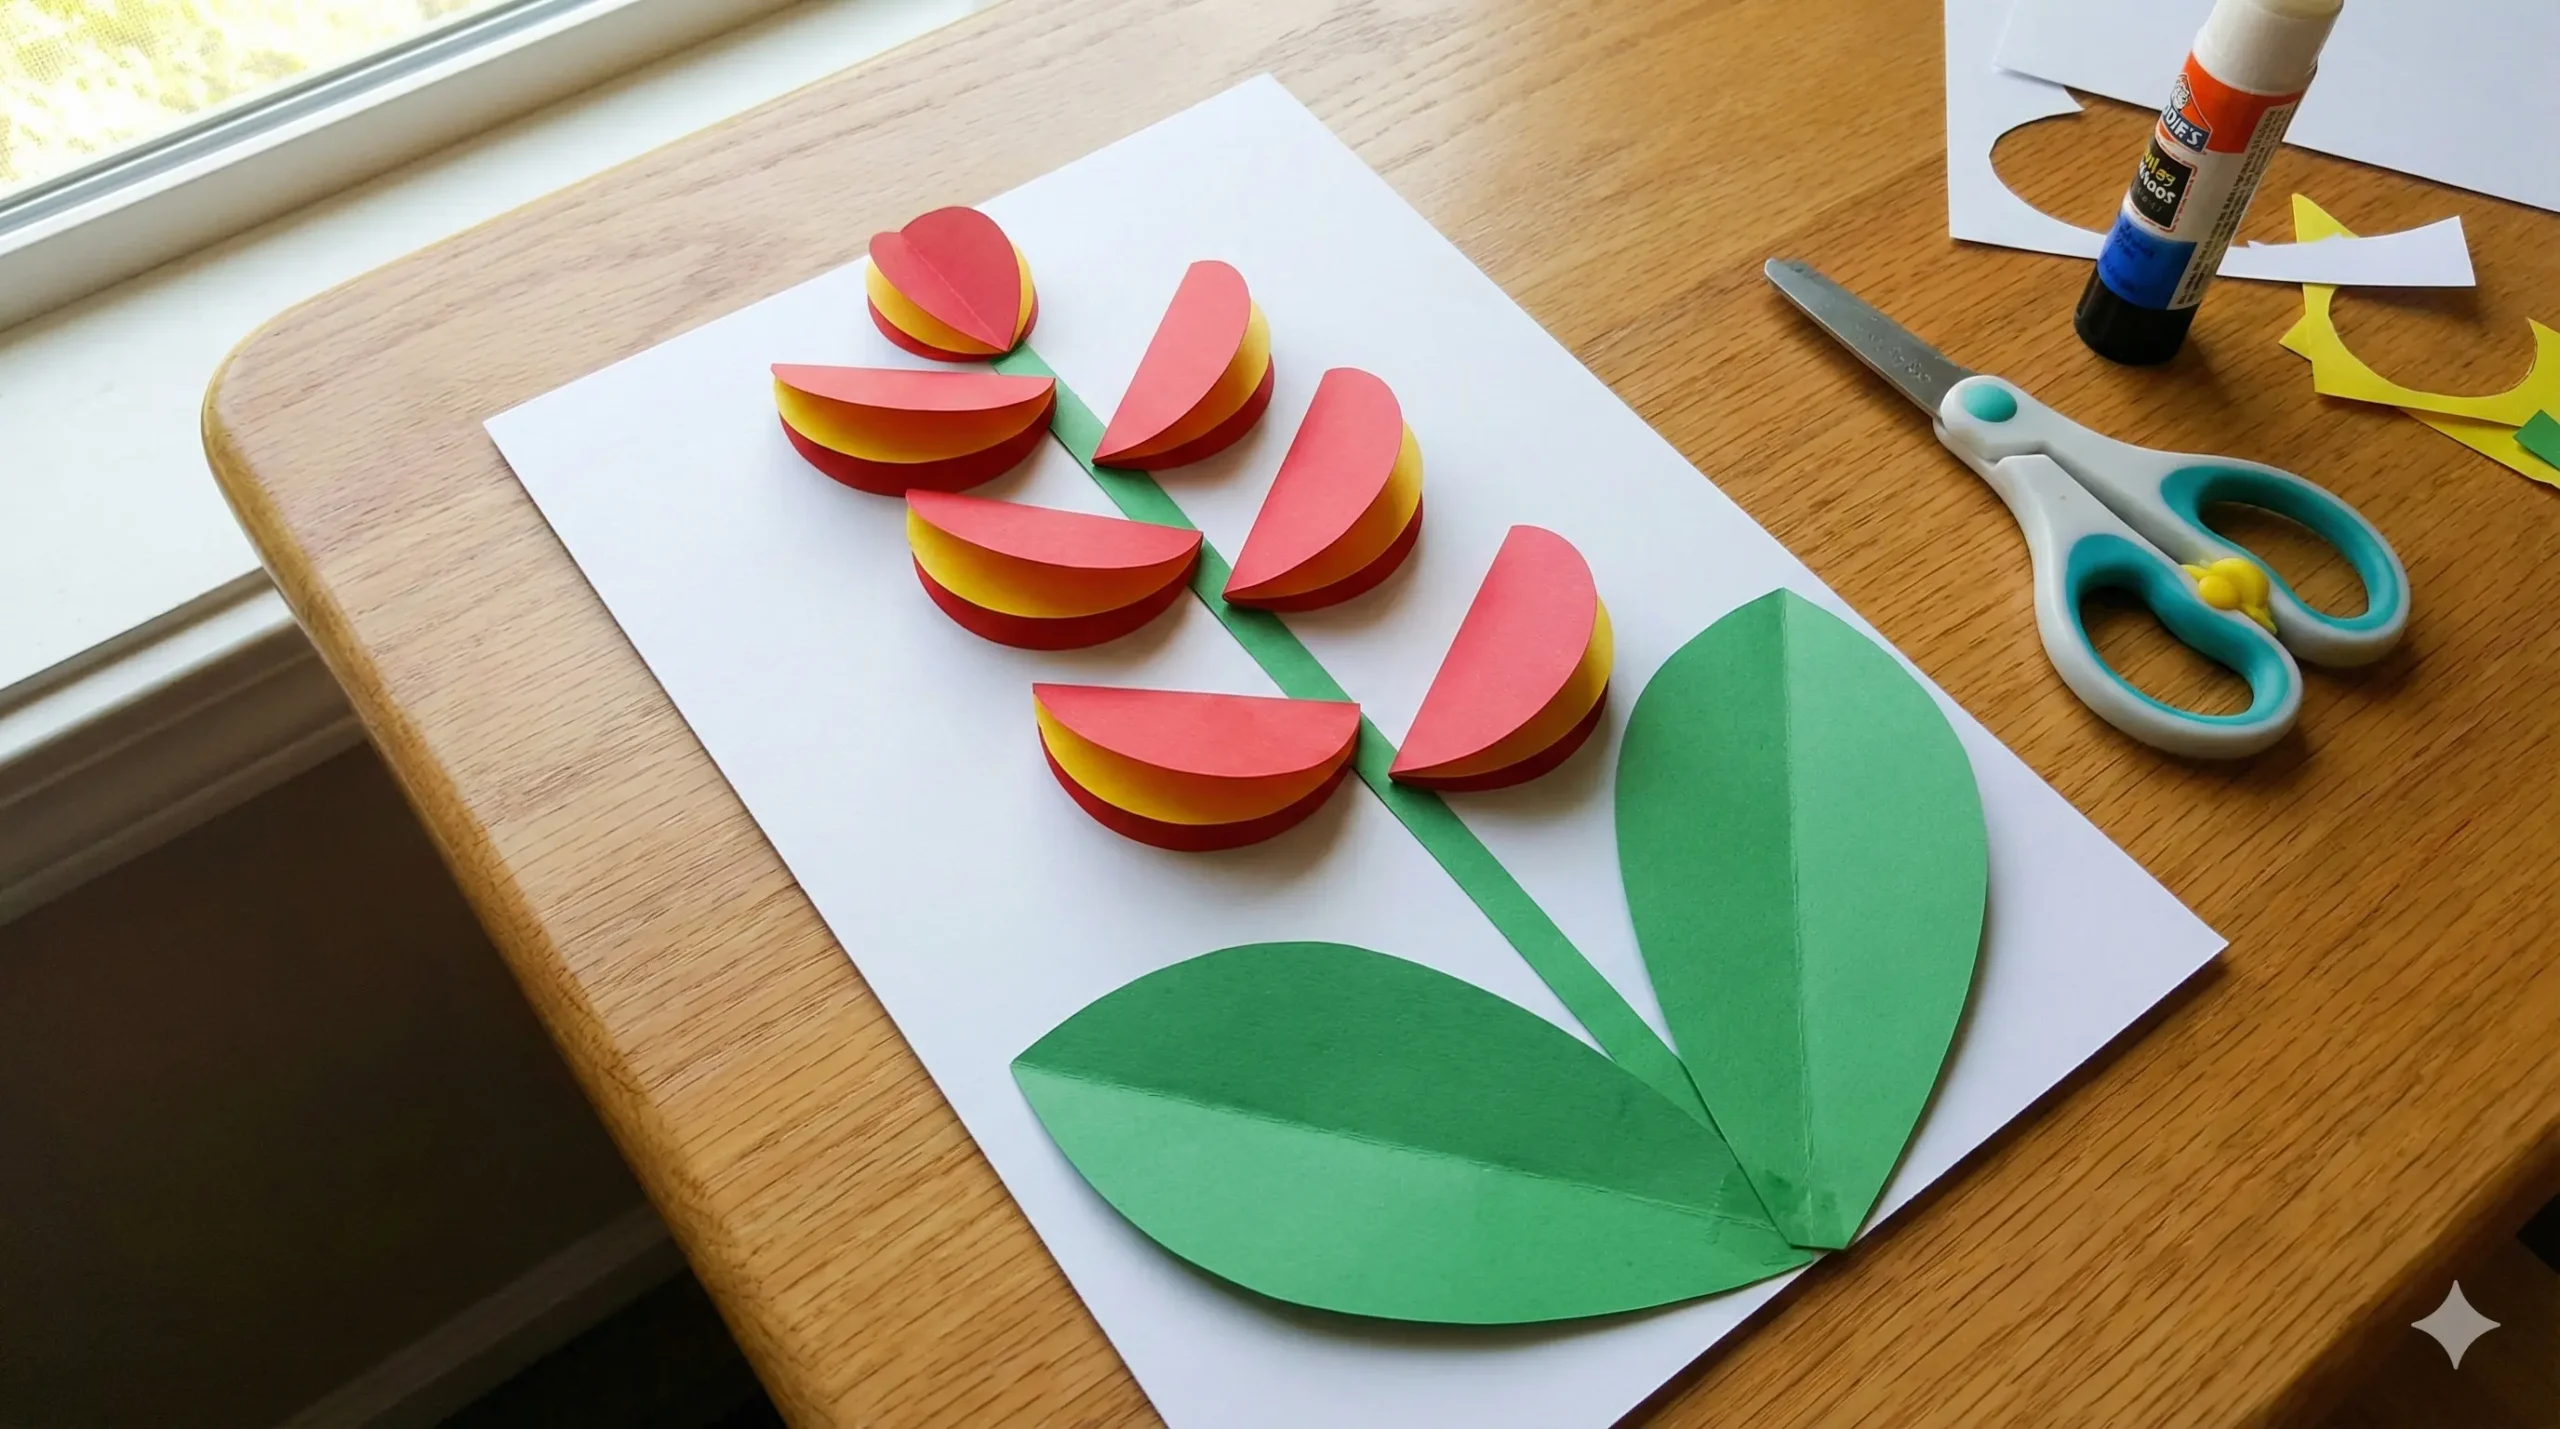
The Heliconia flower is made up of a series of “bracts” (the colorful claw-like parts). For this craft, we will use 7 bracts, but you can make yours longer or shorter.
- Take your Red paper (or whatever your primary color is). Trace and cut out 7 large circles. A diameter of about 3 to 4 inches works well.
- Take your Yellow paper (the accent color). Trace and cut out 7 smaller circles. These should be about an inch smaller in diameter than your red circles.
Tip: To save time, you can fold the paper and cut multiple circles at once!
Step 2: Create the Stem
Every flower needs a strong stem.
- Take your Green craft paper.
- Cut a long, thin rectangular strip. It should be about 1 inch wide and as long as your paper allows (standard A4 or Letter size length is fine).
- Optional: To make the stem sturdier, you can glue this strip onto a piece of cardstock or even a wooden skewer, but plain paper works fine if you are pasting it onto a background later.
3. Fold and Assemble the Bracts
Now, let’s turn those flat circles into the famous “lobster claws.”
- Take one Red circle and one Yellow circle.
- Glue the yellow circle directly into the center of the red circle.
- Once the glue is tacky or dry, fold the circle in half. You should now have a semi-circle that looks like a taco, with the yellow showing on the inside and the red on the outside.
- Repeat this for all 7 sets of circles. These are now your Heliconia bracts!
4. Arranging the Flower
This is the most important step to get that authentic “zigzag” look.
- Lay your green stem vertically on your workspace.
- Take your first folded bract. Apply glue to one side of the red outer layer (near the fold).
- Place this first bract at the very top of the green stem. It should be pointing upwards and slightly to the left.
- Take the second bract. Apply glue near the fold. Place this one slightly below the first one, but pointing to the right.
- Take the third bract. Place it below the second, pointing back to the left.
- Continue this alternating pattern (Left, Right, Left, Right) all the way down the stem. Ensure each new bract slightly overlaps the bottom of the one above it. This connects them visually and mimics the real plant structure.
5. Add the Leaves
Heliconia leaves are large, long, and paddle-shaped.
- Using your green paper again, cut out two large, elongated oval shapes. Point the ends to make them look like leaves.
- Fold the leaves in half lengthwise to create a central vein and add some 3D texture.
- Glue the leaves to the bottom of the stem.
6. Final Touches
Your craft is almost done!
- If you want to mount this, glue the entire assembly onto a sheet of white or blue cardstock.
- You can use a marker to draw a line down the stem to connect the bracts more clearly if they look like they are floating.
Creative Variations to Try
Once you have mastered the basic technique, why not mix it up?
- The Rainbow Heliconia: Instead of just red and yellow, use a different color for every single bract to make a rainbow flower.
- The Texture Challenge: Instead of plain craft paper, try using tissue paper for the inner circles. It adds a crinkled texture that looks very organic.
- Greeting Cards: Make miniature versions of this craft (using 1-inch circles) and glue them onto folded cardstock. They make stunning, handmade Mother’s Day cards or birthday greetings.
- Wall Art: Make 5 or 6 of these flowers in different heights. Arrange them together on a large canvas or poster board to create a full tropical garden scene.
Conclusion
And there you have it! With just a few circles and a bit of glue, you have transformed flat paper into a vibrant, 3D Paper Circle Heliconia.
This craft is a wonderful reminder that art doesn’t have to be complicated to be beautiful. It allows children to practice their cutting skills, learn about exotic nature, and create something they can be proud of. Whether you display it on the fridge, frame it for a bedroom, or gift it to a grandparent, this “false bird-of-paradise” is sure to bring real smiles.