Spring is a magical time of year. It is when the frost melts away, the sun begins to shine a little brighter, and the world bursts into color. Among the very first signs of this joyous season are the cheerful, bright yellow heads of daffodils bobbing in the breeze.
While this bloom is a natural phenomenon of the season, something special happens in March and August regarding this specific flower. It is Daffodil Day, a global movement dedicated to supporting cancer patients, survivors, and funding life-saving research.
Whether you are a teacher looking for a meaningful classroom activity, a parent wanting to teach your children about empathy and nature, or simply a craft enthusiast looking to welcome Spring, this Delightful Daffodil Papercraft for Kids is the perfect project.
In this guide, we will explore the significance of Daffodil Day, the educational benefits of this craft, and provide a detailed, step-by-step tutorial on how to make your own paper garden.
What is Daffodil Day? Understanding the Symbolism
Before we dive into the glue and scissors, it is wonderful to share the “why” behind this craft with children. The daffodil is one of the first flowers of spring, symbolizing rebirth, new beginnings, and hope. This is why cancer organizations around the world have adopted it as a symbol of hope for a future without cancer.
Unlike other international holidays, Daffodil Day doesn’t fall on a single universal date. Instead, it follows the seasons of the specific region to ensure fresh flowers are available.
When is Daffodil Day Celebrated?
- United States: Typically held in March (often around the 22nd).
- Ireland: Observed on the 28th of March.
- Canada: Celebrates with the Daffodil Ball, often on April 26th.
- Australia: Celebrated later in the year, usually on the 22nd of August.
- New Zealand: Scheduled for late winter, around August 29th.
Regardless of when your country observes it, the theme remains the same: spreading awareness, raising funds, and offering unwavering support to families affected by cancer. Making a paper daffodil is a small but beautiful way to participate in this global circle of hope.
Why Paper Crafts are Essential for Child Development
In a digital age, returning to basic paper crafts offers immense benefits for children. This daffodil project is more than just a time-filler; it is a developmental tool.
- Fine Motor Skills: The act of cutting along curved lines (for the petals) and straight lines (for the stem) strengthens the small muscles in the hand, which are crucial for handwriting.
- Following Instructions: Step-by-step crafting teaches children patience and the ability to sequence events (First we cut, then we glue).
- Emotional Intelligence: Discussing the meaning of the flower helps build empathy. You can explain that we are making these bright flowers to “cheer people up,” introducing the concept of charity and kindness.
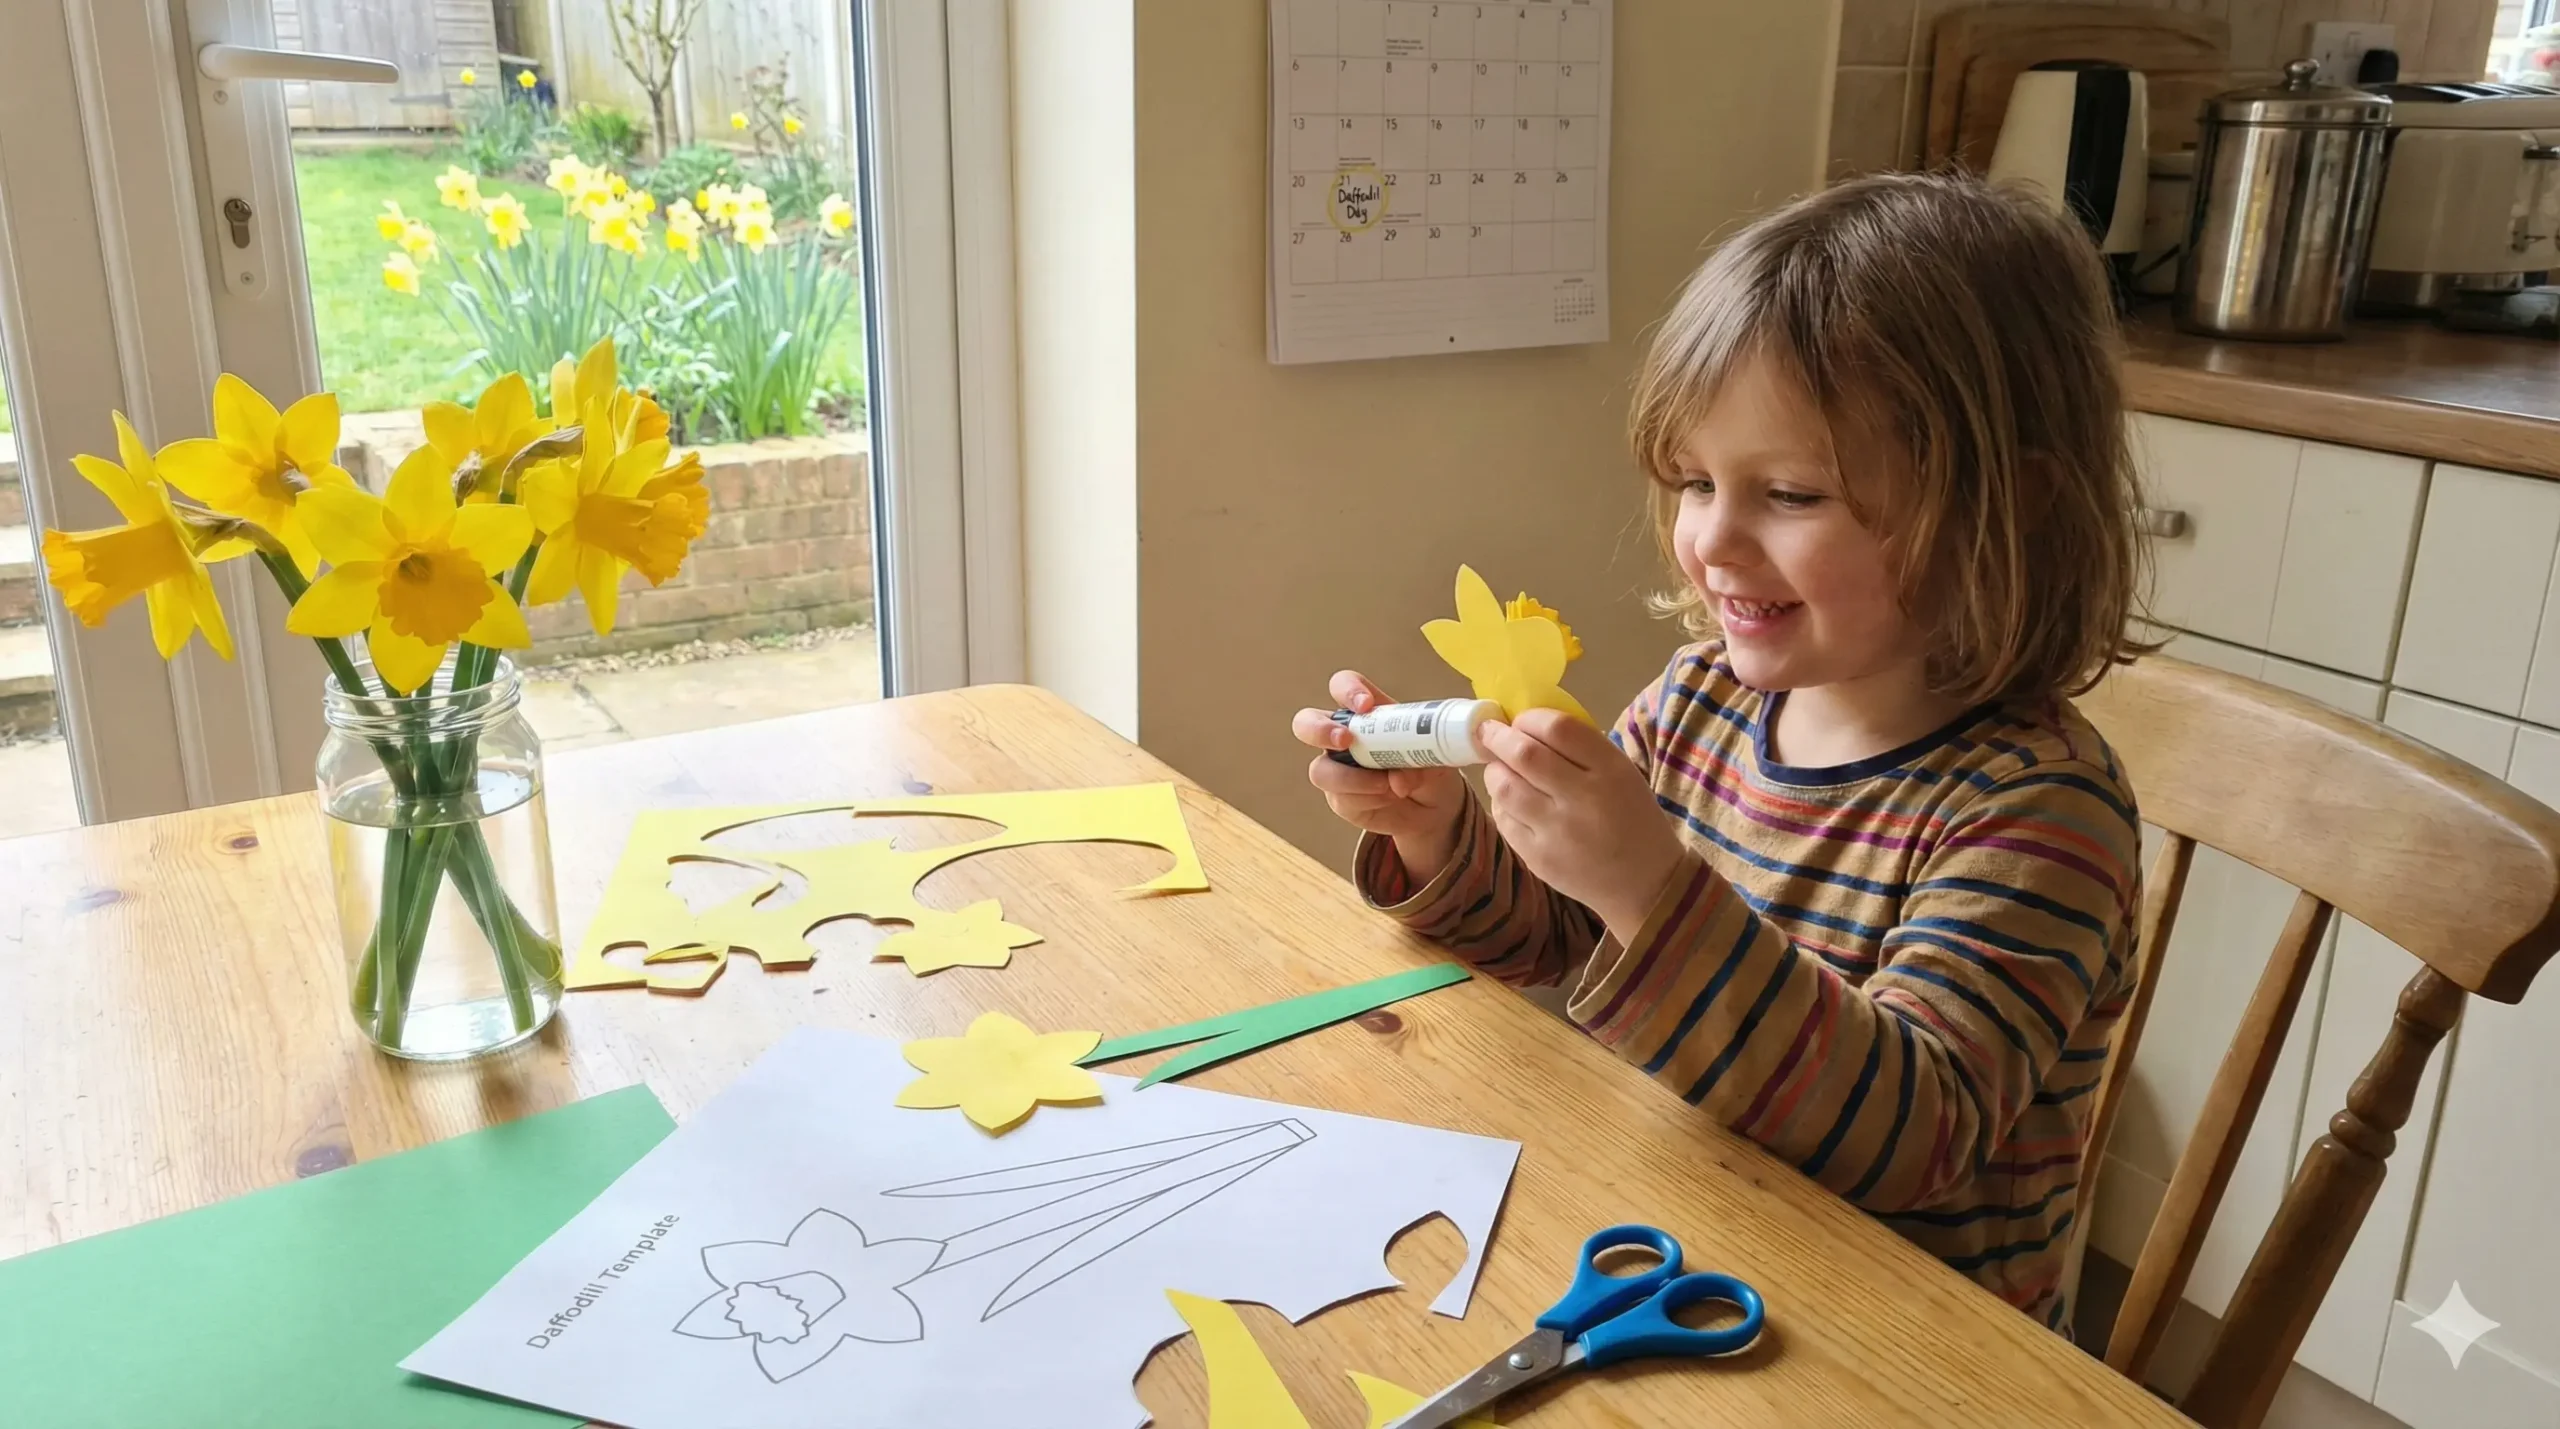
The Delightful Daffodil Papercraft: Step-by-Step Tutorial
This craft is designed to be simple enough for preschoolers (with help) but leaves enough room for creativity that older elementary kids will enjoy it too. It requires minimal supplies that you likely already have in your home or classroom.
Supplies Required:
- Colored Craft Papers:
- Yellow: For the petals and the trumpet (center).
- Orange: (Optional) for a contrasting center cup.
- Green: For the stem and long leaves.
- A Pencil: For tracing templates or drawing shapes.
- A Pair of Scissors: Safety scissors for younger kids.
- Craft Glue: A glue stick works best for paper, but white school glue is also fine.
- The Template: You can draw freehand shapes or print a standard flower template found online.
Instructions:
Step 1: Prepare Your Shapes
If you are using a printable template, download and print it out. If you are doing this freehand (which is great for creativity!), here is what you need to draw and cut:
- The Petals: Draw a flower shape with six petals on the yellow paper. It should look like a star with rounded points.
- The Center (Trumpet): Cut a small circle or a strip of yellow/orange paper.
- The Stem: Cut a long, straight strip of green paper (about 1 inch wide).
- The Leaves: Daffodil leaves are long and spear-shaped. Cut two long, thin pointed oval shapes from the green paper.
Step 2: Create the Flower Base
Take your six-petaled yellow flower shape. If you want the flower to look more 3D and realistic, use the edge of your scissors (adult supervision required) or a pencil to gently curl the edges of the petals inward. This gives the flower volume and makes it look like it is blooming.
Step 3: Make the Famous “Trumpet” Center
The defining feature of a daffodil is its central cup. There are two ways to do this depending on the child’s skill level:
- The Easy Way (Flat): simply cut a smaller circle out of orange or dark yellow paper and glue it to the center of your petals.
- The 3D Way (Advanced): Take a small strip of yellow or orange paper. Cut tiny slits along one long edge (fringing). Roll the strip into a cylinder and glue the ends together. Glue the non-fringed side down into the center of the petals. This creates a pop-up cup that looks just like a real daffodil!
Step 4: Prepare the Stem
Take your long green strip. To make it sturdy, you can fold it in half lengthwise. If you want a 3D stem, you can roll the paper around a pencil, glue the edge, and slide the pencil out. This creates a paper tube that can support the flower head.
Step 5: Assemble the Flower
Apply a generous amount of glue to the top of your green stem. Press the back of the yellow flower head firmly onto the stem. Hold it there for 10-20 seconds to ensure the glue sets.
Step 6: Add the Leaves
Daffodils have distinctive long leaves. Apply glue to the bottom inch of your green leaf cutouts. Attach them to the lower part of the stem, slightly angled outwards. You can curl the tips of the leaves with a pencil for an extra realistic touch.
Creative Variations to Try
Once you have mastered the basic daffodil, try these fun variations to keep the creativity flowing:
1. The “Cupcake Liner” Daffodil: Instead of cutting paper for the center trumpet, use a mini yellow or orange cupcake liner! Glue the bottom of the liner to the center of your paper petals. It provides instant 3D texture and is very easy for toddlers to handle.
2. A Bouquet of Hope: Don’t just stop at one! Make a whole bunch of these daffodils. You can tie them together with a ribbon to create a bouquet. These make wonderful gifts for grandparents, neighbors, or even to drop off at a local nursing home to brighten the residents’ day.
3. Mixed Media Art: Glue your finished paper daffodil onto a piece of light blue cardstock (representing the sky). Have the kids use crayons or markers to draw grass, clouds, and a sun in the background. This turns the craft into a frameable piece of art.
Fun Facts About Daffodils for Kids
While you are crafting, keep the conversation going with these interesting botanical facts:
- Family Name: The scientific name for the daffodil is Narcissus.
- Pet Safety: Squirrels won’t eat daffodil bulbs because they taste bad and are poisonous to them. This is why gardeners love planting them—they are pest-resistant! Note: Always remind kids never to eat plants or flowers.
- The Waiting Game: Daffodils grow from bulbs. You plant them in the autumn before the snow falls, and they sleep underground all winter long, waking up just in time for spring.
- Official Flower: The daffodil is the national flower of Wales.
Conclusion
Creating this Daffodil Papercraft is about more than just cutting and pasting. It is a celebration of the changing seasons and a powerful lesson in community and hope. Whether you are observing Daffodil Day in March, April, or August, the sentiment remains the same.
By taking the time to sit down with your children and create something beautiful, you are creating memories and instilling values of empathy. Plus, you end up with a house full of vibrant yellow flowers that never wilt!
So, grab your yellow paper and your glue, and let’s make this season a little brighter, one paper flower at a time.
Frequently Asked Questions (FAQ)
Q: Can I use construction paper instead of craft paper? A: Absolutely! Construction paper works perfectly for this craft. In fact, construction paper is often a bit sturdier than standard craft paper, which helps the stem hold the weight of the flower head better.
Q: Is this craft suitable for toddlers? A: Yes, with supervision. For toddlers, we recommend pre-cutting the shapes for them. Let them focus on the assembly (gluing the parts together) and perhaps coloring the paper with crayons before assembly.
Q: How can I display these paper daffodils? A: These look lovely taped to a window to catch the light. You can also place them in a dry vase (no water!) on the dining table, or glue them to the front of a folded piece of cardstock to create a handmade greeting card