There are certain elements of nature that immediately draw people together. A flowing river, a starry sky, or perhaps our absolute favorite—a warm, crackling bonfire! While we often associate bonfires with camping trips and marshmallows, in India, the bonfire holds a sacred and celebratory significance, especially during the harvest festival of Lohri.
Lohri is a vibrant festival primarily celebrated in Northern India—including Punjab, Haryana, Himachal Pradesh, and Delhi. It marks the passing of the winter solstice and welcomes the longer days as the sun begins its journey into the Northern Hemisphere. Usually celebrated on the 13th of January, a day before Makar Sankranti, it is a festival of fire, dance, and togetherness.
Traditionally, communities gather around a massive bonfire at sunset, tossing in sesame seeds, jaggery, and popcorn as offerings to the fire god, Agni, while singing folk songs and dancing to the beat of the Dhol.
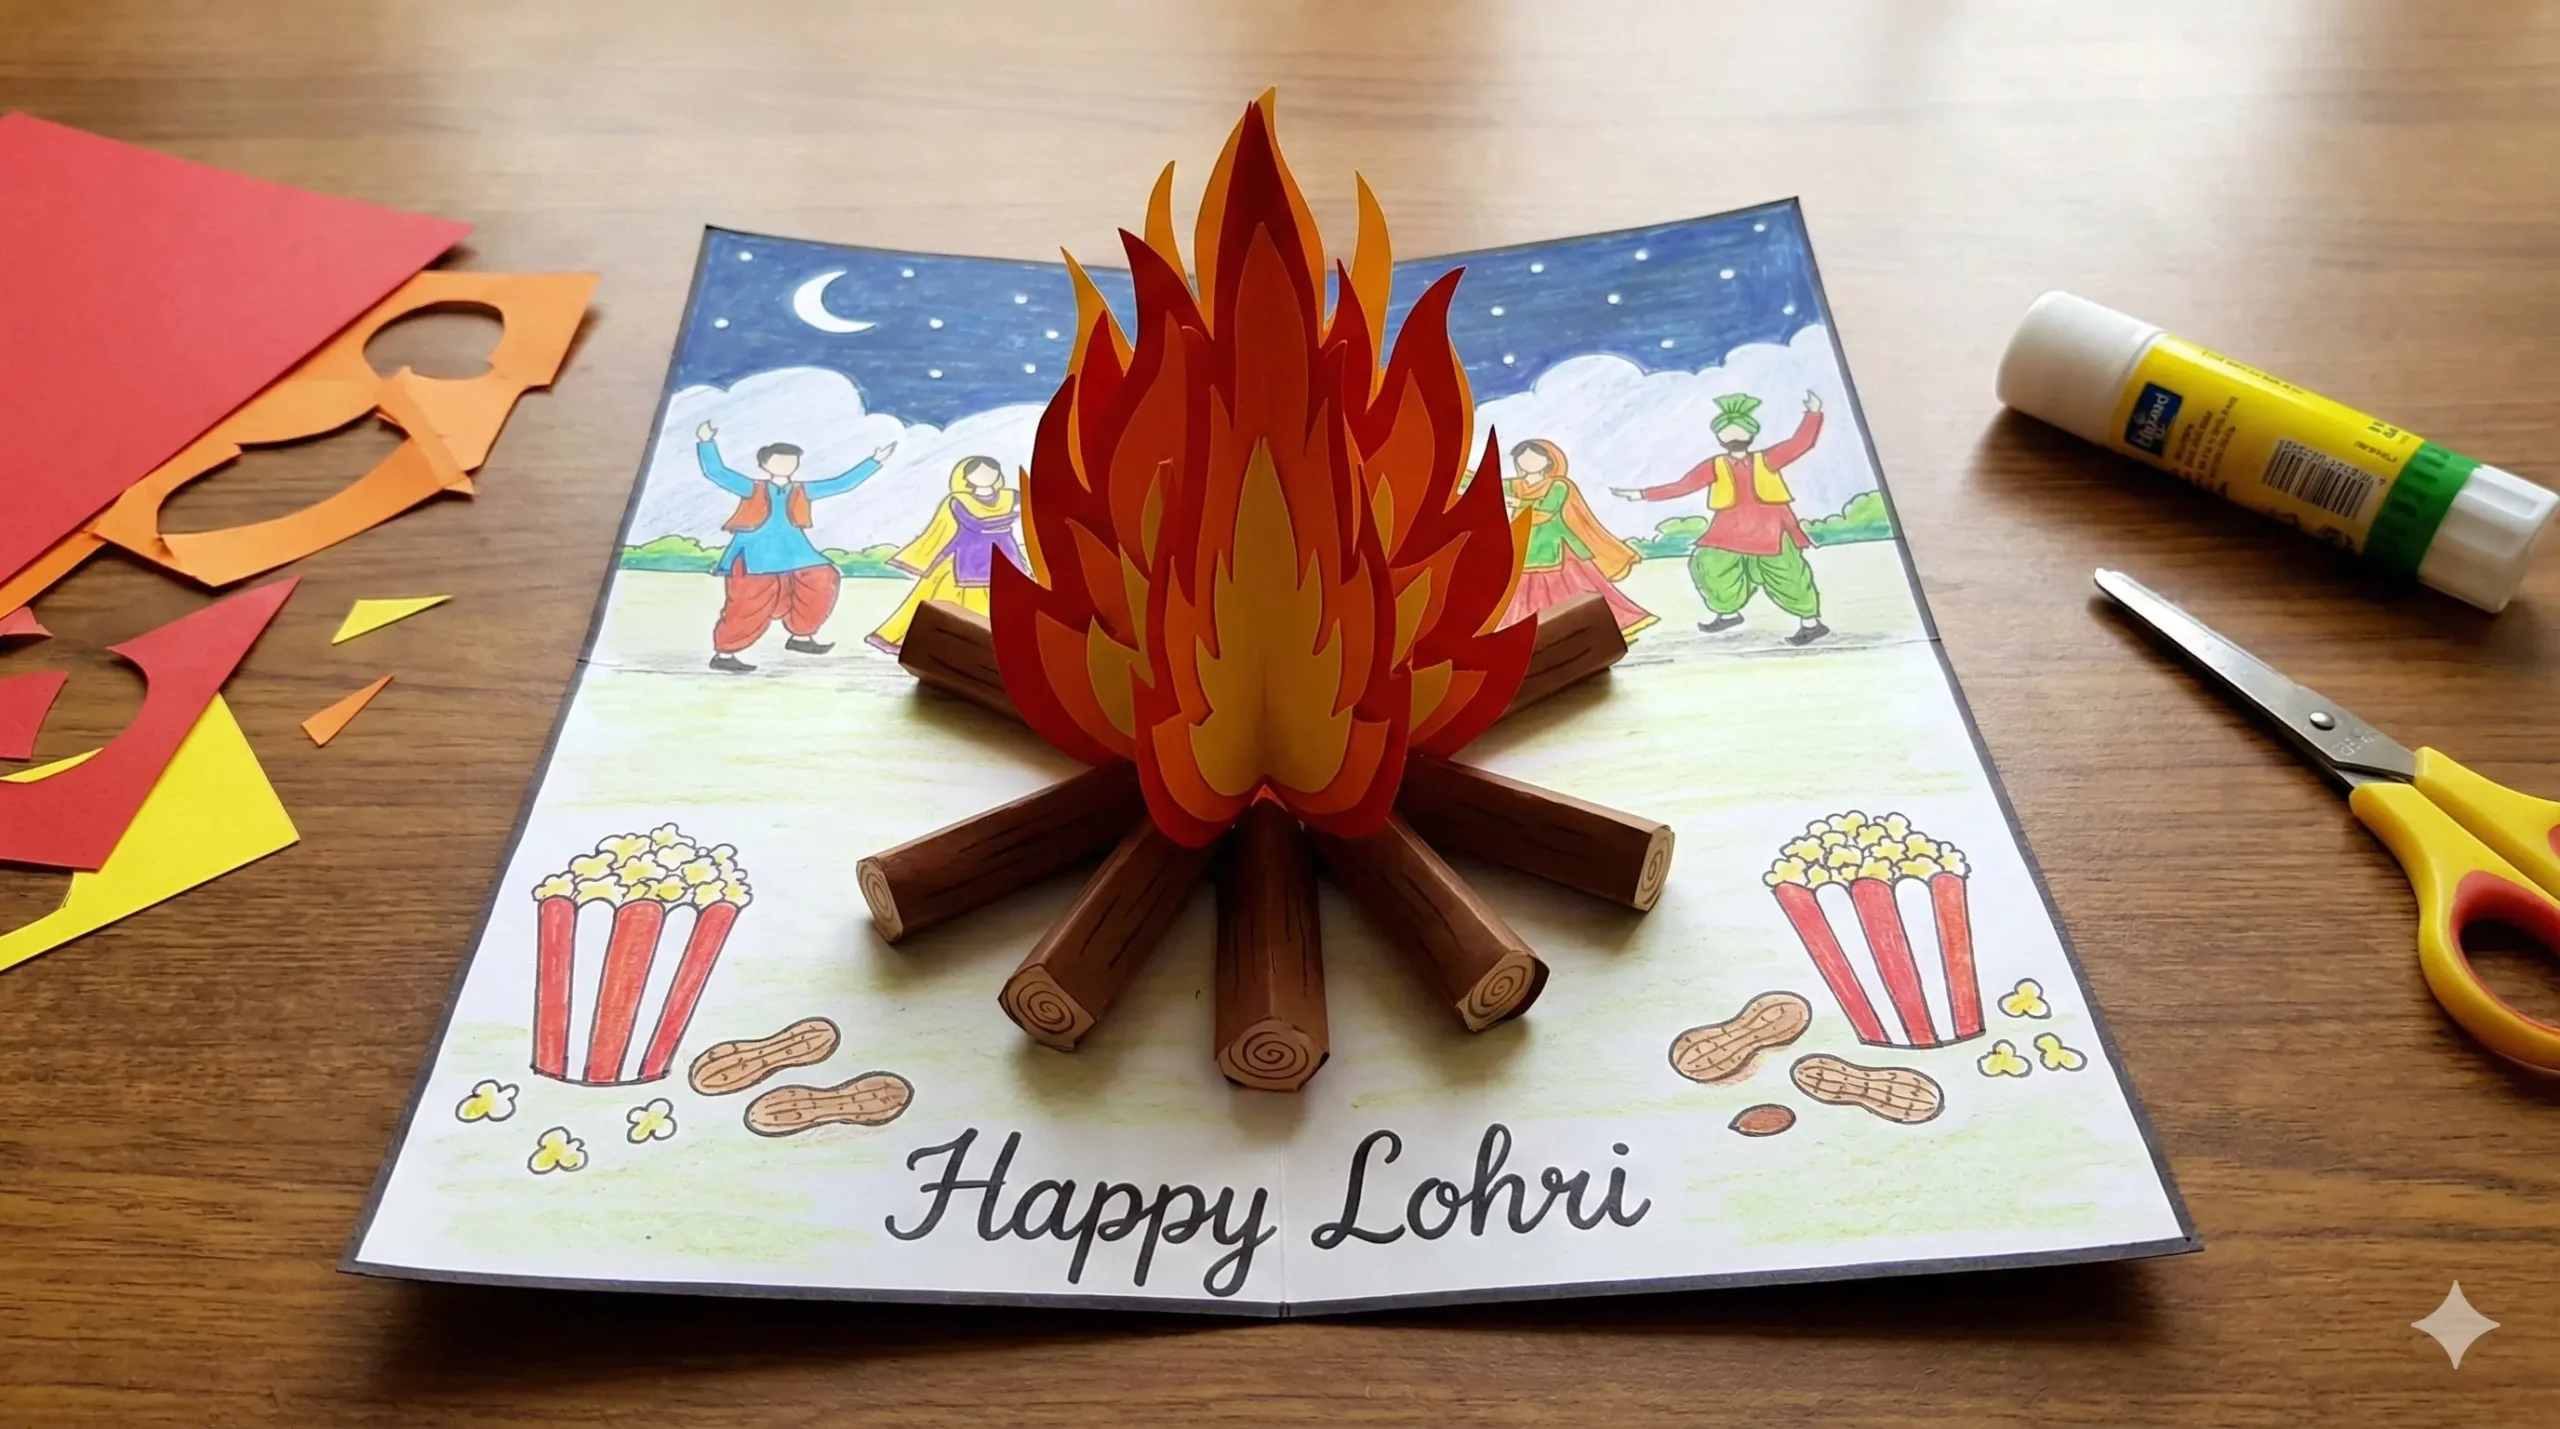
This year, why not bring that warmth into your home (safely!) with a craft? We are going to create a 3D Popup Bonfire Card. It is the perfect way for kids to learn about Indian culture while practicing their engineering and art skills.
Understanding the Tradition: Why a Bonfire?
Before we dive into the glue and scissors, it is wonderful to share the “Why” with your children. This adds educational value to the crafting time.
Lohri is essentially a harvest festival. The bonfire represents the energy of the sun returning to the earth. It is also a way to say goodbye to the chilly winter days. In folklore, the fire is also associated with the legend of Dulla Bhatti, a legendary hero of Punjab who led a rebellion against the Mughal empire and rescued girls from being sold into slavery. Many Lohri songs sung around the fire pay tribute to him.
+1
By making this card, you aren’t just cutting paper; you are keeping a centuries-old story alive.
Supplies Required
To create this fiery masterpiece, you will need basic stationery supplies. The beauty of this project is that it uses scraps you likely already have.
- Cardstock or Thick Craft Paper: Cream or white is best for the base so the colors pop.
- Colored Craft Paper: You specifically need Red, Orange, and Yellow (the colors of fire). You will also need Brown for the logs.
- Coloring Materials: Colored pencils, markers, or crayons.
- A Lohri-themed Coloring Page: You can search online for “Lohri coloring pages” featuring dancers or drums, or have your child draw a scene.
- Scissors: Child-safe scissors are recommended.
- Glue Stick: Liquid glue can be too wet for paper crafts; a glue stick is cleaner.
- Pencil and Eraser.
Step-by-Step Instructions: How to Make the 3D Popup Card
This project involves two main components: the background scene and the 3D pop-up mechanism for the fire.
Phase 1: Preparing the Base
- Create the Card Body: Take a sheet of thick cardstock (A4 size works well). Fold it in half horizontally to create a standard greeting card shape. Press the fold firmly to create a sharp crease.
- Prepare the Background: If you have a printed coloring sheet featuring Bhangra dancers, dhol players, or harvest scenes, color it in now. Use vibrant colors—Lohri is a colorful festival! Bright turbans, colorful dupattas, and green fields should fill the page.
- Tip: If you don’t have a printable, encourage your child to draw a night scene. Use dark blue for the sky and draw stars at the top. The fire will go at the bottom.
- Mount the Scene: Cut your colored scene slightly smaller than the front of your folded cardstock. Glue it onto the front cover. Alternatively, you can put the scene inside the card if you want the pop-up to be the surprise inside! For this tutorial, we will create the pop-up on the inside fold.
Phase 2: Constructing the 3D Bonfire
This is the engineering part! We are going to use a simple technique to make the flames stand up when the card opens.
- Cut the Flames: You need to create the layers of the fire.
- Take your Red paper and cut out a large flame shape (teardrop shape with a pointy top).
- Take your Orange paper and cut a flame shape slightly smaller than the red one.
- Take your Yellow paper and cut a flame shape smaller than the orange one.
- Create the 3D Effect (The Fold Method):
- To make the fire 3D, we need multiple pieces. Cut out three identical sets of the Red/Orange/Yellow flame stacks.
- Glue the Yellow onto the Orange, and the Orange onto the Red for all three sets. You now have three flat fire shapes.
- Fold each fire shape in half vertically (from the tip to the bottom).
- The Assembly (The Honeycomb Technique):
- Take Flame A and apply glue to the right half of its backside.
- Take Flame B and press its left half against the glue on Flame A.
- Now apply glue to the right half of Flame B.
- Press the left half of Flame C against it.
- Result: You should now have a fan-like structure of flames that can open and close.
Phase 3: Putting It All Together
- Position the Fire: Open your cardstock base. We will place the fire right on the center crease line.
- Glue to Card: Apply glue to the remaining exposed back sides of your flame structure (The left side of Flame A and the right side of Flame C).
- The Pop-Up Moment: Carefully align the center of the flame fan with the center crease of the card. Press the card closed. Rub your hand over it to secure the glue.
- Test It: Open the card. The fire should “pop” up and stand vertically in the center!
Phase 4: Adding the Logs and Details
A fire needs fuel!
- Add Logs: Cut small rectangular strips from brown paper. Crinkle them up a bit to give them a wood texture. Glue them flat onto the card at the base of your 3D fire.
- The Offerings: Lohri isn’t complete without Rewari (sesame sweets) and popcorn. Use a white crayon or marker to draw little white dots (popcorn) and brown ovals (peanuts) around the fire or even “flying” into the flames.
- The Message: Write a warm greeting. “Happy Lohri,” “May your life shine bright like the fire,” or “Sundar Mundariye” (a line from a famous folk song) are great options.
Educational Benefits of This Craft
Crafting is fun, but it is also a developmental tool. Here is what your child gains from this activity:
- Cultural Awareness: It serves as a visual aid to explain the geography (North India) and traditions (Harvest) of a specific culture.
- Engineering Basics: Understanding how a 2D piece of paper can become a 3D object through folding and symmetry introduces basic geometry and structural concepts.
- Color Theory: Working with warm colors (Red, Orange, Yellow) helps children understand color families and gradients.
- Fine Motor Skills: Cutting complex shapes like flames and gluing small parts refines hand-eye coordination.
Celebration Ideas: How to Use Your Card
Once the card is ready, don’t just put it in a drawer!
- The Grandparents Gift: In Indian culture, elders are deeply respected. A handmade card given to grandparents is a gesture of love and respect.
- Virtual Celebration: If you are living far away from family, use the card as a prop during a video call. Open it up to “light” the bonfire for your relatives on screen!
- The Centerpiece: Make a few of these cards and place them on your dining table as a centerpiece for your Lohri dinner.
Conclusion
Lohri is a festival that reminds us that even in the coldest winter, there is warmth to be found in community and celebration. This 3D Popup Card is a small reflection of that joy. It captures the essence of the roaring fire and the spirit of the harvest.