There’s something magical about taking a handful of shapeless, colorless material and turning it into something bright, beautiful, and full of character. Crafts have the power to relax the mind while giving kids a sense of accomplishment—and clay crafts do this better than most. They combine tactile satisfaction, creativity, and patience, making them ideal for older kids, pre-teens, teens, and even adults who love hands-on projects.
While quick and easy crafts are wonderful for beginners, there are days when kids want a challenge. They want to spend a little extra time, try new techniques, and watch a project slowly come to life. For those days, this Gorgeous DIY Clay Butterfly is the perfect choice. It’s detailed yet manageable, colorful yet structured, and encourages artistic confidence.
This craft uses air-dry clay or foam clay, which is soft, smooth, and easy to manipulate. With just a few tools and some imagination, kids can turn simple shapes into an elegant butterfly with layered wings, fine details, and expressive colors. Let’s explore how to create this stunning clay butterfly step-by-step—and why it’s such a great project for growing minds.
Why Clay Crafts Are Great for Older Kids & Teens
Clay is one of the most versatile craft materials. It molds, bends, smoothens, and blends beautifully. Kids who are stepping into more advanced crafting love the creative freedom clay offers.
Here’s why a clay butterfly is the perfect weekend craft:
• Encourages patience and fine motor skills
Rolling, shaping, pressing, and detailing clay strengthens hand control and improves concentration.
• Boosts creativity
Butterflies come in endless patterns and colors. Kids can design their own wings using bold, soft, or gradient shades.
• Offers therapeutic calm
The slow, repetitive motions of shaping clay are incredibly soothing, making this craft a great stress reliever.
• Builds artistic confidence
Completing a multi-step project gives a sense of achievement that boosts self-esteem.
• Perfect for display
Once dry, the butterfly becomes a long-lasting decorative piece that kids can proudly show off.
Supplies You’ll Need
To make this gorgeous clay butterfly, you’ll need:
- Air-dry clay or foam clay in bright colors
- Clay modeling tools
- Thin wire for the antennae
- A shaping board or clean table surface
- Toothpick or detailing tool
- Markers or sharpies for final accents (optional)
Choose colors like blue, green, red, yellow, purple, or black to create vibrant wings. Kids can mix and match shades to design their own style.
How to Make the Gorgeous DIY Clay Butterfly
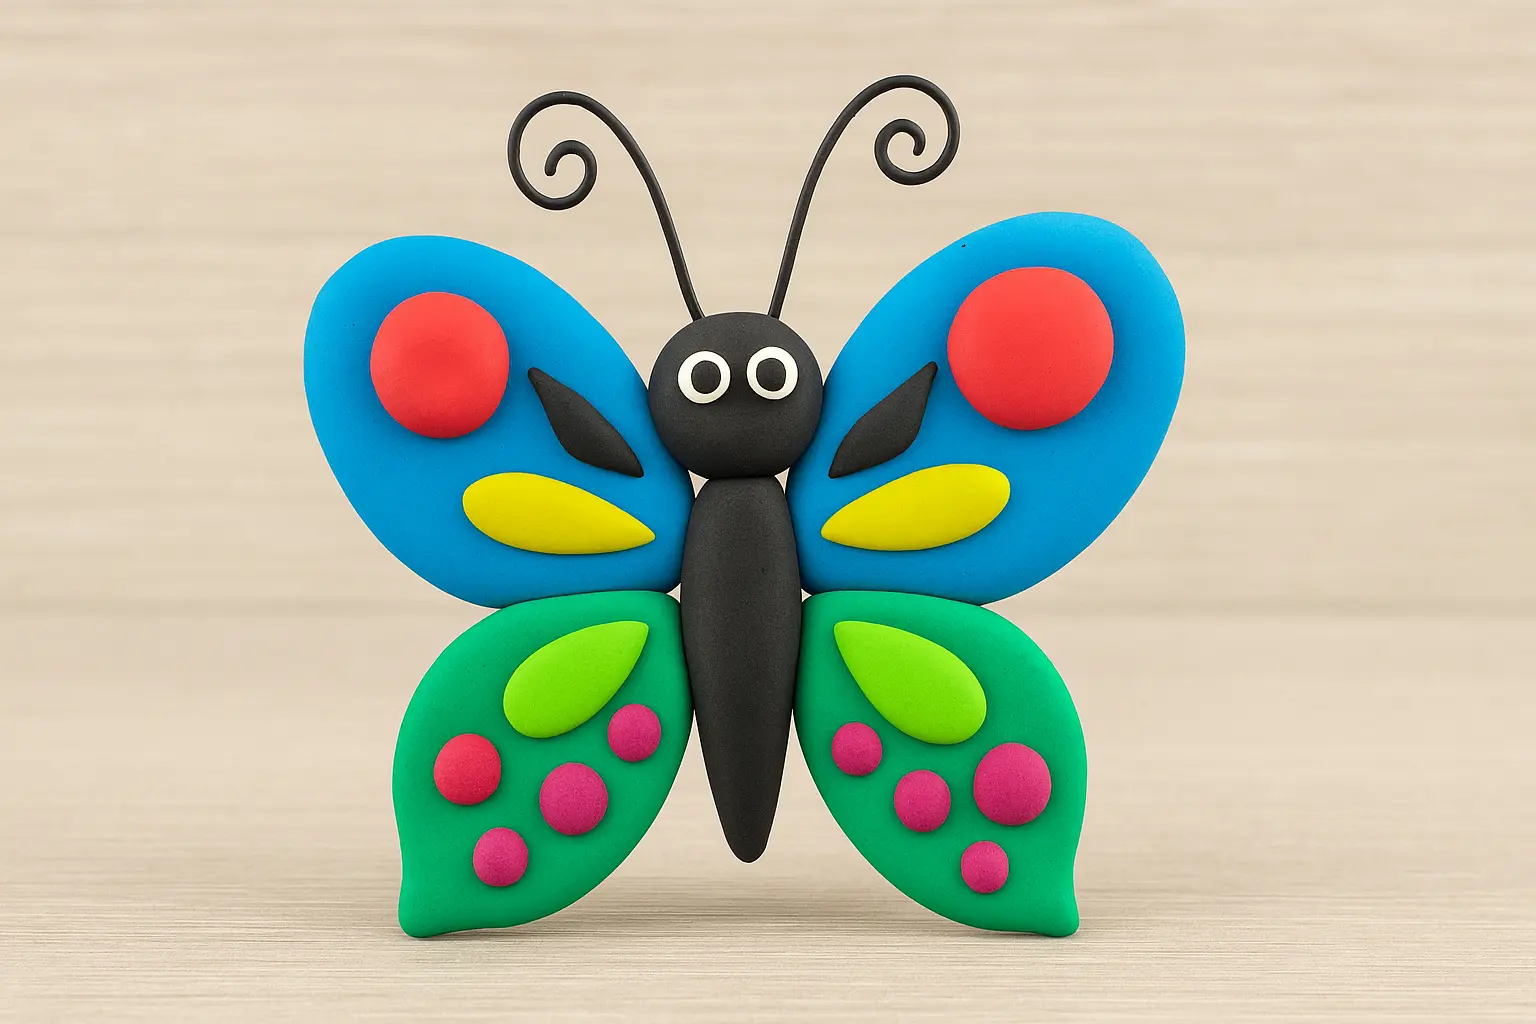
This butterfly is created in multiple layers. Each piece is shaped separately and then attached. The result is a beautifully detailed and colorful butterfly with dimension and personality.
Let’s go step-by-step.
Step 1: Prepare Your Clay Colors
Begin with different shades of clay—blue, green, red, black, yellow, and any other color your child wants to include. Softer clay works best, so knead each color gently to warm it up. This helps reduce cracks and gives a smoother finish.
For the first part of the wings, start with blue clay.
Step 2: Shape the First Wing Section
Take a small ball of blue clay. Roll it between your palms until it becomes smooth and even. Now turn it into a short cylinder. Pinch one end gently to form a tapered point.
This shape will become the signature teardrop section of the butterfly’s wing.
Step 3: Flatten Into a Teardrop
Press the cylinder lightly on the board. The pointed end should stay narrow while the wider end becomes a firm base. The goal is to achieve a perfect teardrop shape—rounded at one end and slim at the other.
This forms the top-left portion of the first wing.
Step 4: Add Red and Black Details
Create a small ball of red clay and flatten it into a disc. Stick it onto the wide end of the blue teardrop. This forms a bold contrast that enhances the wing’s design.
Next, take a tiny piece of black clay and shape it into a small triangle. Attach it just beneath the red disc. This creates a layered, decorative look.
With that, the first section of the wing is complete.
Step 5: Make the Second Wing Section
For the second piece of the wing, create another teardrop in blue clay, but slightly smaller than the first one. This keeps the butterfly’s proportions balanced.
Take a small piece of green clay and shape it into a miniature teardrop. Place it on top of the blue shape so that the pointed ends align. This creates a layered effect and adds depth to the wing.
Step 6: Build the Remaining Wing Parts
Each wing of the butterfly has four parts. Repeat the same process using different colors:
- Larger teardrops for the top sections
- Smaller teardrops or circles for the lower sections
- Accents such as dots, stripes, or tiny clay shapes
Older kids love customizing patterns—swirls, zigzags, dots, or stripes can be added for flair.
Encourage experimentation. No two butterflies should look the same!
Roll a piece of black or dark clay into a long oval. Smooth the edges to make the body slightly tapered at the ends. Then form a smaller ball for the head.
Using a toothpick, draw two tiny indentations for the eyes. You can also add small clay dots to make raised eyes if desired.
Attach the head firmly to the body.
Step 8: Make the Antennae
Cut two small pieces of thin wire. Curve the top of each wire into a small loop or swirl. Insert them gently into the top of the butterfly’s head to form the antennae.
If you prefer a fully clay-based craft, you can roll tiny clay ropes instead of using wire.
Step 9: Assemble the Wings
Now comes the exciting part—fixing the wings onto the body.
- Arrange the four sections of the left wing
- Do the same for the right wing
- Press each section gently against the body
- Smooth the connections with a clay tool so everything holds firmly
Make sure the wings are symmetrical but not identical—variation gives the butterfly character.
Step 10: Add Final Details
Once the butterfly is fully formed, you can:
- Add small dots using contrasting clay
- Create miniature patterns with a toothpick
- Add lines or shading using markers after the clay dries
Let the clay butterfly dry completely. Air-dry clay usually requires 24 to 48 hours depending on thickness.
When dry, your butterfly becomes a lightweight, decorative craft ready to display on a desk, shelf, or wall.
Tips for a Perfect Clay Butterfly
• Keep your hands slightly moist
A light touch of water prevents clay from cracking while shaping.
• Blend seams gently
Use a clay tool or fingertip to smooth any bumps.
• Don’t rush drying
Thicker clay sections need more time to harden.
• Experiment with colors
Butterflies in nature display endless color combinations—let kids explore freely.
• Add glitter or metallic touches
For a glam look, sprinkle glitter or use metallic clay accents.
Why Kids Love This Project
This clay butterfly isn’t just a craft—it’s an experience. Kids enjoy:
- Rolling clay into satisfying shapes
- Layering wings with bright colors
- Seeing the butterfly slowly come together
- Displaying their finished creation proudly
- Creating something that feels artistic and grown-up
It’s a weekend project that feels both fun and meaningful.
Final Thoughts
Crafts like this DIY Clay Butterfly help children relax, focus, and tap into their creativity in a hands-on way. Whether done alone, with siblings, or as a family project, it’s a beautiful activity that combines art, patience, and imagination. Once complete, this butterfly becomes a long-lasting keepsake that reminds kids of what they can achieve with time and creativity.