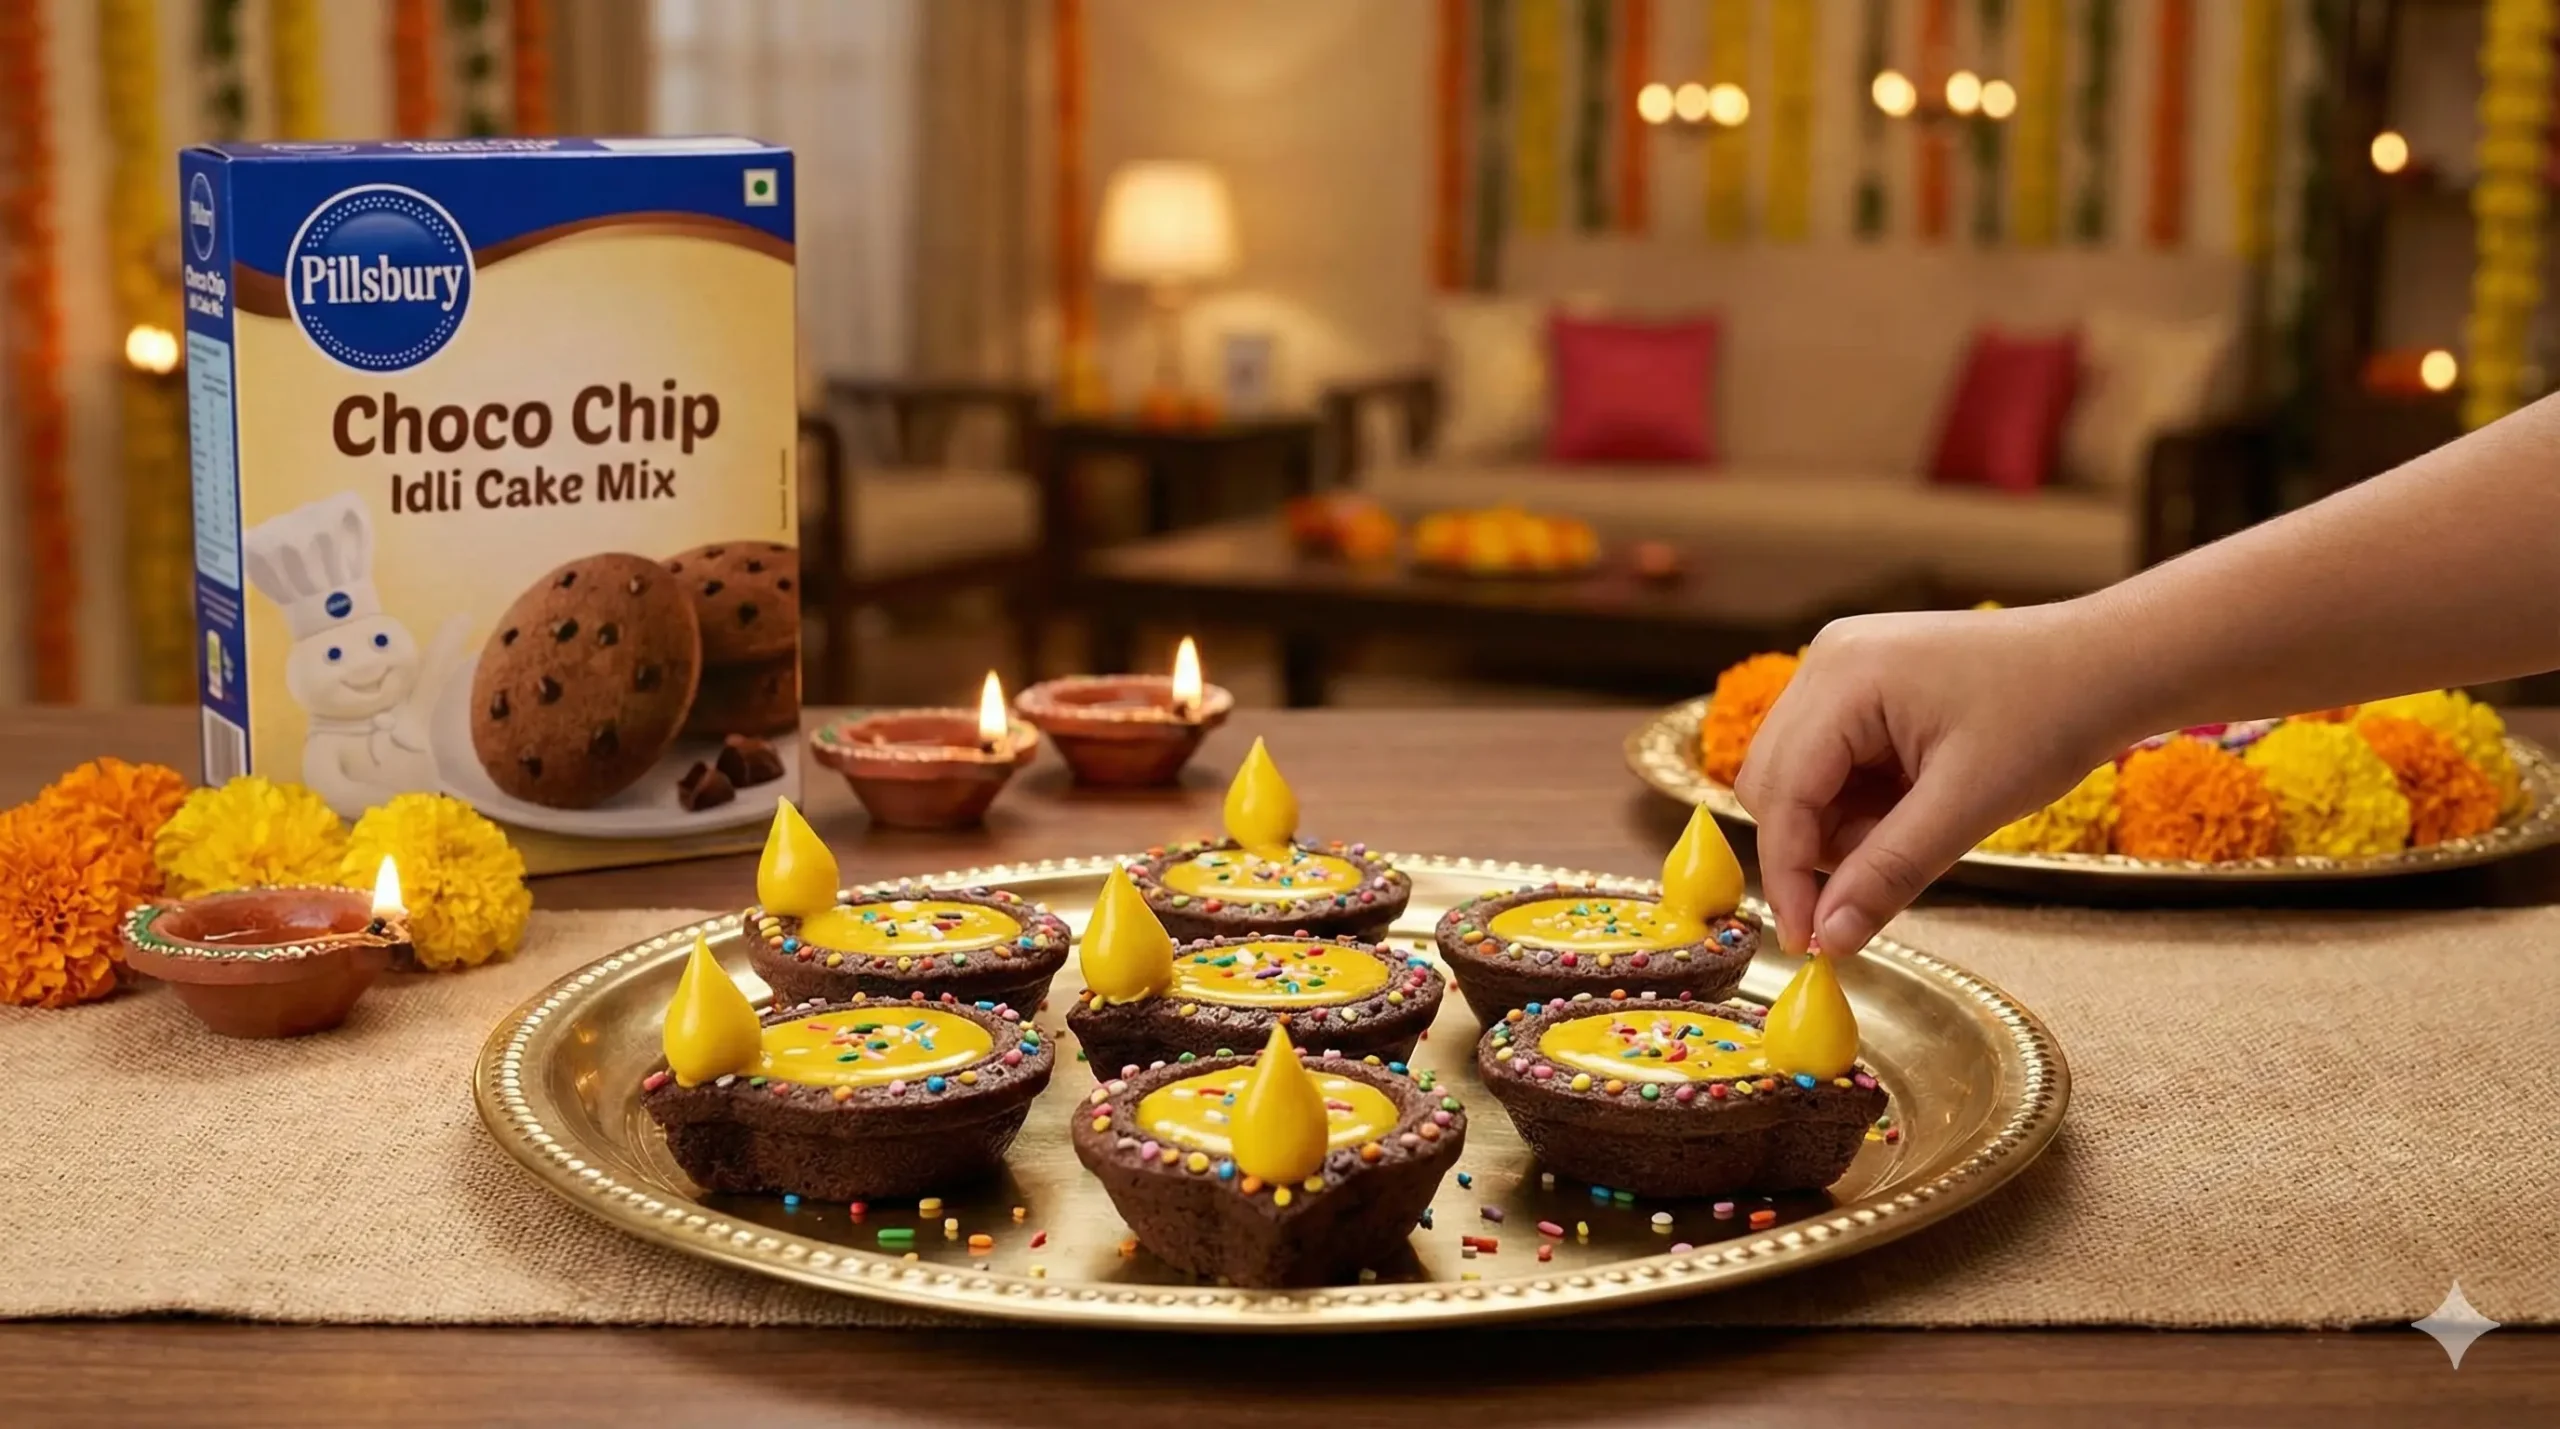
Light up this Diwali (or any party!) with an edible Diya made from Pillsbury Choco Chip Idli Cake Mix. It’s the perfect fusion treat that gets the whole family involved. A great activity for National Idli Day on March 30th too!
If you are a parent, you know the drill. The doorbell rings, and suddenly your living room is filled with the energetic chatter of 5 to 10 kids. Whether it is a holiday playdate, a post-school hangout, or a festive gathering, the biggest challenge for any host is food.
We all face the same dilemma during these impromptu get-togethers. We need a snack that ticks four very difficult boxes:
- Fussy-eater approved: It has to taste amazing.
- Kid-friendly: Something they can hold and eat without a mess.
- Mom-approved: Ideally, something that isn’t deep-fried or loaded with preservatives.
- Quick: Because hungry kids are not known for their patience!
So, when the neighborhood kids decided to hold their “Book Club” at our home recently, I found myself staring into the pantry, wondering, “What on earth do I make?”
With Diwali just around the corner, and the festive spirit already in the air, I wanted to move away from the standard chips and store-bought cookies. I remembered picking up a couple of packs of Pillsbury Choco Chip Idli Cake Mix on my last supermarket run. We had tried them before as standard round idlis, and they were a hit—soft, fluffy, and studded with chocolate.
But this time, I wanted to unleash a little creativity. I decided to try an experiment: The Choco Idli Cake Diya.
It turned out to be a brilliant activity. The kids loved the idea and offered to help, turning a simple cooking chore into a fun craft session. If you are looking for a show-stopping yet simple treat for Diwali, or a fun twist to celebrate National Idli Day on March 30th, this recipe is your new best friend.
Why Fusion Food Wins Hearts (and Stomachs)
Traditional Indian festivals are synonymous with Mithai (sweets). However, modern kids often crave chocolate over traditional Laddoos. This recipe is the perfect bridge between the two worlds.
By using an Idli steamer, we are using a traditional Indian cooking method (steaming), which preserves moisture and creates a light texture without the need for butter or heavy baking oils. But by using the Choco Chip mix, we are giving the kids the flavor profile they love.
Transforming these cakes into “Diyas” (earthen lamps) makes them thematically perfect for the Festival of Lights. It shows children that tradition can be fun, adaptable, and delicious.
Ingredients You Will Need
The beauty of this recipe lies in its simplicity. You don’t need a pantry full of baking supplies.
For the Idli Cakes:
- 1 Pack: Pillsbury Choco Chip Idli Cake Mix (This usually makes about 8 to 10 idlis depending on your mold size).
- 120 ml: Milk (Room temperature works best).
- 2 Tablespoons: Vegetable oil (Any neutral-smelling oil like sunflower or canola).
- Water: For the steamer.
For the “Diya” Assembly and Decoration:
- Skewers or Toothpicks: To hold the structure together.
- Cookie Cutters: specifically a small circle cutter.
- Icing Sugar: About ½ cup.
- Yellow Gel Food Color: To create the “flame.”
- Colorful Sprinkles: Silver balls, rainbow sprinkles, or edible glitter.
- Milk (for glaze): 1-2 teaspoons.
Step-by-Step Instructions
Follow these steps to create your edible lamps. This is a great time to invite the kids into the kitchen to help with the mixing and decorating!
Phase 1: Making the Idli Cakes
1. Prep the Steamer: Pour water into your Idli steamer or cooker and put it on medium heat. Grease your idli plates with a tiny drop of oil or butter. This ensures the cakes pop out smoothly later.
2. Mix the Batter: In a mixing bowl, empty the contents of the Pillsbury Choco Chip Idli Cake Mix. Add the 120ml milk and 2 tablespoons of vegetable oil.
- Pro Tip: Mix gently. Just like a regular cake batter, if you over-mix it, you might knock out the air bubbles, making the idlis dense instead of fluffy. Stir until just combined and smooth.
3. Steam to Perfection: Pour the batter into the greased idli molds. Place the stand inside the steamer. Cover and steam for roughly 10 to 12 minutes.
- Note: Do not use the whistle if you are using a pressure cooker. Just let the steam do the work.
4. The Toothpick Test: After 10 minutes, insert a toothpick into the center of one idli. If it comes out clean, they are done. If it’s sticky, give it another 2 minutes. Remove the stand and let them cool for 5 minutes before scooping them out.
Phase 2: The Transformation (Creating the Diya)
This is where the magic happens. We are going to turn round cakes into traditional lamp shapes.
1. The Cut: Take a cooled Choco Chip Idli. Take your small circle cookie cutter. You want to cut a bite-sized circle out of the top edge of the round idli.
- Visualize it: Imagine the round idli is a clock. Place your cutter at the 12 o’clock position and punch out a circle.
- The Result: The large piece that remains will look like a crescent moon or a bowl (this is the base of the Diya). The small circle you just cut out will become the flame.
2. Shaping the Flame: Take the small circular piece you cut out. You can trim the sides slightly with a knife to make it look more like a teardrop or a flame shape, or simply use it as a round flame.
3. Assembly: Place the “flame” piece on top of the “Diya base” piece. Use a skewer or a toothpick to gently pierce through the flame and down into the base to hold them securely together. Now it stands upright and looks like a lamp!
Phase 3: Decoration (Lighting the Lamp)
A Diya isn’t complete without its golden glow.
1. Make the Glaze: In a small bowl, mix the icing sugar with a tiny splash of milk. You want a thick consistency, not runny. Add 2 drops of Yellow Gel Food Color and mix well. This is your “fire.”
2. Glaze the Flame: Dip the top “flame” part of your cake structure into the yellow icing, or use a spoon to coat it. Let it drip slightly for a natural look.
3. Decorate the Base: Use a little white icing or chocolate sauce to act as glue on the crescent base. Let the kids go wild with sprinkles. Silver balls look elegant, while rainbow sprinkles make it look like a party.
4. Serve: Arrange them on a platter. Your edible Diwali Diyas are ready to eat!
Why This Recipe is Perfect for Kids
As a parent, I am always looking for activities that double as snacks. Here is why this specific project works so well for children aged 4 and up:
- Motor Skills: Stirring the batter, pouring it into molds, and placing the sprinkles helps with hand-eye coordination.
- Safety: Unlike baking in a hot oven where burns are a risk, or frying on a gas stove, this recipe uses steam. While the adult should handle the hot steamer, the rest of the process is cool to the touch and safe.
- Creativity: There is no “wrong” way to decorate a Diya. Whether they want a blue Diya or a pink one, it encourages artistic expression.
- Patience and Reward: The steaming time is short (10 minutes), which is perfect for a child’s short attention span. They see the results of their labor almost immediately.
Nutritional Bonus: Steaming vs. Baking
For health-conscious parents, the “Idli Cake” concept is a winner. Here is the science behind why steaming is a great cooking method:
- Moisture Retention: Steaming cooks the food by heating water into vapor. This keeps the cake moist without requiring excessive amounts of butter or oil that traditional baking often needs.
- No Charring: There is no risk of burnt edges or acrylamide formation (which can happen at very high baking temps).
- Lightness: These cakes tend to be lighter on the stomach, making them a better evening snack than heavy pastries.
Celebrating National Idli Day (March 30th)
Did you know there is a day dedicated entirely to the humble Idli? March 30th is World Idli Day.
While we usually celebrate this day with Sambar and Chutney, who says we can’t break the rules? This Choco Chip Idli Cake is a fantastic way to introduce the concept of the “Idli” to kids who might be fussy about the savory version.
Fun Fact for Kids: The Idli has a long history, with references to similar steamed foods appearing in Indian literature as far back as the year 920 CE! By making this chocolate version, you are actually participating in a culinary evolution that spans centuries.
Troubleshooting Tips
Even the easiest recipes can have hiccups. Here is how to ensure success:
- Idlis sticking to the plate? You likely didn’t grease the molds enough, or you tried to remove them while they were too hot. Let them cool for 5 minutes; they will pop right out.
- Batter too runny? Be careful with the milk measurement. Add it slowly. The batter should be dropping consistency, not pouring consistency like water.
- Crumbled while cutting? If the cake crumbles when you use the cookie cutter, it might be too warm. Pop the idlis in the fridge for 10 minutes to firm up before cutting.
Conclusion
The next time you have a house full of energetic kids, or you are looking for a unique way to celebrate the festive season, skip the stress of complicated baking.
The Pillsbury Choco Chip Idli Cake Diya is more than just a snack; it is a memory. It captures the essence of festivals—bringing people together, sharing joy, and creating something beautiful (and delicious).
So, grab a pack, fire up the steamer, and get ready to light up your table with these adorable, chocolatey treats.
Happy Cooking and Happy Diwali!
Frequently Asked Questions (FAQs)
Q: Can I make this in the microwave? A: Yes! If you have a microwave-safe idli stand, you can cook these in about 3-4 minutes. However, traditional steaming often yields fluffier results.
Q: Is this suitable for vegetarians? A: Yes, the Pillsbury Choco Chip Idli Cake Mix is generally vegetarian (always check the green dot on the pack to be sure).
Q: Can I use wheat flour instead of the mix? A: If you prefer to make the batter from scratch using whole wheat flour and cocoa powder, you certainly can. However, the pre-mix ensures a consistent rise and texture which is helpful when shaping them into Diyas later.
![When a birthday party invite arrives, the excitement begins! There is a gift to choose, wrapping paper to find, and of course, the search for the perfect birthday card. While it is easy to pick up a mass-produced card from the local store, nothing quite matches the charm and emotional value of a handmade birthday card.When a child sits down to create a card, they aren't just putting paper and glue together; they are creating a one-of-a-kind masterpiece. In a world of digital messages and store-bought items, a handmade card stands out as a unique piece of art—there isn't another copy of it in the entire world!If you want to help your children move away from the "buy it" culture and embrace the "make it" spirit, we have gathered 20 bright and colorful DIY birthday card ideas. These projects range from simple toddler-friendly designs to more intricate crafts for older kids.Why Choose Handmade Birthday Cards?Beyond the fun of getting messy with craft supplies, making DIY cards offers several benefits:Personal Connection: The recipient knows that time, effort, and thought went into their gift.Skill Development: Crafting improves fine motor skills, color coordination, and patience.Unique Aesthetic: Each card is a "limited edition." No two strokes of a brush or placements of a sticker are exactly the same.Eco-Friendly & Budget-Friendly: You can often use scraps of paper, buttons, and ribbons you already have at home.Top 20 Creative DIY Birthday Card Ideas1. The "Calorie-Free" Pop-Up Cake CardYou can’t have a birthday without a cake! This clever design uses folded paper strips to create a 3D "pop-up" effect when the card is opened. Kids can "frost" their paper cake with glitter, pom-poms for "cherries," and even add paper candles. It’s a calorie-free surprise that looks professional but is simple enough for school-aged children.2. Textured Spring Bouquet CardNothing cheers someone up like a bouquet of flowers. For this card, kids can use basic quilling skills—rolling thin strips of paper into coils—to create vibrant petals and leaves. The result is a 3D floral arrangement with incredible texture that the recipient will want to touch and display.3. Beginner’s Watercolor Abstract CardDon’t worry if you aren't a pro artist! The beauty of watercolors is in their fluidity. Let kids experiment with wet-on-wet techniques, allowing bright blues, pinks, and yellows to bleed into one another. Once dry, they can write "Happy Birthday" over the top in a bold black marker. Each card will be a unique work of abstract art.4. Washi Tape Birthday CandlesThis is a fantastic last-minute idea. Simply cut strips of colorful washi tape in different lengths and stick them vertically on the front of the card. Draw a small yellow flame at the top of each strip. In minutes, you have a modern, stylish card featuring a row of glowing candles.5. Fingerprint Balloon ExtravaganzaPerfect for toddlers! Draw a small basket at the bottom of the card and a few "strings" leading up. Let the child dip their fingers in various paint colors and "stamp" balloons at the end of each string. It’s a sweet, personalized keepsake that records just how small their fingers were.6. Button Hot Air Balloon CardIf you have a jar of mismatched buttons, this is the project for you. Glue buttons of different sizes and colors in a large bunch to create the "balloon" part of a hot air balloon. Use a black fineliner to draw the basket and the clouds.7. Scrappy Paper Cupcake CardUse leftover scraps of patterned scrapbook paper to cut out a cupcake liner shape and a fluffy "frosting" top. Mix and match patterns—like polka dots for the liner and floral for the frosting—for a whimsical, "shabby-chic" look.8. Pom-Pom Cupcake TopperSimilar to the cupcake card, but add a single, large red pom-pom on top as the "cherry." It adds a delightful 3D element that makes the card pop.9. Handprint Sun "You Are My Sunshine" CardPaint a child's hand yellow and press it onto the card. Draw a smiling face in the center of the palm. It’s a bright, cheerful card that is perfect for a parent’s or grandparent’s birthday.10. Confetti Shaker CardCut a window out of the front of the card and tape a small plastic bag (or clear vellum) filled with colorful sequins or confetti behind it. When the recipient shakes the card, the confetti dances around!11. Origami Heart CardFold a small piece of red or pink paper into an origami heart and glue it to the center of a minimalist white card. It’s elegant, simple, and shows a high level of effort.12. Dinosaur "RAWR" CardFor the dino-lover! Use green cardstock to create a dinosaur silhouette. Give the dinosaur a small party hat made of felt or glitter paper to make it look festive.13. Rainbow Ribbon CardGlue short lengths of different colored ribbons horizontally across the card. It’s a great way to use up "scrap" ribbon and creates a beautiful, tactile rainbow.14. Chalkboard Style Birthday CardUse black cardstock as your base and let the kids draw with white or neon gel pens. It mimics the look of a chalkboard and looks very modern and "on-trend."15. Leaf-Printed Nature CardGo for a walk and find some interesting leaves. Paint one side of the leaf and press it onto the card like a stamp. This creates a beautiful, earthy card perfect for an autumn birthday.16. LEGO-Inspired Pattern CardIf your child loves building blocks, they can use the actual blocks as stamps! Dip the circular "nubs" of a LEGO brick into paint to create a cool, geometric dot pattern.17. String Art "Star" CardPoke small holes in the shape of a star or an initial. Let the child "sew" through the holes with colorful embroidery thread to create a geometric string art masterpiece.18. 3D Paper Balloon CardCut out several identical paper circles. Fold them in half and glue them back-to-back to create a 3D sphere. Glue this "balloon" to the card for a striking effect.19. Photo-Collage Birthday CardPrint out small photos of the birthday boy or girl and the child making the card. Arrange them in a heart shape and decorate with stickers. It’s a guaranteed tear-jerker for family members!20. Pom-Pom Ice Cream ConeDraw a simple triangle "cone" and glue three different colored pom-poms on top as "scoops" of ice cream. It’s cute, simple, and looks good enough to eat.Essential Supplies for Your DIY Card StationHaving a dedicated "card kit" makes it easy to whip up a masterpiece at a moment's notice. Here are the essentials:Cardstock: Multi-colored packs of heavy paper.Adhesives: Glue sticks for paper, and white liquid glue for heavier items like buttons or pom-poms.Coloring Tools: Watercolors, markers, and gel pens.Embellishments: Washi tape, sequins, buttons, and ribbons.Scraps: Never throw away small pieces of wrapping paper or construction paper!A Quick Guide to Card LayoutsElementIdeaFront Message"Happy Birthday," "Let's Celebrate," or "A Special Wish."Inside MessageA funny joke, a poem, or a simple "I love you."Back "Signature""Made with love by [Name]" or "Limited Edition."Conclusion: Making Birthdays BrighterIn the end, it doesn't matter if the lines aren't perfectly straight or if there is a little too much glitter. The joy of a DIY birthday card is in the personality it carries. When a child hands over a card they made themselves, they feel a sense of pride, and the person receiving it feels truly seen and appreciated.So, the next time a birthday rolls around, skip the card aisle at the supermarket. Instead, clear off the dining table, bring out the paints and buttons, and let your kids' imaginations run wild. You’ll be creating more than just a card—you’ll be creating a memory.](https://resultdr.com/wp-content/uploads/2025/12/ChatGPT-Image-Dec-19-2025-11_51_26-AM.webp)