March is a magical month for young readers. With Dr. Seuss’s birthday on March 2nd, schools and homes across the country transform into whimsical worlds of rhyme and color. This day also marks National Read Across America Day, an initiative by the National Education Association to celebrate the joy of literacy. While reading these classic stories is a reward in itself, pairing them with hands-on activities helps solidify the lessons and makes the characters leap off the page. Handprint crafts are particularly special for toddlers and preschoolers because they turn a child's own physical growth into a piece of art. In this guide, we’ve rounded up 15 simple Dr. Seuss-inspired handprint crafts that focus on fine motor development, sensory play, and, most importantly, fun! The Developmental Magic of Handprint Crafts When people talk about the benefits of arts and crafts for kids, they usually focus on creativity. However, handprint art offers unique physical and cognitive advantages: Fine Motor Strength: Dipping fingers into paint and pressing palms onto paper requires controlled movements that strengthen the small muscles in the hands. Sensory Integration: Feeling the cool, slippery texture of paint is a vital sensory experience for early learners. Hand-Eye Coordination: Aligning a handprint to match a character's body helps children refine their spatial awareness. Memory Retention: Connecting a physical activity to a story helps children remember the plot and vocabulary much more effectively. Top 10 Dr. Seuss Books to Pair with These Crafts Before you start painting, pick up one of these legendary titles to read with your little ones: Green Eggs and Ham The Cat in the Hat One Fish, Two Fish, Red Fish, Blue Fish The Lorax Fox in Socks Horton Hears a Who! How the Grinch Stole Christmas! Put Me in the Zoo Oh, The Places You’ll Go! There’s a Wocket in My Pocket! 15 Simple Seuss Handprint Crafts for Kids 1. The Cat in the Hat Handprint The most iconic Seuss character is surprisingly easy to make with a handprint! How to: Paint the palm and thumb white (for the face/body) and the four fingers with red and white stripes (for the hat). Press firmly on blue cardstock. Detail: Once dry, use a black marker to add the whiskers and a red fingertip to create the bow tie. 2. Thing 1 and Thing 2 Twin Prints These mischievous characters are perfect for a two-hand project. How to: Paint both palms red (for the bodies) and all fingers bright blue (for the wild hair). Detail: Glue a white paper circle onto the red palm and write "Thing 1" or "Thing 2" in the center. 3. Red Fish, Blue Fish This is a fantastic way to teach colors and counting. How to: Have your child make one red handprint and one blue handprint horizontally on the page. Detail: The thumb becomes the bottom fin, and the fingers become the tail. Add a googly eye to the palm area! 4. The Lorax Handprint The Lorax "speaks for the trees," and his bushy mustache is his most famous feature. How to: Paint the entire hand bright orange and press it upside down (fingers pointing down). Detail: The fingers form the Lorax's body and legs. Use yellow paint or paper to add a massive, fluffy mustache across the palm. 5. Horton the Elephant Horton is a symbol of loyalty. This craft captures his gentle nature. How to: Paint the hand grey. Keep the four fingers together for the body and extend the thumb out to be Horton’s trunk. Detail: Use a pink pom-pom on the tip of the "trunk" to represent the clover and the tiny Who who lives there. 6. Green Eggs and Ham This is a fun, messy one that focuses on color mixing. How to: Make a white handprint (the egg white) and use a green thumbprint in the center of the palm (the yolk). Detail: Draw a simple "ham" silhouette next to it with a pink or green marker. 7. Fox in Socks "Fox, Socks, Box, Knox!" This craft is a great pincer-grip workout. How to: Make an orange handprint with fingers slightly spread. Detail: The thumb is the fox's head. Paint "socks" onto the other four fingers using blue or checkered patterns. 8. The Grinch’s Growing Heart Though usually a holiday favorite, the Grinch is a Seuss staple year-round. How to: Use lime green paint for a handprint with fingers pointing down. Detail: Draw a small red heart in the center of the palm. For extra fun, draw three hearts of increasing size to show it growing! 9. Put Me in the Zoo Leopard Based on the character Spot, this craft is all about patterns. How to: Make a bright yellow handprint. Detail: Use fingertips dipped in various colors (red, blue, green) to add "spots" all over the yellow palm and fingers. 10. Oh, The Places You’ll Go! Hot Air Balloon Celebrate the future with this colorful balloon craft. How to: Use multiple colors on the fingers to create a "rainbow" handprint pointing upward. Detail: Draw a small brown basket underneath the palm and connect them with "ropes" using a black marker. 11. Truffula Tree Forest The Lorax's trees are famous for their soft tufts. How to: Use bright pink, yellow, and purple paint. Make several handprints at the top of the page. Detail: Draw long, spindly, striped trunks (like candy canes) leading down from the "fluffy" handprint tops. 12. Sneetches with Stars Teach about kindness and equality with the Sneetches. How to: Paint the hand yellow and press it vertically. Detail: Add a small green star stamp or sticker right in the middle of the palm. 13. Wocket in My Pocket This imaginative craft lets kids invent their own "Wocket." How to: Make any color handprint you like—the sillier, the better! Detail: Cut a "pocket" shape out of construction paper and glue it over the bottom half of the handprint so the fingers peek out. 14. Mr. Brown Can Moo! (Cow Handprint) Explore onomatopoeia and animal sounds. How to: Make a white handprint. Detail: Use black thumbprints to add "cow spots" and draw a little pink snout on the thumb. 15. The Foot Book (Hand/Foot Hybrid) Since this book is about feet, why not use both? How to: Make a handprint on one side and a footprint on the other. Detail: Label them "Left Hand, Right Foot" to help with basic anatomy and direction lessons. Pro-Tips for Seuss Crafting Success Use Heavy Paper: Acrylic paint and wet hands can warp thin printer paper. Use cardstock for a sturdy keepsake. Keep Wipes Handy: To prevent "rainbow smears" across your furniture, keep a pack of baby wipes on the table for immediate clean-up. The "Process Over Product" Rule: Especially with toddlers, don't worry if the Cat in the Hat looks a little "wacky." In the world of Dr. Seuss, wacky is exactly what we’re aiming for! Dry Before Details: Always let the handprint dry completely before using Sharpies or markers for the facial features. This prevents the ink from bleeding. Fun Facts About Dr. Seuss to Share While Crafting Did you know these fun tidbits about Theodor Geisel (Dr. Seuss)? He wasn't a real doctor! He added "Dr." to his pen name because his father always wanted him to practice medicine. Green Eggs and Ham was a bet. His editor bet him he couldn't write a book using only 50 words. He won! He invented the word "Nerd." The first recorded use of the word "nerd" was in his 1950 book, If I Ran the Zoo.

Roaring Fun: Easy Crumpled Paper Lion Craft for Kids

Crafting with children is often praised for its ability to spark imagination and keep little hands busy. While we frequently celebrate the mental “wins”—like improved patience and problem-solving—the physical developmental perks are just as vital.

This Crumpled Paper Lion Craft is a fantastic example of a “stealth” educational activity. It’s vibrant, tactile, and incredibly fun, but beneath the surface, it’s a powerhouse for developing fine motor skills and hand dexterity. By crushing, squeezing, and sticking paper, children are building the muscle strength they’ll eventually need for writing, tying shoelaces, and using utensils.

Let’s dive into why this craft is a must-try and how you can create your own king of the jungle at home.

Why Paper Crumpling is a Development Powerhouse

Before we get to the “how-to,” let’s look at the “why.” Most crafts involve precise movements like drawing or cutting. However, crumpling is a unique sensory experience.

  • Grip Strength: Squeezing craft tissue paper into tight balls requires the use of the small muscles in the palm and fingers.
  • Tactile Stimulation: The sound of the paper crunching and the texture of the crinkles provide excellent sensory feedback.
  • Hand-Eye Coordination: Placing each tiny ball of paper within the lines of the lion’s mane helps children refine their spatial awareness.

Supplies You’ll Need

To get started, gather these basic craft supplies. You likely already have most of these in your art bin!

  • Construction Paper or Cardstock: Yellow and orange are the classic choices for a lion.
  • Craft Tissue Paper: Use shades of orange, brown, or gold for the mane.
  • Pencil: For tracing your templates.
  • Safety Scissors: Perfect for little hands to practice cutting.
  • Craft Glue: A simple glue stick or school glue works perfectly.
  • Black Sharpie or Marker: To add those cute facial details.
  • Lion Craft Template: (You can hand-draw the circles and shapes if you don’t have a printed version!)

Step-by-Step Guide: How to Make a Crumpled Paper Lion

1. Prepare Your Base Shapes

Start by downloading and printing your lion template. If you are drawing this freehand, you will need to cut out the following parts:

  • A large circle for the Mane.
  • A slightly smaller circle for the Head.
  • An oval for the Body.
  • A long, curved strip for the Tail.
  • Small circles or ovals for the Eyes and Forehead.

2. Assemble the Foundation

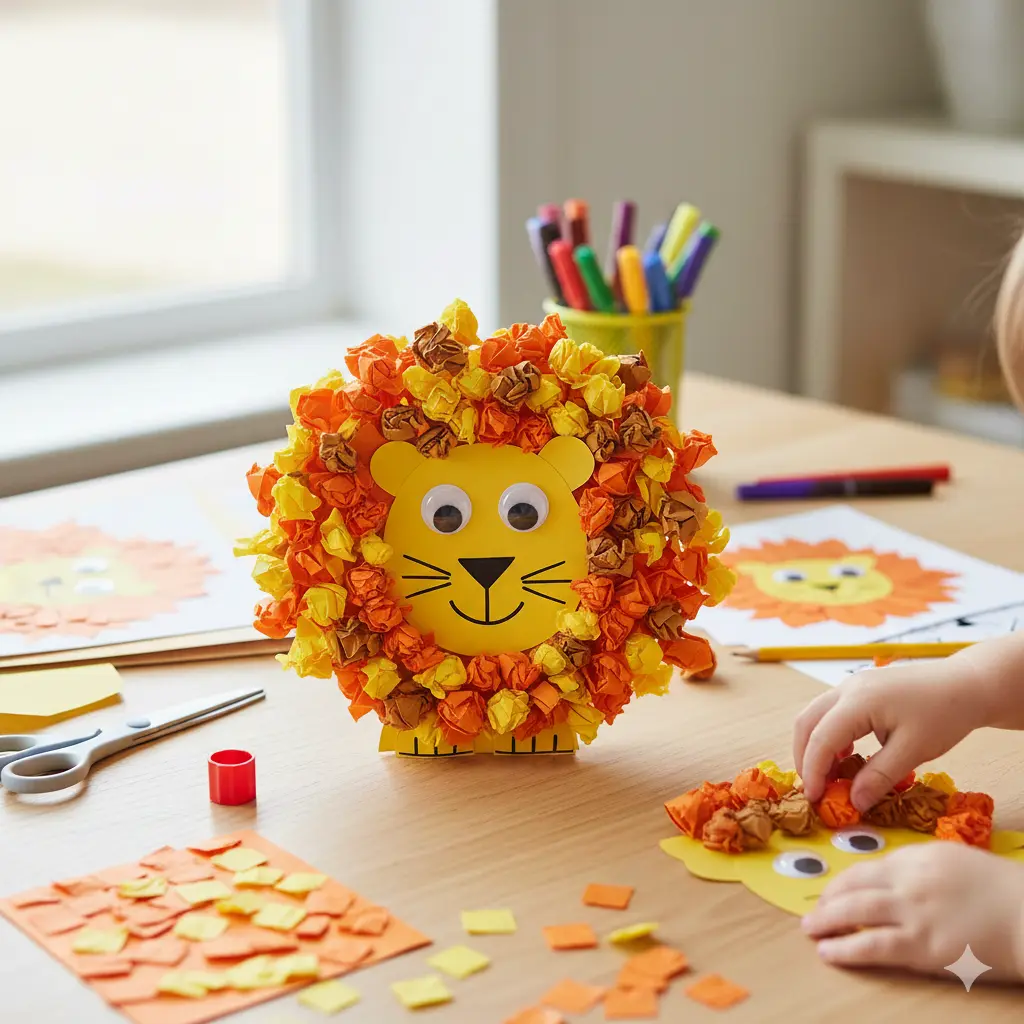
Let’s start building our lion! Take the smaller head circle and glue it directly into the center of the larger mane circle. You should see a consistent ring of the mane color surrounding the face. This creates the “canvas” for your paper crumpling.

3. The Fine Motor Fun: Crumpling!

This is the part kids love most. Take your craft tissue paper and tear it into small squares (about 2×2 inches). Show your child how to scrunch the paper into a tight little ball using only their fingertips.

Pro Tip: Using different shades of orange and yellow tissue paper creates a “3D” effect that makes the lion’s mane look more realistic and textured.

4. Build the Mane

Apply a generous amount of glue to the outer ring (the mane section) of your lion. One by one, press the crumpled tissue paper balls onto the glue. Encourage your child to pack them closely together so there are no gaps.

5. Add the Facial Features

While the mane is drying, it’s time to give your lion some personality!

  • Glue the eyes and the forehead piece onto the center face.
  • Use your Sharpie to draw a nose, a wide smile, and perhaps some cute whiskers.
  • If you have googly eyes in your craft kit, feel free to use those for some extra “wiggly” fun!

6. Attach the Body and Tail

Glue the head/mane assembly onto the top of the body oval. Finally, attach the tail tip to the tail strip and glue it to the back of the body. Your lion is now ready to roar!

Educational Extensions for Parents and Teachers

This craft doesn’t have to end when the glue dries. You can turn this into a full afternoon of “Lion King” themed learning:

1. Biology and Nature

Talk to your kids about where lions live (the savanna) and why they have manes. Did you know that only male lions have manes? It’s a great way to introduce basic animal facts.

2. Storytime Integration

Pair this craft with classic children’s books like The Lion Inside or Library Lion. Seeing the character they just created come to life in a story makes the experience much more memorable.

3. Color Theory

If you are using different shades of tissue paper, talk about warm colors. Explain how yellow, orange, and red represent heat, sun, and fire—perfect for a majestic lion!

Tips for a Mess-Free Crafting Session

We know that glue and tissue paper can sometimes lead to a sticky situation. Here is how to keep things organized:

  • The Tray Method: Have your child do the crumpling and gluing inside a shallow tray or a baking sheet. This keeps the stray bits of tissue paper contained.
  • Dab, Don’t Pour: If using liquid glue, teach kids to use “just a dot” or use a small paintbrush to spread the glue.
  • Wet Wipes Ready: Keep a pack of wipes nearby for sticky fingers before they touch the furniture!

Frequently Asked Questions

What if I don’t have tissue paper? No problem! You can use orange napkins, crepe paper, or even scrap pieces of construction paper. Just keep in mind that thicker paper is harder to crumple, which might be a better challenge for older kids.

Is this craft suitable for toddlers? Absolutely. While toddlers may need help with the scissors, the act of crumpling paper is one of the best ways to keep them engaged while developing their “pincer” grip.

Final Thoughts

The beauty of the Crumpled Paper Lion Craft lies in its simplicity. It doesn’t require expensive electronics or complicated kits—just paper, glue, and a bit of imagination. By the end of the day, your child will have a cute new friend and stronger hands to show for it.

Leave a Reply

Your email address will not be published. Required fields are marked *