When the sun starts to peek through the clouds and the first flowers begin to bloom, nothing captures the magic of the season quite like the butterfly. These delicate, fluttering creatures are more than just beautiful insects; they are symbols of transformation, hope, and the vibrant energy of nature. While the weather outdoors may not always be bright and sunny, you can always bring the spirit of spring indoors with creative projects. If your family loves butterflies as much as we do, this collection of 20 Butterfly Crafts for Kids is exactly what you need. These activities are designed to be fun and colorful, providing children with numerous opportunities to fine-tune their motor skills through cutting, gluing, painting, and assembling. From nature-inspired art to keepsakes that use tiny handprints, these crafts are perfect for a rainy afternoon or a sunny backyard playdate. Why Butterfly Crafts are Great for Development Beyond the obvious fun, crafting butterflies offers several educational and developmental benefits for children: Fine Motor Skills: Maneuvering scissors to cut wing shapes or using a glue stick helps strengthen the small muscles in a child's hands. Symmetry Lessons: Butterflies are a natural way to teach the concept of symmetry—whatever happens on the left wing must happen on the right! Nature Appreciation: Using natural materials like leaves and twigs connects children to the environment. Color Theory: Mixing paints for vibrant wings allows kids to explore how different colors interact. 1. The Nature-Inspired Leaf and Stick Butterfly One of the best ways to start a crafting session is with a nature walk. This craft turns outdoor treasures into beautiful art. The Materials: Flat, sturdy leaves (for wings), thin twigs (for the body), and liquid glue. The Process: Encourage kids to pick up fallen leaves in different shapes and sizes. Glue a twig in the center of a piece of cardstock, and then glue two matching leaves on either side. The Result: A rustic, earthy butterfly that reminds the whole family of the beauty found in the backyard. 2. Handprint Wooden Spoon Butterflies These are not just crafts; they are precious keepsakes. Using a child’s handprint makes the project personal and unique. The Materials: Small wooden craft spoons, cardstock, paint, and googly eyes. The Process: Trace your child’s hands on colorful paper and cut them out. These will serve as the wings. Paint the wooden spoon a bright color—this is the butterfly's body. The Assembly: Glue the handprints to the back of the spoon. Add eyes and a smile to the spoon’s "head." These make excellent puppets for an afternoon of imaginative play! 3. Flower Petal Butterfly Art This activity is fabulous because it uses real floral elements to create a mosaic effect. The Materials: Cardstock, glue, and a variety of flower petals (tulips, pansies, or daisies work well). The Process: Draw a simple butterfly silhouette on the paper. Have the kids "fill in" the wings by gluing down individual flower petals. The Detail: The natural textures and colors of the petals create a 3D effect that paper simply cannot match. 4. Coffee Filter Tie-Dye Butterflies This is a classic craft that never goes out of style because of the "magic" involved in the color-spreading process. The Materials: White coffee filters, washable markers, a spray bottle with water, and a pipe cleaner. The Process: Flatten the coffee filter and draw patterns with markers. Spray the filter with a little water and watch the colors bleed together like tie-dye. The Final Touch: Once dry, scrunch the filter in the middle and secure it with a pipe cleaner, which also forms the antennae. 5. Clothespin and Tissue Paper Flutterers Simple and effective, these butterflies can be clipped onto curtains or even onto a string to make a nursery garland. The Materials: Wooden clothespins, colorful tissue paper, and glitter. The Process: Decorate the clothespin with paint or glitter. Cut a rectangle of tissue paper, bunch it in the center, and clip the clothespin over it. The Detail: Fan out the tissue paper on both sides to create light, airy wings. 6. Paper Plate Symmetrical Painting This is the perfect way to teach kids about "mirror images." The Materials: A paper plate, tempera paint, and scissors. The Process: Fold a paper plate in half, then open it back up. Squirt a few drops of different colored paint on just one side of the fold. The Magic: Fold the plate again and press down firmly. When you open it, you’ll have a perfectly symmetrical, colorful butterfly pattern! Cut out the butterfly shape once the paint is dry. 7. Cardboard Tube "Recycled" Butterflies Give your toilet paper rolls a second life with this eco-friendly project. The Materials: Cardboard tubes, construction paper, and sequins. The Process: Wrap the tube in colored paper. Cut two large "B" shapes for wings and glue them to the back of the tube. The Detail: Let the kids go wild with sequins, stickers, or buttons to decorate the wings. 8. Bead and Pipe Cleaner Butterflies This craft is excellent for practicing "threading" skills, which are vital for hand-eye coordination. The Materials: Colorful pony beads and long pipe cleaners. The Process: Thread beads onto two pipe cleaners. Twist the pipe cleaners into two circles (one large, one small) and then pinch them together in the middle with a third pipe cleaner to create the body and antennae. 9. Stained Glass Window Butterflies Watch the sun shine through your creations by sticking these on a bright window. The Materials: Black contact paper (or black cardstock) and colored tissue paper scraps. The Process: Cut a butterfly silhouette out of black paper, leaving the "wing" areas hollow. Place it on contact paper and let kids fill the holes with small bits of tissue paper. The Result: When the sun hits the window, the butterfly glows like real stained glass. 10. Cupcake Liner Butterflies Cupcake liners are naturally pleated, making them look like delicate, textured wings. The Materials: Two cupcake liners, a craft stick, and glue. The Process: Flatten the liners and fold them in half. Glue them to the sides of a painted craft stick. The Detail: Since liners come in so many patterns (polka dots, stripes, florals), the design possibilities are endless! 11. Fingerprint Butterfly Cards Perfect for a "Thank You" or "Happy Birthday" note, these cards use the child’s own fingerprints to form the wings. 12. Origami Butterflies For older children, simple folding techniques can turn a square of paper into a sophisticated 3D butterfly. This is a great introduction to the Japanese art of paper folding. 13. Bubble Wrap Print Butterflies Don’t throw away that packing material! Dip bubble wrap into paint and press it onto paper. The circular patterns create a unique "scaly" look that mimics real butterfly wings. 14. Yarn-Wrapped Butterfly Wings Cut a butterfly shape out of cardboard and have the kids wrap colorful yarn around the wings. This adds a wonderful tactile and fuzzy element to the project. 15. Pasta Butterfly Art Bow-tie pasta (Farfalle) actually means "butterflies" in Italian! Paint the dry pasta shapes and glue them onto a garden scene drawn on paper. 16. Sponge-Painted Butterflies Cut a kitchen sponge into a wing shape. Kids can dip it in paint and stamp their own butterfly patterns across a long roll of paper to create custom gift wrap. 17. Foil Embossed Butterflies Draw a butterfly on a piece of cardboard with white glue. Once dry, cover it with aluminum foil and rub gently. The "veins" of the wings will pop up, creating a cool metallic effect. 18. Paper Chain Butterfly Create a traditional paper chain for the body and attach large paper wings. This is a great group project for a classroom. 19. Washi Tape Butterflies Use strips of colorful Washi tape to decorate a plain cardstock butterfly. This is a "mess-free" way to get high-impact, colorful results. 20. Doily Butterflies Paper doilies have beautiful, intricate cut-outs. Fold them in half and attach them to a clothespin for a vintage-looking, elegant butterfly. Conclusion Butterflies are a wonderful subject for children's art because they allow for total creative freedom. There are no rules for what color a butterfly "should" be, which encourages kids to experiment and express themselves. Whether you are using items from your recycling bin or treasures found on a nature walk, these 20 butterfly crafts will keep your little ones engaged and inspired.

Spring Flowers: Red Poppy Felt Craft for Home Decor and Gifts

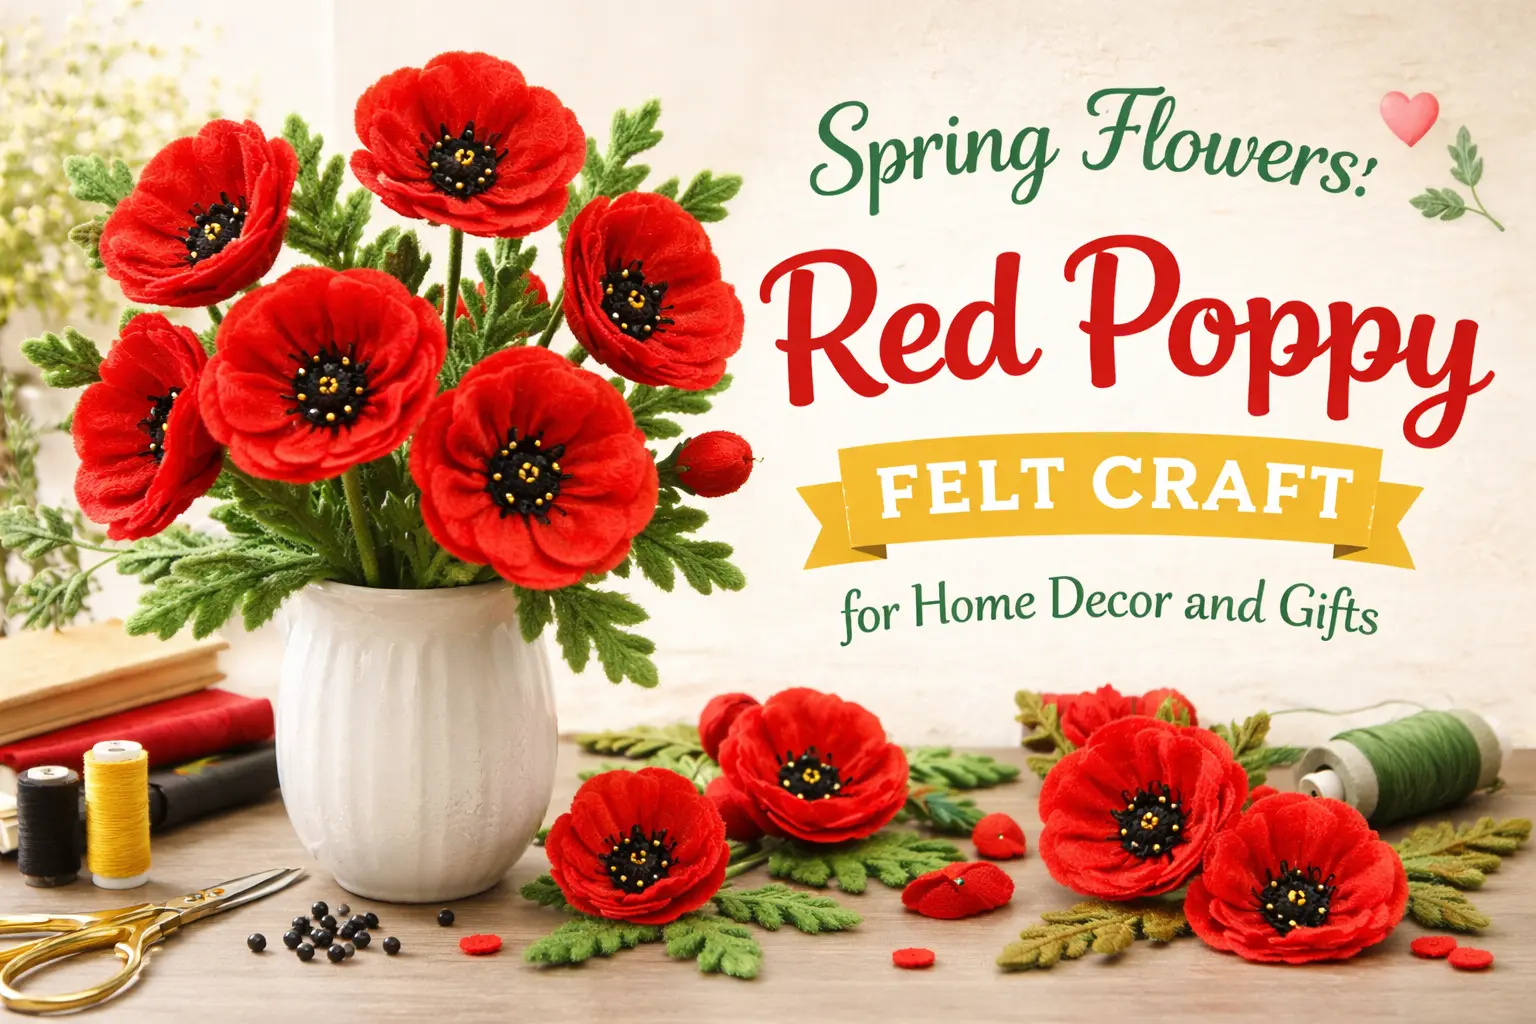
As the seasons shift and the air turns crisp, there is nothing quite like the sight of vibrant blooms to lift the spirit. Spring brings with it a symphony of colors, but few flowers are as striking and symbolic as the red poppy. Whether you are looking to celebrate the arrival of spring, create a meaningful tribute for Memorial Day, or find the perfect handmade gift for a teacher or parent, these Red Poppy Felt Crafts are the ideal solution.

The beauty of working with felt is its durability. Unlike real flowers that wilt within days, these felt poppies remain permanent, vibrant, and soft to the touch. This project is also a win for eco-friendly crafters, as it incorporates upcycling by turning an everyday kitchen item—a simple sauce tin—into a designer-style vase.

This guide will walk you through the process of creating a stunning poppy bouquet that is quick, easy, and professional-looking.

The Symbolism of the Red Poppy

Before we dive into the “how-to,” it is worth noting why the red poppy is so special. In many cultures, the poppy represents sleep, peace, and imagination. Most notably, it is the flower of remembrance used to honor those who served in the armed forces. By making these with your children, you have a wonderful opportunity to discuss history and the importance of gratitude while engaging in a creative outlet.

Supplies You Will Need

To ensure a smooth crafting session, gather all your materials beforehand. This project uses a unique “secret ingredient”—shoe sticks—which are the thick plastic sticks often found in new shoes to help them retain their shape. They make the perfect sturdy stems!

  • Felt: High-quality red felt for the petals and black felt for the flower centers.
  • Upcycled Container: An empty sauce tin can (thoroughly cleaned and dried).
  • Decorative Base: Patterned paper or scrapbook paper to cover the tin.
  • Stems: Plastic shoe sticks (recycled) or thick green floral wire.
  • Embellishments: Black buttons for the center of the poppies.
  • Tools: Heavy-duty scissors, a hot glue gun, and a circle template (or an 8-petaled flower die-cut).

Step-by-Step Instructions: Creating Your Poppy Bouquet

Step 1: Prepare the Upcycled Vase

The foundation of your display starts with a simple tin can.

  1. Rinse and Dry: Ensure the tin is completely free of food residue and the metal edges are smooth.
  2. Covering the Tin: Measure the height and circumference of your can. Cut your patterned paper to match these dimensions.
  3. Secure: Apply a thin line of hot glue to the seam of the paper and wrap it tightly around the tin. This instantly transforms a piece of “trash” into a beautiful, personalized vase.

Step 2: Cutting the Poppy Petals

Using your flower template or a die-cut machine, cut out 8-petaled flower shapes from your red felt. If you want a fuller bouquet, aim for at least 5 to 7 flowers.

  • Pro Tip: If you don’t have a template, you can draw a simple cloud-like shape with eight rounded humps on a piece of cardstock to create your own stencil.

Step 3: Giving the Flower a 3D Shape

Flat felt flowers can look a bit dull. To give them a realistic, cup-like shape:

  1. The Cut: Take your scissors and cut a single slit between two petals, going all the way from the edge to the exact center of the flower.
  2. The Overlap: Take the two petals on either side of the slit. Pull one slightly over the other so they overlap.
  3. Glue: Apply a very thin layer of hot glue between the overlapping petals.
    Note: Be careful with the amount of glue used. On felt, glue “spillovers” can dry white and look messy. A tiny dab is all you need for a secure hold.

Step 4: Adding the Center Detail

Every poppy needs its signature dark center.

  1. Black Felt Circle: Cut a small circle out of black felt (about the size of a nickel).
  2. The Button: Glue a black button onto the center of the black felt circle.
  3. Assembly: Glue this entire black center piece into the middle of your red 3D flower. The button adds a lovely weight and a professional finish to the craft.

Step 5: Attaching the Stems

Now it is time to give your flowers some height.

  1. The Shoe Sticks: If you are using recycled shoe sticks, ensure they are clean.
  2. Bonding: Apply hot glue to the top of the stick and press it firmly against the back of the felt poppy. Hold it for a few seconds until the glue sets.
  3. Variation: If your shoe sticks are a bright color that doesn’t match, you can wrap them in green floral tape or paint them before attaching the flowers.

Step 6: Arranging the Bouquet

Place your finished poppies into the decorated tin can. Because the shoe sticks are sturdy, the flowers will stand tall without drooping. You can add some green tissue paper or dried moss inside the tin to hold the stems in place and add a “natural” touch.

Why This Craft is Perfect for All Ages

This project is categorized as “easy,” making it a fantastic choice for various groups:

  • For Kids: It teaches them about shapes, colors, and the value of recycling. While an adult should handle the hot glue gun, children can help with cutting the felt and choosing the patterned paper for the vase.
  • For Seniors: The large shapes are easy to handle, and the project provides a therapeutic way to create something beautiful for a living space.
  • For Busy Adults: It is a “lazy crafter” dream! You can finish an entire bouquet in under 30 minutes.

Creative Ways to Use Your Felt Poppies

Don’t stop at just a vase! These red felt poppies are incredibly versatile:

  1. Memorial Day Tributes: Pin a single poppy to your lapel or create a wreath for your front door to honor veterans.
  2. Mother’s Day Gifts: Every mother loves a flower that stays beautiful forever. Pair this bouquet with a handwritten note for a heartfelt gift.
  3. Teacher Appreciation: A poppy tin makes a wonderful desk accessory for a teacher to hold pens and pencils.
  4. Party Decor: Use them as centerpieces for a spring-themed brunch or a garden party.

Summary and Maintenance

One of the best features of felt decor is that it is low maintenance. To keep your poppies looking fresh, simply give them a light dusting once a month or use a lint roller to remove any stray fibers. Unlike silk flowers, felt doesn’t fray easily, ensuring your bouquet stays intact for years to come.

Crafting should be a joyful, stress-free experience. By using simple materials like felt and upcycled tins,

Leave a Reply

Your email address will not be published. Required fields are marked *