Why wait for the outdoors to come to you when you can bring the outdoors in? This craft is a wonderful excuse for a quick nature walk.The Activity: Have the kids collect fallen petals, interesting twigs, and green leaves.The Craft: Use a sturdy twig as the butterfly's body and arrange colorful petals as the wings on a piece of cardstock. This activity teaches children to observe the diverse textures and colors found in their own backyard.2. Handprint Wooden Spoon PuppetsTransform ordinary kitchen items into one-of-a-kind beauties.The Secret: Use the child's handprints as the wings. Tracing their hands on bright construction paper and attaching them to a wooden craft spoon creates a personalized keepsake. These are perfect for afternoon puppet plays or as a heartfelt gift for grandparents.3. Accordion-Fold Paper Butterfly GarlandsBrighten up any room with a string of fluttering friends.Fine Motor Focus: The repetitive folding required to make "accordion wings" is excellent for strengthening the small muscles in a child’s hands.The Result: String several together with twine to create a whimsical garland that brings the spirit of a summer meadow into your home.4. Classic Coffee Filter SuncatchersThis is a "must-try" because it’s nearly impossible to mess up!The Science: Use washable markers to draw on a flattened coffee filter, then mist it with water. Watch as the colors bleed and blend—a great introduction to capillary action.Assembly: Once dry, pinch the center with a clothespin to create a vibrant, translucent butterfly that glows when taped to a sunny window.5. Bow-Tie Pasta ArtDid you know that Farfalle pasta literally means "butterflies" in Italian?Sensory Play: Let kids paint dry bow-tie pasta in neon or pastel shades. Glue them onto a "garden" drawn on paper for a 3D effect that kids love to touch and show off.6. Upcycled Toilet Paper Roll ButterfliesDon't toss those cardboard tubes! They make the perfect sturdy bodies for 3D butterflies.Customization: Wrap the roll in patterned paper or paint it. Use pipe cleaners for the antennae and add googly eyes to give each butterfly a unique personality.7. Symmetry Paint SqueezeThis is a classic art technique that feels like magic to a preschooler.The Method: Fold a piece of paper in half and open it back up. Squirt a few dots of paint on only one side, then fold and press. When you peel it open, you have a perfectly symmetrical butterfly.8. Paper Plate Wing SpansPaper plates are the perfect canvas for toddlers because of their durability.The Build: Cut a paper plate in half or into quarters to create large, sturdy wings. Decorate with sponge stamps, stickers, or pom-poms for a chunky, colorful craft that stands up to rough play.9. Stained Glass Tissue Paper ButterfliesUsing clear contact paper and scraps of tissue paper, kids can create "stained glass" art.The Look: When hung against the glass, the light shines through the layers of tissue paper, creating a beautiful mosaic effect that mimics the delicate nature of real butterfly wings.10. Beaded Pipe Cleaner ButterfliesFor older kids, threading beads is a calming and focused activity.The Twist: Thread colorful pony beads onto two pipe cleaners, then twist them into wing loops. This creates a tactile, flexible butterfly that can even be turned into a ring or a backpack charm.Why Butterfly Crafts Matter: The Educational AngleBeyond the fun, these projects serve as essential building blocks for early childhood education.1. Fine Motor Skill DevelopmentAlmost every step in butterfly crafting—cutting wings, squeezing glue, or folding paper—requires precise movements. These actions develop the hand-eye coordination necessary for future tasks like writing and tying shoelaces.2. Exploring STEM ConceptsSymmetry: Butterflies are nature’s best example of symmetry. Explaining that both wings must match introduces basic geometry and math concepts.Metamorphosis: Use craft time to discuss the life cycle from caterpillar to chrysalis to butterfly. It’s a science lesson disguised as an art project!3. Color and Shape RecognitionSorting beads by color or choosing the right shape for a wing helps younger children categorize the world around them. It encourages them to use descriptive language: "I'm using the round, yellow bead for the head."Crafting Supply ChecklistTo get started with these 20 ideas, keep a "Butterfly Box" ready with these essentials:Adhesives: Non-toxic school glue, glue sticks, and masking tape.Paper: Construction paper, cardstock, coffee filters, and tissue paper.Recyclables: Toilet paper rolls, egg cartons, and paper plates.Embellishments: Googly eyes, pipe cleaners, pom-poms, and sequins.Nature Finds: Twigs, pressed flowers, and leaves.Summary of Best Butterfly Crafts by AgeAge GroupRecommended CraftPrimary SkillToddlers (2-3)Paper Plate WingsColor RecognitionPreschool (4-5)Symmetry PaintingUnderstanding PatternsElementary (6+)Beaded Pipe CleanersDexterity & FocusFinal Thoughts: Let Their Imagination Take FlightButterfly crafts are more than just a way to pass a rainy afternoon. They are a celebration of change, color, and the beauty of the natural world. Whether your child is carefully threading a bead or joyfully smashing paint between two sheets of paper, they are learning that they have the power to create something beautiful.The next time the weather keeps you indoors, remember that a little bit of paper and a whole lot of imagination are all you need to make the room flutter with life.

The Significance of Ramayana Crafts

Before we dive into the glue and glitter, it is essential to understand why we celebrate. The name Dussehra is derived from the Sanskrit word Dasha-hara, which literally means the “removal of ten.” This refers to Lord Rama’s victory over the ten-headed demon king, Ravana.

By engaging in “Recreate Ramayana” crafts, children don’t just make toys; they build a connection to virtues like courage, honesty, and devotion.

Why Kids Love These Projects:

  • Interactive Storytelling: Moving a handmade puppet makes the battle of Lanka feel real.
  • Skill Development: Cutting, painting, and assembling improve fine motor skills and patience.
  • Cultural Pride: Understanding the “why” behind festivals builds a lasting bond with traditions.

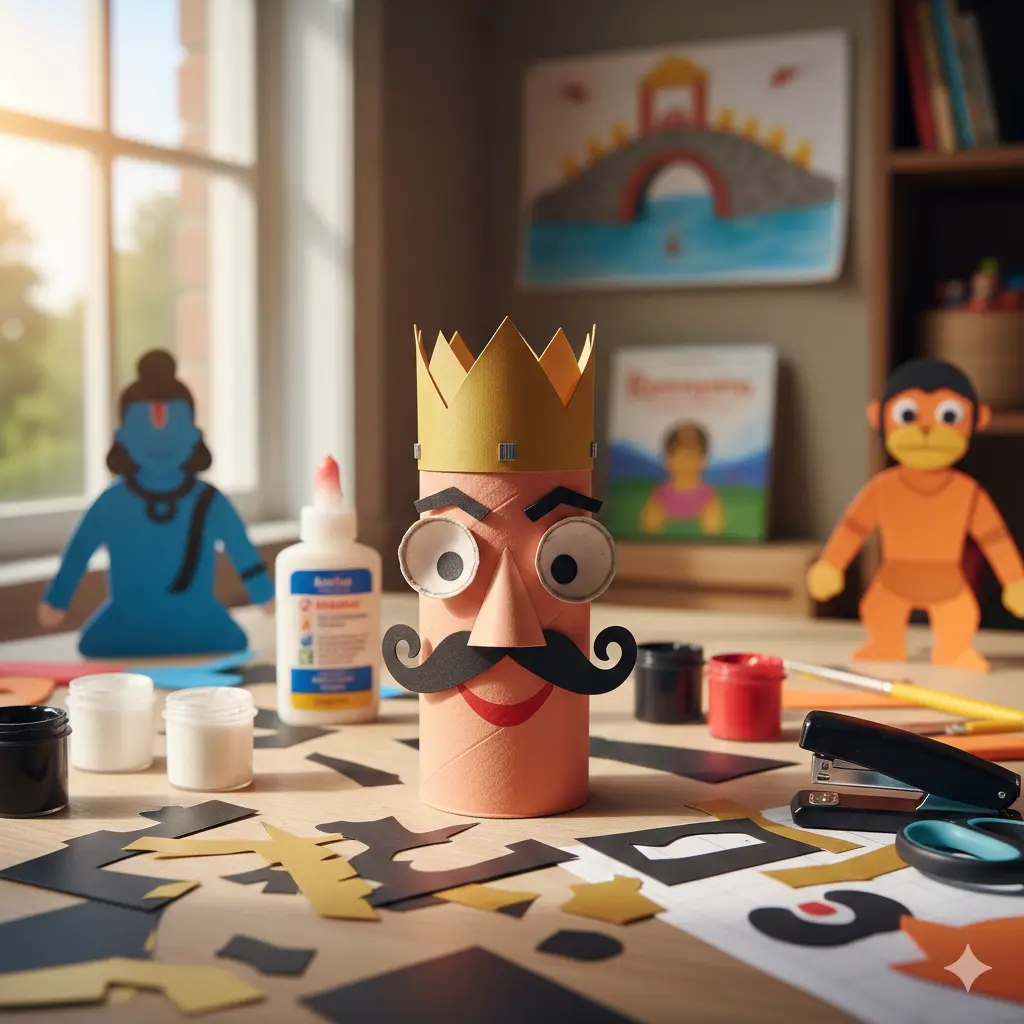
DIY Toilet Roll Ravana: Step-by-Step Guide

This is one of our favorite “Day 9 & 10” Navratri activities. It’s eco-friendly, uses common household items, and creates a striking 3D figure of the King of Lanka.

Materials You Will Need:

  • Structure: 1 Empty toilet paper roll.
  • The 10 Heads: 2 Egg carton cups (to be modified).
  • Paper Supplies: Golden, black, and white craft paper.
  • Paints: White, red, and black poster paints.
  • Tools: Scissors, glue, and a stapler.

Instructions:

1. Creating the Base and Skin Tone

First, we need to create a realistic skin tone. Mix a large amount of white paint with a small drop of red to create a peach color. Paint the entire toilet paper roll with this mixture. Pro-tip: Save a little peach paint in a capped container for the nose later!

2. Preparing the Extra Heads

Since Ravana is famous for his ten heads, we use egg carton cups to represent them. Cut the cups from the edges to make them slightly smaller and more uniform. Paint these cups white to provide a clean base for the eyes.

3. Crafting the Iconic Features

  • The Nose: Cut a small circle from white paper and paint it with the peach color you saved. Once dry, fold the circle into a small cone, staple the ends, and stick it right between where the eyes will go.
  • The Eyes: Once the white paint on your egg cartons is dry, use black poster paint (or a marker) to dab two dots for the eyes.
  • The Moustache & Eyebrows: Cut bold, “demon-king” style eyebrows and a thick moustache from black craft paper. Stick these onto the toilet roll to give Ravana his fierce expression.

4. The Royal Finishing Touches

Every king needs a crown. Cut a majestic crown shape out of the golden craft paper. Wrap it around the top edge of the toilet roll and staple it securely. Finally, use your red paint to give Ravana a wide, confident smile.

More Ways to Recreate the Ramayana

If you want to build a full “Ramayana Corner” in your home, don’t stop at Ravana! Here are three additional ideas to keep the momentum going:

1. Ramayana Hand Puppets

Hand puppets are the ultimate tool for a home theater. You can create Rama, Sita, Lakshman, and Hanuman using simple felt or thick cardstock.

  • Rama: Use blue paper and add a golden bow.
  • Hanuman: Use orange paper and don’t forget the long, curved tail!
  • Sita: Use vibrant colors like pink or purple for her traditional attire.

2. DIY Story Standees

If you prefer a 3D display over puppets, “standees” are the way to go. Use the cardboard from cereal boxes to cut out character shapes. Fold a small tab at the bottom to make them stand upright. This allows children to arrange the characters on a “map” of the journey from Ayodhya to Lanka.

3. Canvas & Paper Coloring

For those who feel that “making stuff is not my forte,” coloring is a fantastic alternative. There are many high-quality resources where you can download Ramayana coloring sheets.

  • Educational Tip: As your child colors, tell them the story of that specific scene. For example, while they color a bridge, explain how the Vanar Sena (monkey army) helped Lord Rama cross the ocean.

Comparison of Craft Styles

Depending on your child’s age and interest, you can choose the right project:

Craft TypeSkill LevelBest For…
Toilet Roll RavanaIntermediateLearning about 3D shapes and Ravana’s ego.
Paper Hand PuppetsEasyRole-playing and interactive storytelling.
Golden Bow & ArrowAdvancedActive play and “Warrior” roleplay.
Coloring KitsBeginnerFocusing on the details of the costumes and scenes.

Frequently Asked Questions (FAQs)

What is the best age for these crafts?

Most of these crafts are perfect for children aged 5 to 12. Younger kids will need help with scissors and staplers, while older children can add intricate details to the golden crowns and armor.

How can I make these crafts eco-friendly?

Always try to upcycle! Use old newspapers for paper-mâché, toilet rolls for bodies, and leftover fabric scraps for the characters’ clothes. This teaches children the value of “Best from Waste.”

Can these be used for school projects?

Absolutely! A DIY Ravana or a Ramayana diorama is a classic school project for the festive season. They are visually striking and show a deep understanding of the epic.

Conclusion: Victory of Creativity

Crafting during the festive season is about more than just glue and paper—it’s about creating memories. By building a ten-headed Ravana or a brave Hanuman, you are giving your children a tangible way to explore the themes of victory, loyalty, and dharma.

These activities transform a centuries-old story into a living, breathing experience right on your dining table. So, grab your paints, clear some space, and let the epic begin!

Leave a Reply

Your email address will not be published. Required fields are marked *